PAN & Vacancies
More information on PAN & Vacancies
- Select a base.
- Select the PAN & Vacancies tab to view PAN details for the selected base.
- Choose one of the following options (click the hyperlinks for details):
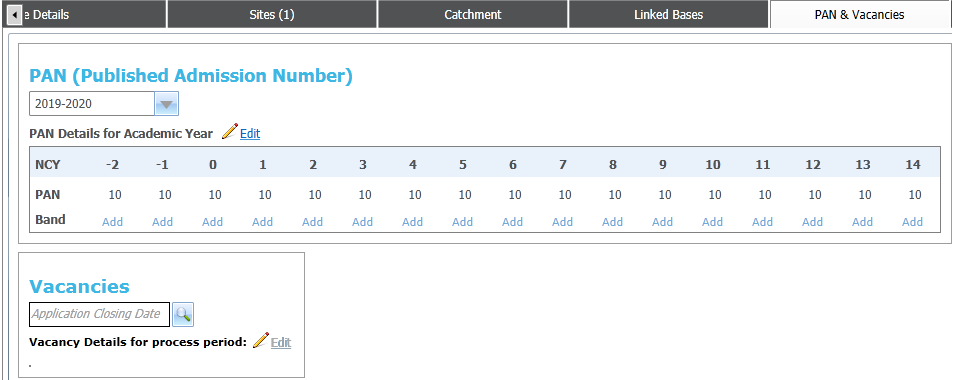
- PANPAN
One treats receivers without a defined PAN as though there were no places available for that transfer group. It is not possible to define a zero PAN. Therefore, where there are no places available for a receiver, there is no need to record any PAN.
Other areas of One share the PAN functionality. As such, you must be aware of the repercussions of any changes you make to the PAN data.- Select the academic year that you wish to edit PAN data for from the drop-down menu.
You can only edit PAN data for future academic years. Only one set of PAN data can be held per school. - Choose from the following options:
- Click the Edit hyperlink to view editable fields that enable you to define PAN numbers for each individual NCY.
- Enter the correct PAN values into the relevant NCY fields.
- Click the Add hyperlink to add Band details if required.
- Click the Add hyperlink for the NCY whose banding you wish to define to display the Band Details dialog

You can only define banding for NCYs that already have PAN details set.- Ensure that the Use Banding check box is selected
- Click the Add Band hyperlink to view editable fields relating to band details.
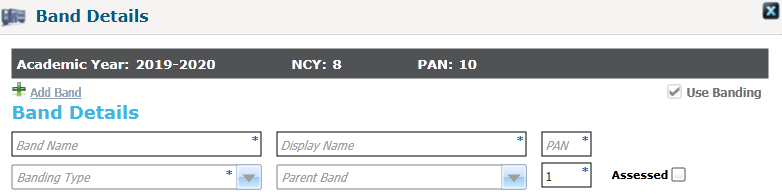
- Enter information as required.
The PANs of all sub-bands within a band must total the PAN of the band. The PAN of all bands must total the PAN of the base for the selected year and NCY. - If the band is to be assessed, select the Assessed checkbox.
- Select the oversubscription criteria to be used for the band.
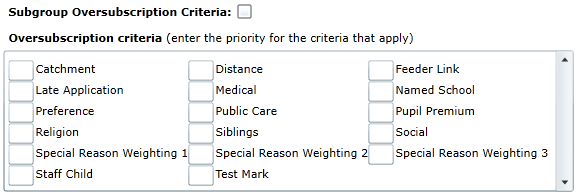
You can do this in two ways:- To use the oversubscription criteria that have been defined for the sub group, select the Subgroup Oversubscription Criteria check box.
- To set oversubscription criteria that are specific to the band you are setting up, enter priority numbers into the fields in the Oversubscription Criteria box. You can select as many oversubscription criteria as required, although they must all have different priority numbers.
- Click the Edit hyperlink to view editable fields that enable you to define PAN numbers for each individual NCY.
- Select the academic year that you wish to edit PAN data for from the drop-down menu.
- VacanciesVacancies
One uses the following rules when managing vacancy numbers:- Any NCYs without a vacancy number are assumed to have zero vacancies for that process period. When the offer routines are run, no students are allocated for these NCYs.
- When vacancy data has been entered and saved for a process period, only the NCYs for which vacancies have been added are displayed. Click the Edit hyperlink to add vacancies for other NCYs.
Once you have defined vacancy numbers for a process period, those numbers are displayed underneath the Vacancies browse. If you wish to edit previously-defined vacancy numbers, click the Edit hyperlink.
If your Local Authority only defines one process period for an academic year, then you must overwrite your vacancy information for each new process period. Only one set of vacancy information can be logged for a given process period. As such, the historical record does not show a breakdown of vacancy data, (as this data changes throughout the year) instead only showing the latest data entered for each academic year.- Click the Vacancies
browse to display the Process Period dialog.
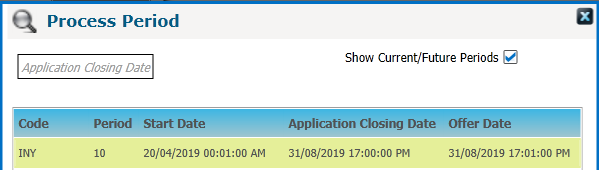
- Highlight the process period you wish to define vacancies for.
- Click the Select
button to select that period and close the dialog.
By default, One only displays current and future process period in the Process Period dialog. To view process periods whose offer date is in the past, de-select the Show Current/Future Period check box. Vacancy details for past process periods can be viewed, but not edited.
- Enter the appropriate vacancy numbers for each NCY
- PANPAN