![]()
The instructions on this page were different in the following release(s):
3.81 | 3.80
Permissions Set Up
Release note for Spring 2024 (3.82)
Delete existing inactive scheduled tasks
Click for more informationClick for more information
Schools can import data from the LA and export data to the LA. For schools to use this functionality, the permission for the B2BS Import/Export and Import/Export data processes must be set to Read-Write. This set up only needs to be done once and can be done at group level. Schools can then be added to the group on an as-required basis to receive the permissions. Additiotnally, every school that is to exchange data via v4 B2B Student should have the B2B Student Base check box selected in v4 client | Bases | Base Details or Education Client | Bases | All Bases.
User at the Local Authority will also require permissions to be able to process the incoming student data. For example, the Unmatched and Matched with Conflicts tabs under Incoming Students, Reports, etc.
There are four Permissions that can be set for a user group:-
- Read
If this permission is set, access to that area will be permitted and all the information will be displayed as read-only. - Read-Write
If this permission is set, access to that area will be permitted and it will be possible to read and update data within that area. - Read-Write-Delete
If this permission is set access to that area will be permitted and it will be possible to read, update and delete data within that area. - Deny
If this permission is set then access to that particular area will be denied
A process has been created that must be to be set up for all the schools that will be transferring data. You will either need to create a group for your schools or use the default group B2BS Schools.
You should add your schools in the B2BS Schools group and ensure that all your schools are part f this group and then set the appropriate permissions for them. If you do not set this permission for your B2B:Student Schools, then your schools will not be able to import data from your system or export data to your system or be able to test the connection.
- Select Tools | Permissions | User Group Processes.
- Select the B2BS Schools group.
Alternatively, select the group you have set up for B2B Student schools. - Select the B2B Import/Export option.

Set the permissions for the following as Read-Write:- B2BS Import/Export
- Import/Export Data
These processes now include the WCFB2BService permission which was previously linked to the LA Scheduled Tasks process.
The following additional permissions are required to process B2B Student data.
- Main menu tabsMain menu tabs
There are two Main Business Processes that have been created for B2B Student:-
- B2BS LA Administration
This controls access to the Setup main tab
- B2BS LA Data Processing
This controls access to the Data Transfer main tab

These main business processes can be used to control access into B2B:Student. For example if you did not wish Users in a particular user group to have any access to B2B Student, then you would set the Deny permission to both the main business processes. This would result in B2B Student not being available from the Online Home page.
Please note that when you switch over your first base to use B2B:Student, the permissions for all the B2B Student business processes will be set to Deny by default for all user groups. Setting the required permissions for your B2B Student users will therefore be required as part of your setup process.
However if for example you wished a user group to be able to access the Setup pages only in B2B Student, then you will need to set the permission on the B2BS LA Administration main business process to one of Read, Read-Write or Read-Write-Delete and set the permission on the B2BS LA Data Processing main business process to Deny.
This would enable the B2B Student button on the Online Home Page and when clicked would take the user to the Setup main tab in B2B Student. Note that the Data Transfer main tab is not available for access.
- B2BS LA Administration
- Sub menu tabsSub menu tabs
You can control access to the sub-tabs within each main tab in B2B Student by setting permissions on the lower level business processes belonging to each main business process in the v4 Client Permissions area.
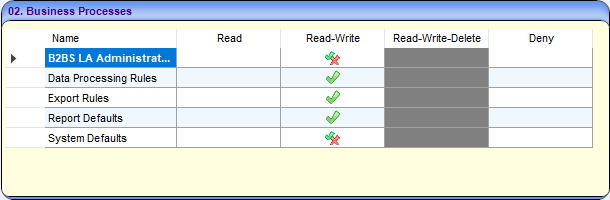
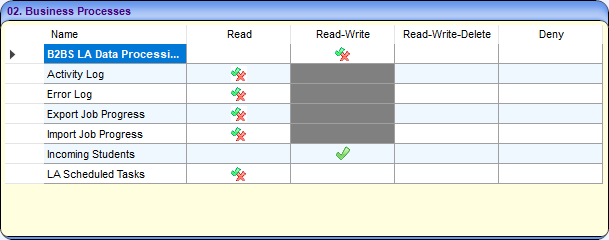
If you wish to give a user group access to the Import Job Progress and Incoming Students sub-tabs only in B2B Student, you would typically set the following permissions against the lower level business processes within B2BS LA Data Processing:-
This would give users within the user group access to the main tabs and sub-tabs in B2B Student as shown below:-
If you wanted a user group to view the pages contained under the Incoming Students sub-tab only, then you would set the following permissions:

Your users would then be able to access the Incoming Students sub-tab on a read-only basis. The users in this user group would be able to specify search criteria, run searches and view both the list of unmatched students and the list of matched students with conflicts. However any buttons normally available to invoke actions from this area (Add, Discard, Match) are not available because of the Read permission set.
If you wanted your users to be able to create and update but not delete records in the Incoming Students sub-tab then you would typically set the permissions similarly to the example below:
This would give your users access to add but not delete unmatched students.
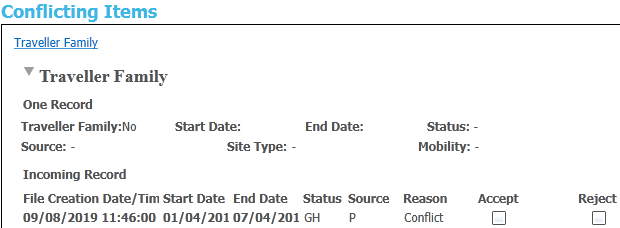
It would also give them access to Accept and Reject, but not Discard Data Items for a Student in Manage Data Conflicts:
- Landing pageLanding page
When B2B Student is selected from the Online Home Page, there is a priority order in which first screen/tab in B2B Student is displayed.
Order of Display (subject to the logged on user having the correct permissions) Screen/Tab displayed when the user first logs in Navigation area in B2B:Student v4 1 Activity Log Data Transfer | Activity Log | Summary 2 Incoming Students Data Transfer | Incoming Students | Unmatched 3 Error Log Data Transfer | Error Log 4 All Reports Reports | All Reports 5 All Submitted Reports | All Submitted 6 Report Defaults Setup | Report Defaults 7 Import Job Progress Data Transfer | Import Job Progress 8 Data Processing Rules Setup | Data Processing Rules 9 System Defaults Setup | System Defaults The priority of the screen that will be displayed will depend on whether the logged on user has permissions to that specific area.
The user group has the B2BS LA Data Processing main business process set to one of Read, Read-Write or Read-Write-Delete and the B2BS LA Administration main business process set to Deny.
Therefore when a user belonging to that user group signs onto Online, they will have access to the B2B Student button on the Online Homepage. Upon clicking on that button, they will be taken to the Data Transfer main tab with the Activity Log | Summary screen displayed by default.
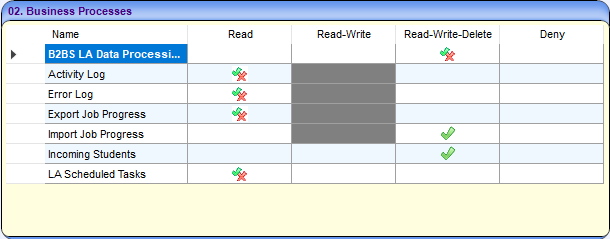
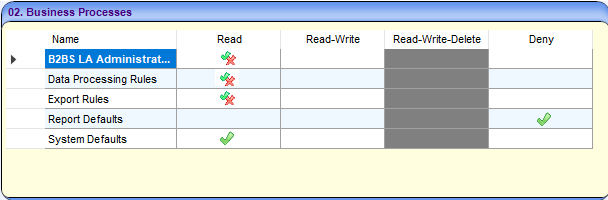
Within the B2BS LA Data Processing main Business Process, the following permissions can be set against the sub business processes: -
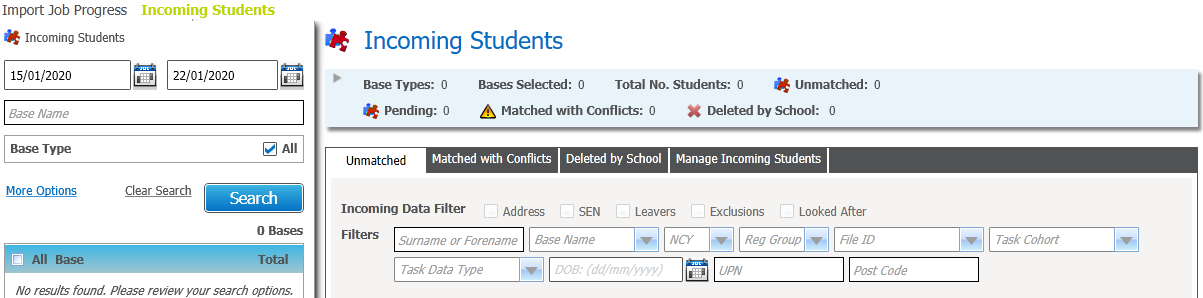
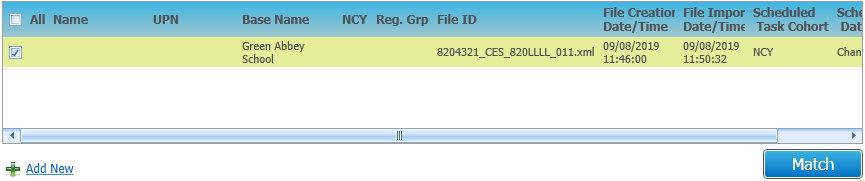
Thus, when a user clicks into B2B Student, the following page will be displayed:
The Data Transfer main tab is highlighted and the Incoming Students sub-tab is displayed by default. Note that the other sub-tabs under Data Transfer (Activity Log, Error Log) are not available to the user in this instance.
- Manage Data ConflictsManage Data Conflicts
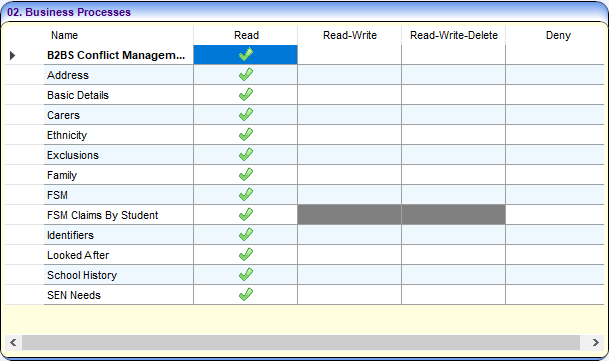
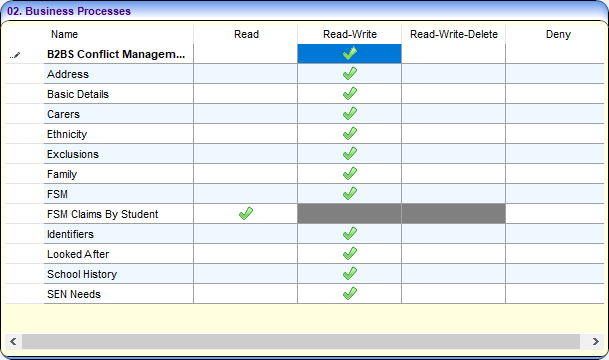
Select the B2BS Conflict Management option for the Main Business Processes field; the system will display the following screen. All the tabs which are available in the Manage Data Conflicts screen will be displayed here.
For each of the tabs it will be possible for you to assign users specific permissions for accessing these and permissions for whether they will be able to view and/or process the data.
The relevant tabs will be accessible to the user in the Manage Data Conflicts area depending on the rights that have been defined for the tabs; the permissions are as follows:
- Read
This means that the user will be able to view the data in the conflict in the relevant tab but the user will not be able to process any data - Read-Write
This means that the user will be able to view the data in conflict in the relevant tab; the user will also be able to Accept and Reject the incoming data. - Read-Write-Delete
This means that the user will be able to view the data in conflict in the relevant tab; the user will also be able to Accept, Reject and Discard the incoming data. - Deny
This means that the user will be denied access to the relevant tab.
For users that do not have permission to any tabs or if they have permissions to a tab or tabs where there is no data in conflict then the link for the student record in the Matched with Conflicts area of the Incoming Students screen will be disabled.
- Read
- AttainmentAttainment
In order to use the B2B attainment import functionality, the username and password of a user with the appropriate data importing permissions must be entered into the CCSConfig | Integration Service | Application Server Settings panel.

In v4 client | Tools | Permissions | User Group Processes, select Data Importing from the Main Business Process drop-down to display the Business Processes panel. At a minimum, the user group must have Read-Write permissions for the Results and Student Details business processes.

Windows permissions for the B2B attainment import and suspense folders
The B2B attainment functionality requires access to a network share to which B2B can write the imported attainment data and any associated suspense files. Therefore, the account under which the application server runs requires read-write-delete access to the shared location. Typically, this would be the NetworkService user account. Additionally, if users will be manually importing data using Pulse (instead of using the automated import option in the scheduled task), then their Windows user accounts must also have read-write-delete access to the shared location.
For more information on assigning folder permissions in Windows, refer to the Set, View, Change, or Remove Permissions on Files and Folders article available from Microsoft.com.
- ReportsReports
You will need to set up the appropriate permissions for users or groups that you wish to have access to and run the reports which will be displayed under the Reports area.

If the appropriate permissions are not set for you then you when you try and run the reports, a warning message will be displayed.
Report Permissions
You do not have permission to administer reports or access report folders.
Please contact your permissions administrator.To assign permissions:
- Select Tools | Permissions | Report Permissions.
- Expand the list of reports in the left-hand panel.
- Select the B2B Student Reports group.
- Select the required user group from the right-hand panel.
- Click the Grant button.