![]()
Update a Non IYSS Client
To open a client record in IYSS, the record must be marked as ‘IYSS’. If you search for a client who exists in the database as a student but is not yet marked as an IYSS client, the message Non IYSS Client is displayed in the search results. You cannot open the record until additional CCIS data has been added, as described in the procedure below.
- From the results of a client search, click on the client’s Name you want to update to display the Update Client – New Situation dialog.
- Select Statutory Education situation for the client from the dropdown list.

- Click the new button to display the New Situation dialog.
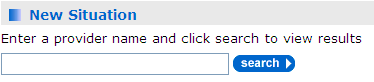
- Enter the name of the client’s statutory education provider in the Enter a provider….search box, then click the search button to display the search results.
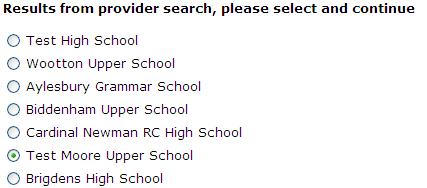
- Select the required provider from the search results, then click the continue button to display the Live Opportunities for Provider: dialog.

- Select the required year group for the client, then click the continue button.
In the New Statutory Education section:
- Enter the date the client started.
- Select a course level, e.g. GCSEs.
- Click the continue button to display the Update Client - Further Details dialog.
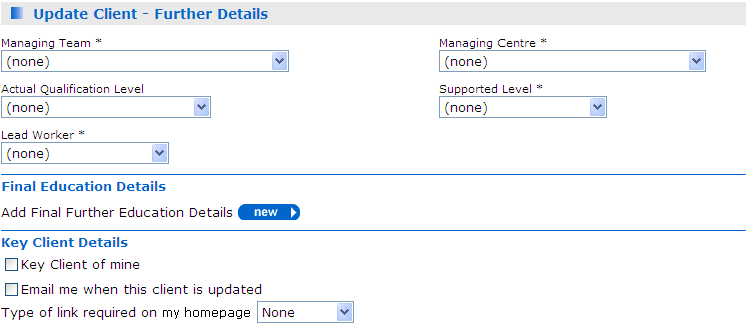
- Complete the fieldsfields in each section.
Field
Description
Managing Team
Mandatory: Select the Team who takes responsibility for the client.
Managing Centre
Mandatory: Select the Centre who takes responsibility for the client.
Actual Qualification Level
Non Mandatory: If the client has sat qualifications, select their overall academic level.
Supported Level
Mandatory: Select the client’s level of need.
Lead Worker
Mandatory: Select the member of staff whose caseload the client will be assigned to.
Final Education Details
If the client has left education:
1. Click the New button to display the Add Final Education Provider dialog.
2. Enter the date the client left education.
3. Search for, then select the client’s education provider.
4. Click the Continue button.
Key Client of mine
Mandatory: Select the check box to make the client a key client on your caseload.
Email me when this client is updated
Non Mandatory: Select to be notified via email if a colleague updates this record.
Type of link required on my homepage
Non Mandatory: If you selected Key Client of Mine (above), select one of the following:
None: The client does not appear in the Key Client portal on My Homepage.
Permanent: The client appears in the Key Client portal on my homepage until you deselect it, using the Key Client options.
Temporary: Client only appears in the Key Client portal when the record has been updated by a colleague.
- Click continue to display the Update Confirmation dialog.
- Click continue again to return to the client record.