![]()
Data Management - Import and Export
Import
Import File Specifications
The Import File Specifications area is accessed via the Focus | Data Management | ImportImport.
This process is critical to import results data successfully.
The import system requires information, on a file that it is to import, so that it can perform validation and interpret and understand the file as it imports the information. Thus a file specification has to be set up describing the file that is to be imported. Once the file specification has been set up, it can be saved and reused each time a file of the specified type is imported.
Selecting this menu option opens the Import File Specification Enquiry page.
Import File Specifications identify the mapping between the containers and data elements within an xml file to the tables in the database.
The Import File Specification used for the English School Census and the Welsh PLASC Census are:
- English Census AY-yyyy-yy
- Welsh Census FT – yy
The Import File Specification used for the Key Stage 1 – Phonics are:
- Phonics and KS1 SIMS Results Fast Track
- Phonics and KS1 SIMS Results Manual
- Phonics yyyy CSV Import (for LAs using spread sheet)
In the case of the School Census the data elements are mapped to holding tables (PLASC). The mapping for the School Census is read only.
- Import File Specification EnquiryImport File Specification Enquiry
This page is opened when the Focus | Data Management | ImportImport | Import File Specifications menu option is selected. It lists existing File Specifications allowing you to view details and add new specifications.
The list displays the File Specification Name and the Import FlowImport Flow. The Location of the file is displayed in a box at the top of the Enquiry page.
To view details of a file double click on the file name or select and click Open in New Window. This opens the Import File Specification page allowing you to view the file structure and apply the file structure to a sample file.
Clicking the New icon opens a blank File Specification page allowing you to create a new file specification.
- Import File SpecificationImport File Specification
This process is critical to import results data successfully.
This page allows you to view an existing file structure or create a new one using a sample file. Select an Import File Specification or click the New button to create a new file specification from the Import File Specification Enquiry page
The file types created are subsequently selected during the Import setup prior to importing results data.
If you are an experienced administrator, the file structure may be built step by step using the function buttons at the top of the File Structure panel. The function buttons comprise, Promote, Demote, Promote the Selected Block, Delete Selected, Add New, Special Characters and Header Lines allowing you to create your own hierarchy.
The simplest method of specifying a file structure is to use the Auto-Generate File Structure functionality which will use an existing data file as a sample of the type you wish to specify.
To do this click the Open Sample File icon and locate the file to be used as the sample on which the file structure will be based. When doing this, it is important to provide a complete file, and not just test data so that the system has an opportunity to recognise the complete data hierarchy and the repeating elements.
Click the Auto-Generate File Structure icon. This populates the File StructureFile Structure grid and display a sample of the processed file.
When the file structure is correct and complete, translation can be considered if necessary. Translation is a facility that allows text replacement to be made to an incoming file before it is imported.
There is a Translation button for each field specified in the file structure.
Enter a File Specification Name if you haven’t already done so and click SaveSave.
After the file has been setup the data groups must be mapped to your database. To do this, click the Data Maps hyperlink located in the Links panel.
The Arrange Data Maps hyperlink opens a page which allows you to define the order by which the data is imported.
The Clone option, adjacent to the Save icon,enables you to use an existing file specification as the basis for another. To use this functionality open an existing file specification and click the Clone button. Although the current display will not change, the system has actually created a copy. This cloned version still shows the original File Specification Name but this is now editable for you to apply a new File Specification Name. The cloned file specification can now be modified appropriately and saved.
- School Census Import File MappingSchool Census Import File Mapping
The English and Welsh School Census Import File Specifications require the Create New Entity field to be mapped to their respective Parent Entity / Tag for the data being imported.
Where the Data being imported spans across multiple Parent Entities / Tags the Create New Entity field should be mapped to the top level Parent Entity / Tag of the data group.
- Data MapsData Maps
This area of the system is accessed by clicking the Data Maps hyperlink located in the Links panel from the Import File Specification Enquiry page. Clicking the Data Maps link opens the Import File Data Map Enquiry page.
Import File Data Map Enquiry
If the data groups in the Import file have been mapped each group will be listed in the Enquiry browse. These may be viewed and edited by double clicking or by selecting and clicking Open in New Window. This displays a grid on the left of the page showing the data fields in the file specification and the hierarchy. These data fields are linked to equivalent fields in the system database for the selected data type, shown in the grid on the right.

To add new data mappings for the selected Import File Specification click the New icon. This will open the Import File Data Mapping page.
- Data MappingData Mapping
This process is critical to import data successfully.
For a new data mapping the Import File Data Mapping page will display a grid on the left of the page showing the data fields in the file specification and the hierarchy. The purpose is to link the data fields in the file specification to equivalent fields in the system database; this defines how you want the system to treat the incoming data for the specific file type, eg XML.
The hierarchy of the specification file will show data fields within data groups or data types. A mapping must be defined and saved for each data type.
To set the Import Rules…
- Select the Type of DataType of Data
- Select the Default ProcessingDefault Processing option to be used for the type of data.
- Select the Merging BehaviourMerging Behaviour, this depends on the Data Type.
- The options available for Matching Behaviour will vary for each Data Type. Logically, some Data Types will not offer a matching behaviour.
It is crucial that these parameters are set by a competent administrator.
Match and Add Unmatched Records: This process allows you to match records but not to use this data to update existing records.
To map the data fields…
- Select a data field from the specification file structure on the left and “drag and drop” it with the mouse to the equivalent data field to import it into.
This process must be repeated carefully for each data field. If the mappings are not accurate, when data is subsequently imported the resultant information will be corrupt.
The Prompt icon allows you to set a parameter which prompts the user to enter a value at the Create Import Processing Files stage of the import process. This is done by highlighting a field in the right hand pane and clicking the Prompt icon. The prompt symbol will be set against that data field. When data is being imported using this File Type Specification a dialog will be opened prompting you to enter a value; this may be a date, selecting a True/False value or free text information, eg Module ID.
- Arrange Data MapsArrange Data Maps
This page is opened by clicking the Arrange Data Maps hyperlink from the Import File Specification Enquiry page. It allows you to define the order by which the data is imported.
The order is achieved by highlighting a data element and using the green up/down arrow icons to place it in the required position.
Import Data
Import Data Overview
- OverviewOverview
The import system has been developed as a generic facility to allow it to cope with many different file types and formats. It provides the facility to import: Students, School History, Student Address, Gradesets (and Marksets), Aspects, Results (and Targets), Templates (and Columns), Progression Lines, School Census files, from xml, delimited (e.g. csv) or fixed record files.
Multiple file selections for import can be made at the same time.
It is possible to import some entities from a file without importing the whole file (e.g. importing Gradesets and Aspects only from a template file).
The Import Data page is opened from the Focus | Data Management | Import menu option.
Data Import
The Import Data page is opened from the Focus | Data Management | Import menu option. It requires file information to be selected for import. The import process has two methods which are specified when the Import File Type is specified. These are: Manual Step by Step and FastTrack. Each option has a different setup.
For import purposes the Code and/or Name of Aspects and Gradesets are case sensitive. This avoids creating a duplicate entity where the code and/or name are offered in different cases. For example, KS1 AR and ks1 ar will be treated as the same.
For School Census you must identify which file you wish to import and browse the location of the source file. Multiple file selections for import can be made at the same time. Data File Specifications for the latest School Census are supplied.
- Manual Step by Step Import
This option requires you to process the import file before it is committed to the database.- File InformationFile Information
- Select an Import File Type; these are defined on the Import File Specification page. When importing Extended Aspects dataExtended Aspects data there are two data file specificationsdata file specifications specifically defined for this purpose, one for Fast track import and a second for Manual step by step.
- Locate the Import File by clicking the Folder icon. This will open by default at C:\Documents and Settings\<Name>\My Documents\.
- Select a Processing DirectoryProcessing Directory by clicking the Folder icon.
- Alternatively, click the Suggest Directory button. This will show the default directory at C:\Documents and Settings\<Name>\My Documents\ Processing.2007111Processing.2007111. The suggested directory may be changed. The directory, created by the import process, will include the name of the import file, eg SIMS Results Specification.
Click Next to move to the next stage of the import process.
- Data Import PanelData Import Panel
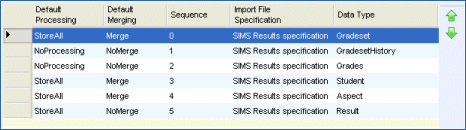
This panel of the import process lists a breakdown of the groups of data available in the selected import file, allowing you to be selective of the data you wish to create import processing files for. This breakdown is based on the Import File Type Specification.
For each group of data listed it shows the type of Data Available, what the data is Dependent On, the Default Merging parameter, File Type and Default Processing setting. This information is defined on the Import File Specification page for the selected Import File Type.
All data may be selected by clicking Select All or random items may be selected by holding the CTRL key down and selecting.
Clicking the Create Import Processing Files button will prepare the data for importing. At this point if a data field in the import file has been set as a prompt item, a dialog will open for you to enter an appropriate value.
Click Next to move to the next stage of the import process.
- Import Information PagesImport Information Pages
These are displayed as a tab set. There may be several tabs depending on the Data Map types included in the import, such as Attainment Grades, Attainment Gradeset History, Attainment Aspects, Student Information. Each row of data is prefixed with a symbol indicating its current status, it will also tell you what your next action can be. Cannot be matchedCannot be matched , Can be matchedCan be matched, Not matchedNot matched and MatchedMatched.
The tool bar at the top of each tab gives various options which allow you to modify the data before adding it to the database. Each function icon will only be enabled appropriate to the type of data and its current status. Certain functions are dependent upon another action, for example, the UnMatch and Compare icons will not be enabled until the data has been matched.
Each file will be removed from display as it is dealt with.
To close the dialog click on the X symbol located top right.
- File InformationFile Information
- Fast Track ImportFast Track Import
For this method of importing data, it is crucial that the Import File Type has been accurately mapped.
File Information
- Select an Import File Type; these are defined on the Import File Specification page. When importing Extended Aspects dataExtended Aspects data there are two data file specificationsdata file specifications specifically defined for this purpose, one for Fast track import and a second for Manual step by step.
- Locate the Import File by clicking the Folder icon. This will open by default at C:\Documents and Settings\<Name>\My Documents\.
- The Processing Directory field is not enabled for a Fast Track import.
- Click the Import button.
This process will automatically import the data and update the database. A status message will be displayed at the foot of the page.
Import Translation
The Import Translation is accessed via Data Management | Import | TranslationTranslation. This opens the Import Translation panel.
The Import Translation focus expands the facilities available in the Import Data Focus. Currently within the Data Management | Import | Import File Specifications allowing you to translate an incoming value to an alternative value, such as an Aspect Name for an Aspect Code, prior to import. This can be viewed by selecting a file specification name editable by the user.
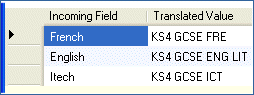
For any given field you can opt to select the translation field for any given source field:
A note on the Import Translation panel states: Please provide the values for translation in the respective columns. First column "Incoming Field" indicates possible data in the import file and "Translated Value" column is the value which would be replaced while importing the data. "Translation Value" should be provided for all the incoming fields for correct translation.
Prior to the provision of the translation facility this option was somewhat limited. Users were confronted with the task of manually adding every row of possible field alternatives. In addition, the data would only persist for the given data-file specification. This constraint no longer applies.
The system now reads a two-column multi-rowed CSV file and saves the file as an XML which may be used in any import process.
The Import Translation facility allows you to create manually re-usable lists of translatable data. For example, a list of examination centres provided by an examination organisation could be translated to a base number or identifier.
Place the cursor in the Incoming Field and manually input details. Save as required.
Additional values from other sources files can be loaded by selecting the Translation File button and choosing New File. Provide a suitable name and select Save.
It is then possible to add values that will be subject to translation. Once this exercise is complete you should Save the file again.
It is also possible to re-call a translation file by selecting Open File. This opens a browser allowing you to navigate to a CSV file. Once selected the system loads the values under the headings Incoming Field and Translated Value
It is possible to re-load the values by selecting the Use Translation File check-box.
Further editing may be carried out by selecting the appropriate options. Rows can be added or removed by selecting Add Row or Remove Row.
When you have completed editing and saved, the system saves an XML file with the same name to the source file directory. The system displays a message at the bottom of the screen.
The XML file may now be loaded in any import file specification as appropriate.
Export
Export Overview
This area of the system will allow you to extract specific sets of data from the system in a pre-defined format.
Exporting specific data groups will enable the Local Authority to pass specific data files to other Local Authorities or more likely to Schools within the Local Authority.
Aspects and Templates can be produced by the Local Authority and distributed to all of the Schools for which they are responsible so that a consistent picture of attainment can be recorded and returned back to the Local Authority.
Results can be passed between Schools via the Local Authority as well as between other Local Authorities.
The attributes for a particular export file will be dependent upon the requested export as well as the specified criteria.
All export files are produced in XML format.
The Export menu gives two further options: Templates Export and Aspect/Results Export.
Aspects/Results
Aspect/Results Export
When first accessing the Export | Templates focus the following panels are made available:
- Export Path
- Aspects by Enquiry
- Aspects by Templates
Exporting specific data groups enables the Local Authority to pass specific data files to other Local Authorities or more likely to Schools within the Local Authority.
Aspects can be produced by the Local Authority and distributed to all of the Schools for which they are responsible so that a consistent picture of attainment can be recorded and returned back to the Local Authority.
Results can be passed between Schools via the Local Authority as well as between other Local Authorities.
All export files are produced in XML format.
This area will allow the user to search for and select one or many Aspects which are to be included in the export file. If Results export is requestedrequested but the specified criteria identifies no students with results then only information about the selected Aspects will be exported.
At least one Aspect must be selected in order that an export can be initiated and completed.
In order to complete any export by whatever combination of data you must ensure you have specified the Export Path and selected at least one Aspect for export.
Clicking the browse button opens the Browse for Folder dialog which allows you to determine where the exported file will be placed once the export has been confirmed.
Checking the Extended Aspect Details box allows you to include such details as Key Stage 4 and 5 markers and QAN data and target information in the export file
Clicking the Add icon on the Aspects by Enquiry panel will open the Export Aspects Enquiry dialog allowing you to select the Aspects for export. Aspects may also be added by clicking the Add icon on the Aspects by Template panel. This will open the Template Enquiry dialog; selecting a Template will add all associated Aspects for export.
After the Aspects have been selected the Remove icons are enabled allowing you to modify the list of Aspects in either panel.
- Include/Exclude ResultsInclude/Exclude Results
The Include Results / Exclude Results icons toggle each other as they are selected.
Clicking the Include Results icon adds additional panels to the page allowing you to be more specific about the results you wish to export. The additional panels available for defining appropriate filter criteria are: ResultsResults, CohortCohort, BasesBases and Transfer GroupsTransfer Groups.
When the Exclude Results icon is selected the page reverts to its original format showing the Aspects by Enquiry and Aspects by Template panels.
- Calculate StudentsCalculate Students
Clicking the Calculate icon will calculate the number of students for whom results are to be exported and enter the number in the Total number of students selected field in the Export panel. This field is not displayed unless the Include Students option is selected and is not editable.
- ExportExport
Clicking the Export icon will process the selected Aspects and Results and display the export information page listing the processed XML export file(s).
- Export Aspect EnquiryExport Aspect Enquiry
This dialog is opened when the Add icon is clicked on the Aspects by Enquiry panel of Export Aspects/Results. It allows you to search for Aspects for export.
To find the required Aspect enter a full or partial description in the Aspect Name field. Other search criteria includes the Aspect Code, the Author and Aspect Type, which may be selected from the drop-down lists. The search process also allows you to filter from within an Aspect Hierarchy. Select an Aspect Hierarchy from the related drop-down list. The list allows you to expand the hierarchy to locate the required Aspect group. Checking the Target Aspect box will filter the search for Aspects flagged as Target AspectsTarget Aspects.
Clicking Search will return a list of Templates matching the criteria. To view details of a Template highlight it and click the Open in New Window icon.
Clicking Search with no criteria will return all Templates in the database.
You may expand or collapse the Aspect Enquiry panel by clicking the icon (the arrows on the icon will invert appropriate to the next available action). This may be set as the default action by clicking the Collapse down arrow and selecting Automatically Collapse.
You may select one or many Aspects in the list. To select multiple random Aspects hold the CTRL key down while selecting. Alternatively, hold the SHIFT key down to select Aspects adjacent to each other.
When you have highlighted the required Aspect(s) for export click Select. This will copy the selected Aspect(s) to the Aspects by Enquiry panel ready for export.
Close the Aspect Enquiry dialog by clicking the X symbol in the top right hand corner.
- Exported Aspect Files ListExported Aspect Files List
This page is automatically opened after the Aspect and Results export process has been completed. It displays a list of the processed XML export file(s) showing the Full Path, the number of Errors, a Description of the export and the name of the XML file(s) generated, eg ASP00004.xml, RES00004.xml, where ASP indicates Aspect Export and RES indicates Results Export. The number is the automatically generated sequential export number.
Clicking the Open Folder icon opens Windows Explorer at the location of the export file(s).
The Messages panel will list any errors, for the selected XML export file, encountered during the export process, showing the Error Message and Error Severity.
Clicking the Save all Messages icon will save the error messages to the database.
Templates
- Export of TemplatesExport of Templates
When first accessing the Export | Templates focus the following panels are made available:
- Export Path
- Templates By Enquiry
In order to complete any export by whatever combination of data you must ensure you have specified the Export Path and selected at least one Template for export.
Clicking the browse button opens the Browse for Folder dialog which allows you to determine where the exported file will be placed once the export has been confirmed.
Checking the Extended Aspect Details box will include Aspect details such as Key Stage 4 and 5 markers and QAN data and target information in the Template export file
Click the Add icon on the Templates by Enquiry panel which will open the Export Template Enquiry dialog allowing you to select the Templates for export.
After the Templates have been selected the Remove icon is enabled allowing you to modify the list of Templates.
Clicking the Export icon will process the selected Templates and display the export information page listing the processed XML export file(s).
- Export Template EnquiryExport Template Enquiry
This dialog is opened when the Add icon is clicked on the Templates by Enquiry panel of Export Templates. It allows you to search for pre-defined Templates for export.
To find the required Templates enter a full or partial description in the Template Name field. Other search criteria may be enter, if known, in the Author and/or Date Created fields.
Clicking Search will return a list of Templates matching the criteria. To view details of a Template highlight it and click the Open in New Window icon.
Clicking Search with no criteria will return all Templates in the database.
You may expand or collapse the Template Enquiry panel by clicking the expand icon (the arrows on the icon will invert appropriate to the next available action). This may be set as the default action by clicking the Collapse down arrow and selecting Automatically Collapse.
You may select one or many Templates in the list. To select multiple random Templates hold the CTRL key down while selecting. Alternatively, hold the SHIFT key down to select Templates adjacent to each other.
When you have highlighted the required Template(s) for export click Select. This will copy the selected Template(s) to the Templates by Enquiry panel ready for export.
Close the Template Enquiry dialog by clicking the X symbol in the top right hand corner.
- Exported Templates Files ListExported Templates Files List
This page is automatically opened after the Templates export process has been completed. It displays a list of the processed XML export file(s) showing the Full Path, the number of Errors, a Description of the export and the name of the XML file generated, eg TEM00024.xml, where TEM indicates Template Export and the number is the automatically generated sequential export number.
Clicking the Open Folder icon opens Windows Explorer at the location where the export file has been saved.
The Messages panel will list any errors and/or messages, for the selected XML export file, encountered during the export process. It shows the Error Message and Error Severity.
This information is only stored for the duration of the window being open and will be cleared down once closed.
Clicking the Save all Messages icon will save the error messages to the database for later review.