![]()
School Places
Release 3.84
Application Reference Number Now Included In Email And On Portal
The Citizen Self Service portal provides full support for applications for school places, integrating with the Admissions and Transfers (A&T) Back Office module.
You can only make one online application per Normal Phased transfer group. However, you can make multiple In Year applications within one academic year, if required.
- Select School Places to display the School Places page.
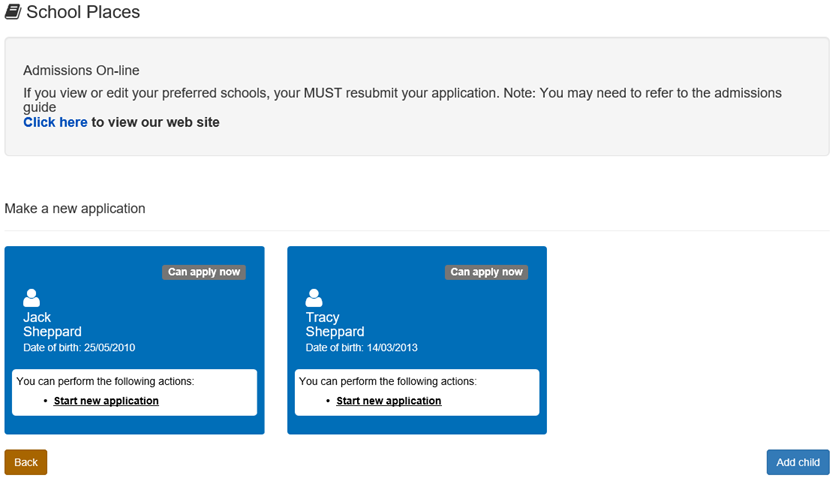
- Select from the following options:
- Start a new application
- Make an applicationMake an application
As the pages are configurable by the local authority, the graphics below are examples only.
To make a new application for a school place:
- Click a child’s Start new application hyperlink to begin a new application for that child.
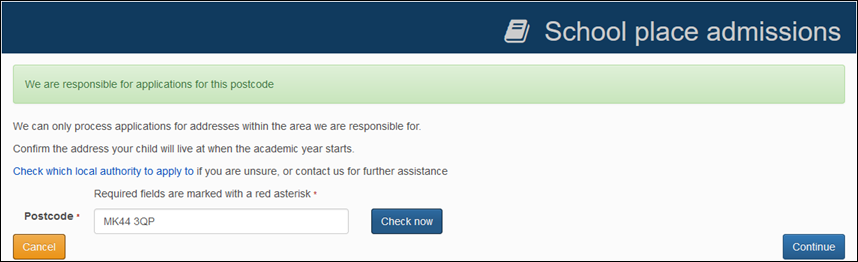
- Enter your child’s postcode and then click the Check NowCheck Now button.
The postcode is checked to ensure that it is within the LA’s catchment area. If it is not, an error message is displayed.If you cannot see the child you wish to apply for in the list, you can add them using the Add Child function.
- Click Continue to display the Select a Transfer Group pagepage.
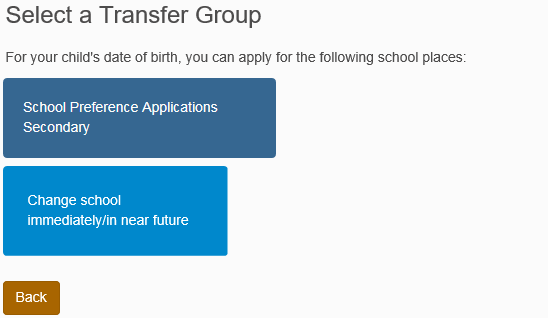
- Select the school place you wish to apply for.
- If you selected Change school immediately/in near future, the In Year Transfer pagepage is displayed.

-
- Enter details as required and click the Confirm button. The system checks to see which school year the child would be eligible for at the new school.
- Click the Next button to display the Find Child screen.
- If you selected an option other than Change school immediately/in near future, the Find Child screen is displayed.
- If you selected Change school immediately/in near future, the In Year Transfer pagepage is displayed.
- EnterEnter your child’s Unique Identifier and Date of Birth.
The UID helps to match your child’s details, but it is not required. If you do not know your child’s UID, click the No UID button to proceed to the Additional Child’s Details screen without entering these details.

- Click the Next button to display the Additional Child’s Details screenscreen.

- If required, select any check boxes that apply.
- Click the Next button to display the Address Details pagepage.
Enter details as required.
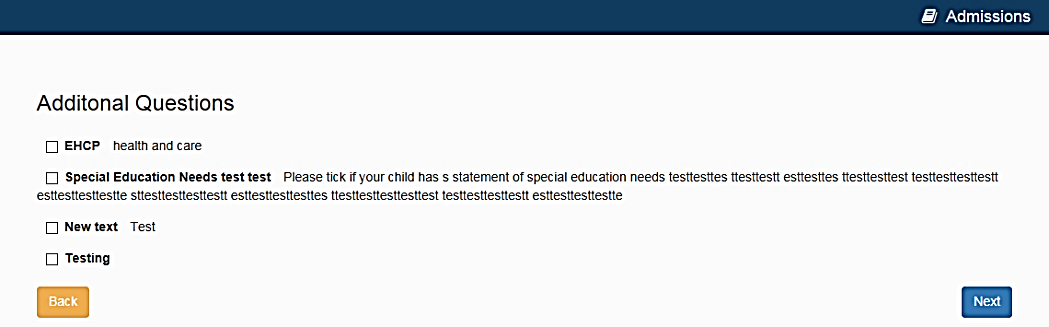
- Click the Next button to display to display the Additional Questions page.
This pagepage displays any custom questions that the LA has configured for the transfer group. Enter details as required.If the LA has not configured any additional questions, then the Child’s Current School page is displayed instead.
- Click the Next button to display the Child’s Current School pagepage.
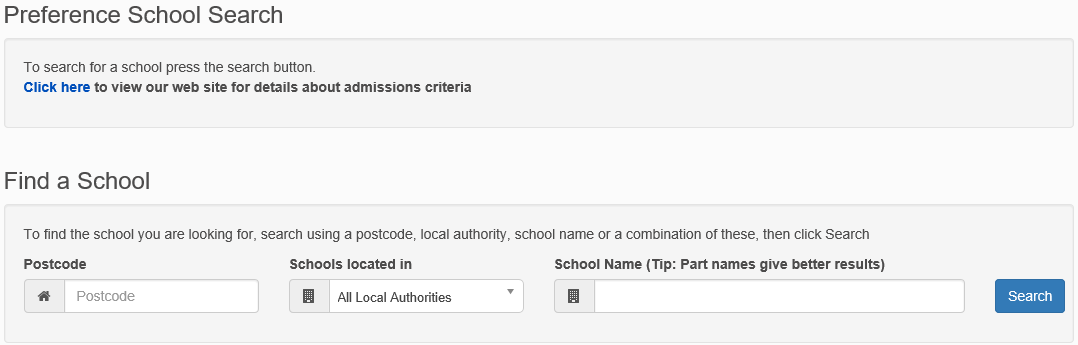
NI Only - Where the Intake NCY is -1 or -2 this page is not displayed. Instead the Preference School Search page is displayed.

- Select from the following options:
- If the system has the correct school on record, click the Next button to display the Preference School Search page.
- Click the Change Current School button if you wish to change the school that is on record.
- If there is no school on record or you clicked the Change Current School button:
-
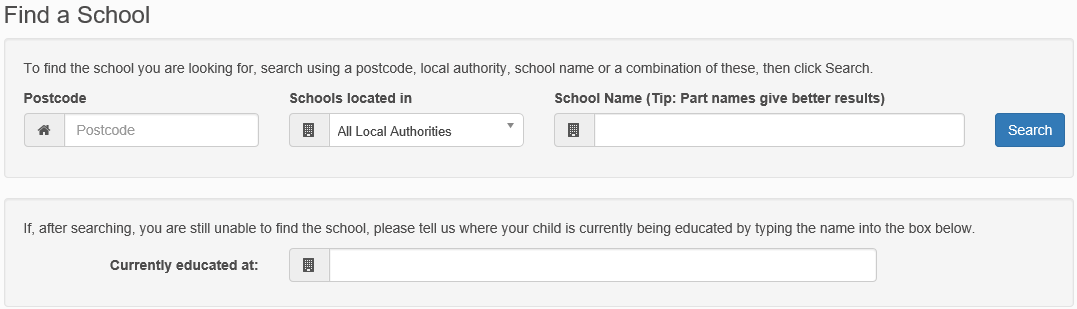
- Enter search criteria into the fields if required.
- ClickClick the Search button to display a list of schools that match the criteria.
- Click on a school to select it.
- Click the Next button to display the Preference School Search pagepage.
Enter details as required.If you cannot find the child’s current school in the search you can enter the name of the school manually into the Currently educated at field.
- ClickClick the Search button to display a list of schools that match the search criteria.
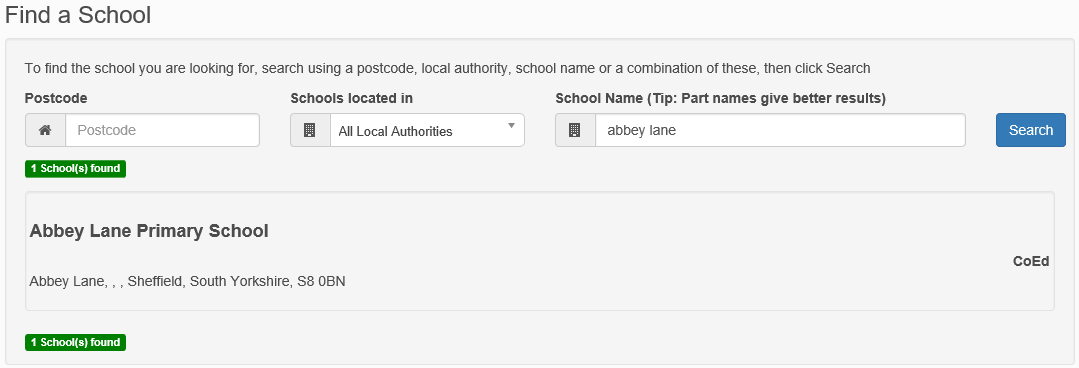
- Click on a school to select it. The Preference Reasons: Sibling pagepage is displayed.
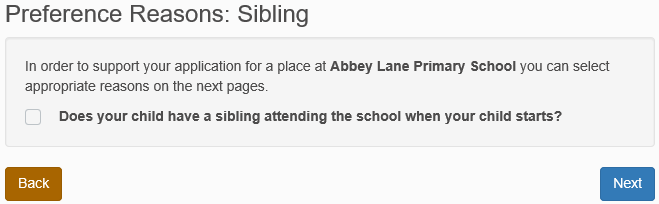
- Select the check box if the child will have a sibling attending the selected school or a partner school at their start date.
- Click Next to display the Sibling Details screenscreen.
Enter details as required.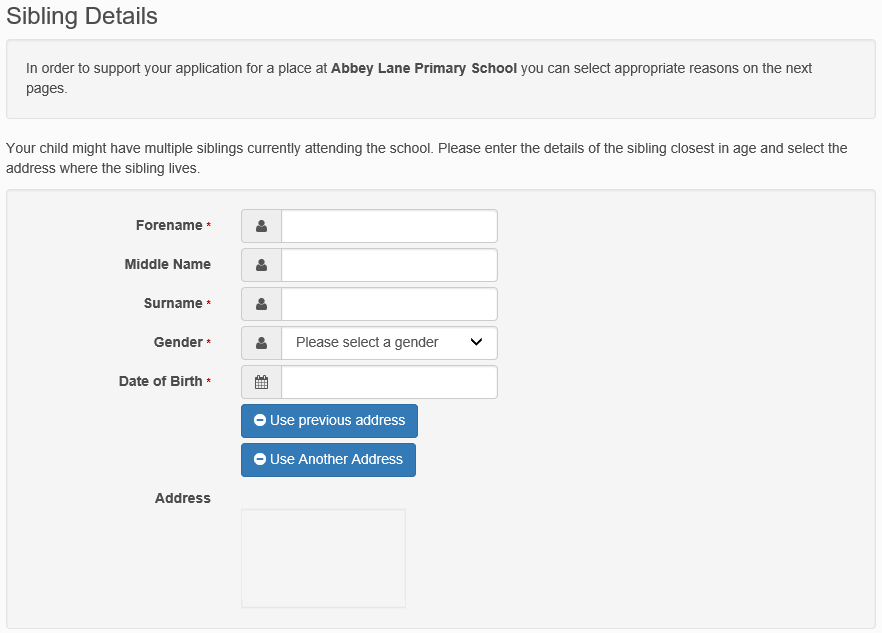
- Click the Next button to display the Sibling’s School pagepage.
If the sibling attends a partner school rather than the preference school, click the Find School button to search for and select the relevant school.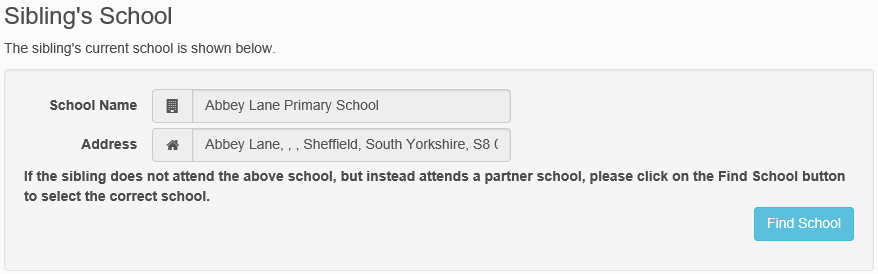
- Click Next to display the Sibling Details screenscreen.
- Click the Next button to display the Preference Reasons pagepage.
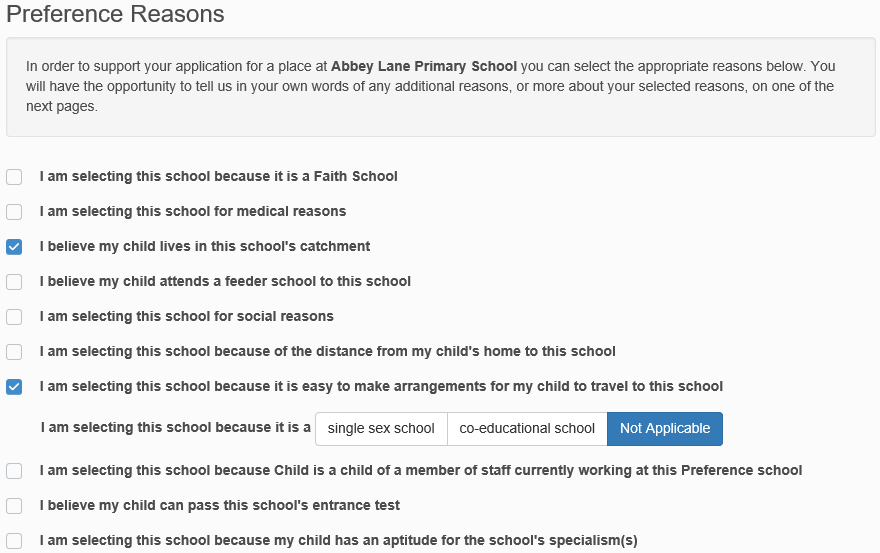
- Select the reasons that you wish your child to attend the selected preference school as required.
- Click the Next button.
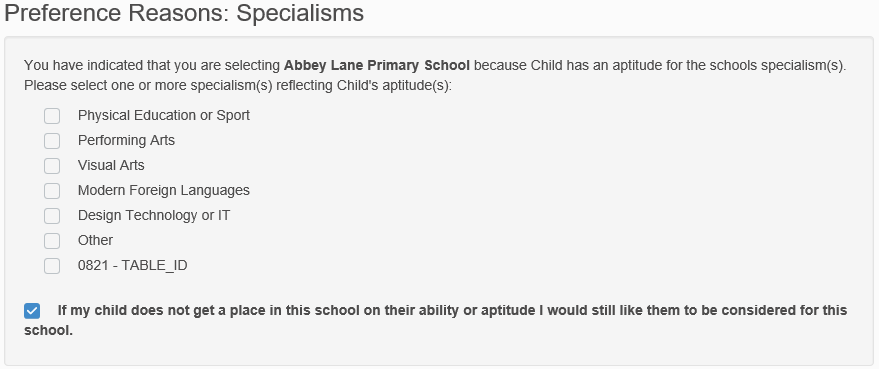
The following optional pages may be displayed.- If you indicated that your child has an aptitude for the preference school’s specialisms then the Specialisms pagepage is displayed.
-
- Select the relevant specialisms as required.
- Select the check box at the bottom of the screen if you want your child to still be considered for the school if they do not get a place on the basis of their ability or aptitude.
- If the LA has configured special reasons then the Special Reasons screen displays.
Enter details as required. - If the LA has configured additional questions then the Preference Reasons (Continued) pagepage is displayed.
Select any relevant questions and add explanatory text as required.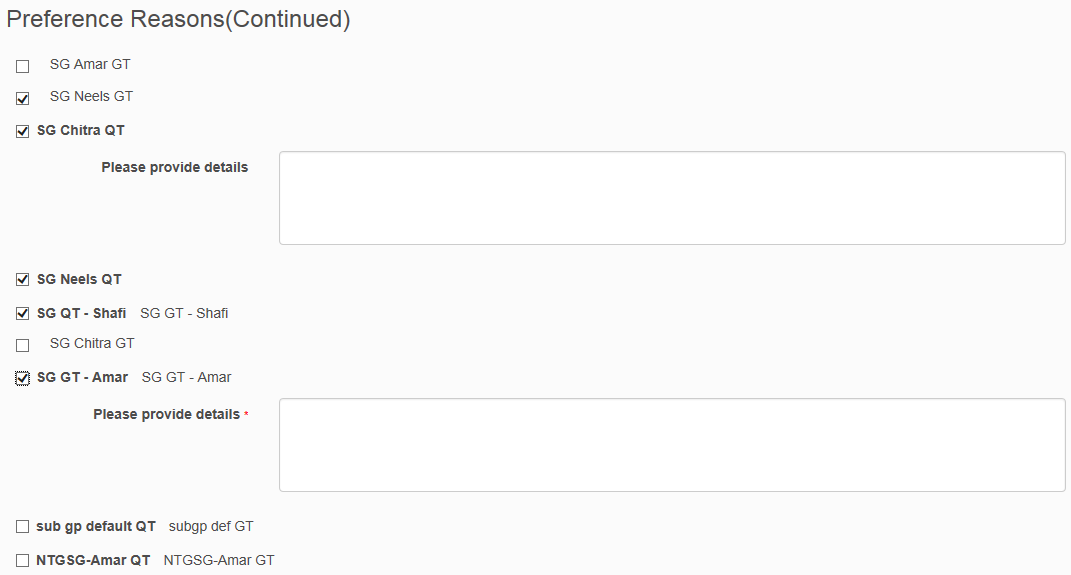
- If you indicated that your child has an aptitude for the preference school’s specialisms then the Specialisms pagepage is displayed.
- Click the Next button to display the Other Reasons pagepage.
Enter any other reasons you may have to support your application.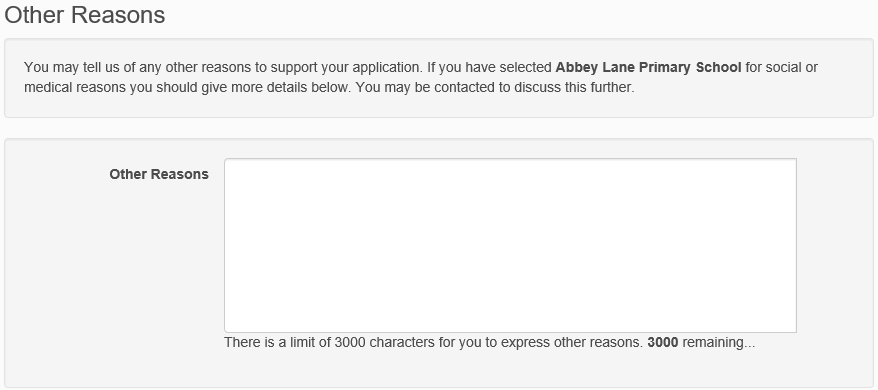
- Click the Next button to display the Your Preferred Schools pagepage.
- Click the Add a new preferred school button to add further preferences.
- Click the Edit button to edit the preference reasons given for a particular school.
- Click the Delete button to delete a preference altogether.
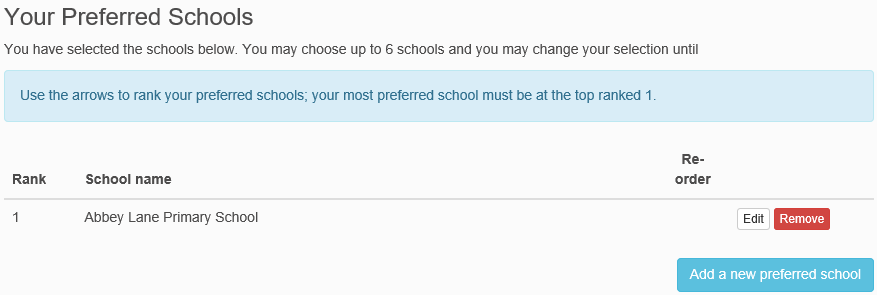
- Click the Next button to display the Application Summary pagepage.
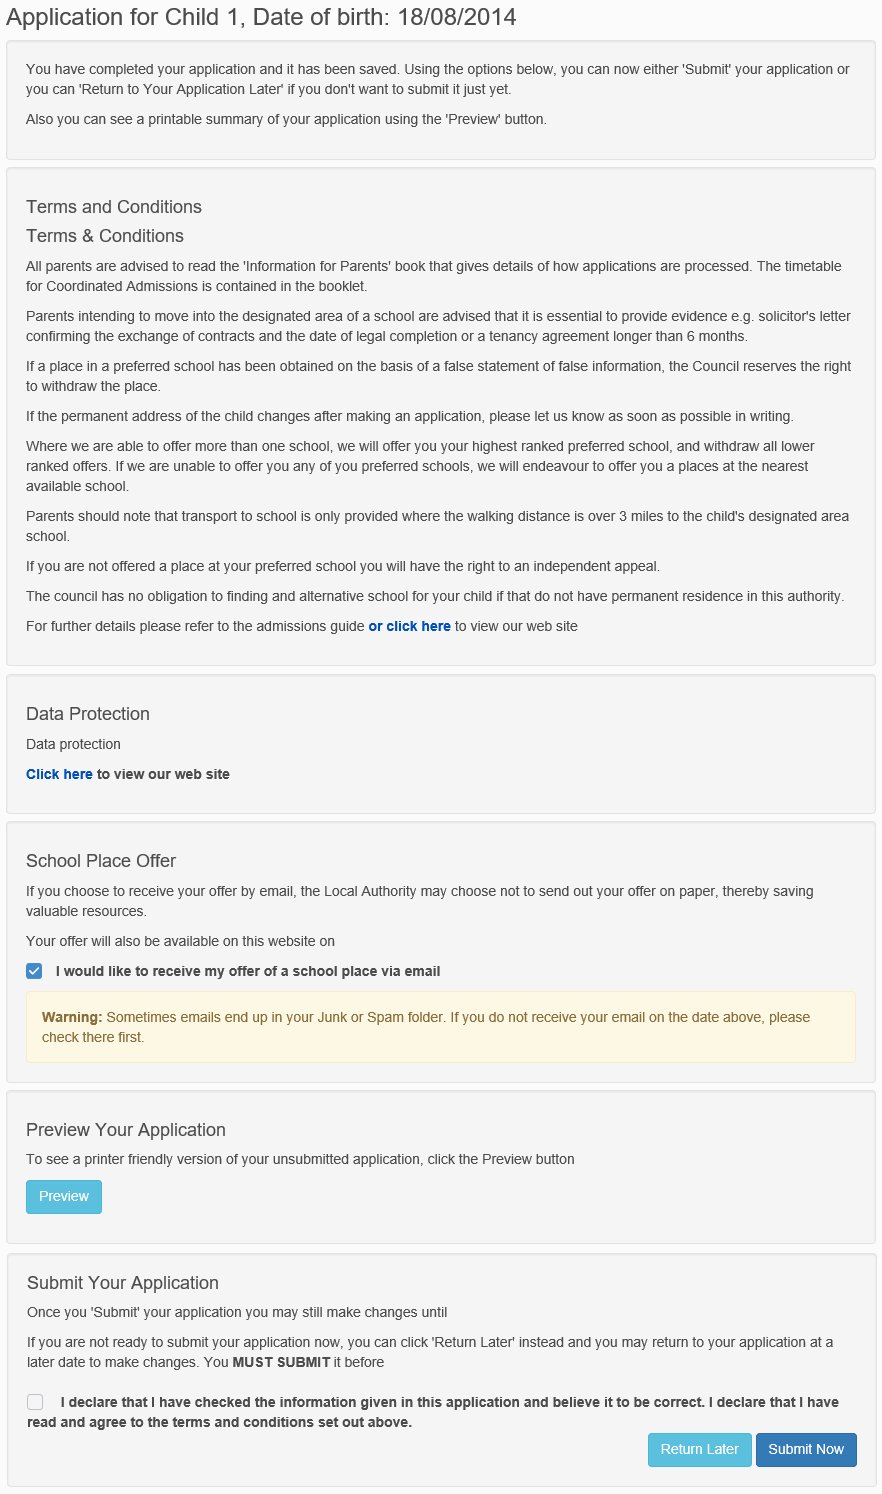
- Select the declaration check box.
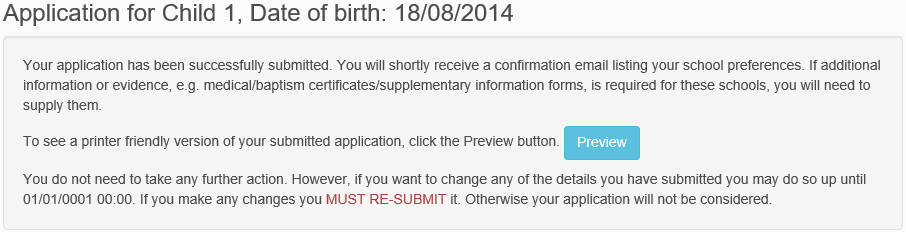
- ClickClick the Submit Now button to submit your application and display a confirmation screen.
- Alternatively, click the Return Later button to save your application for later.
To return to a previously-created application, select Citizen Portal | Home | School Places and then click the Continue Application link under the child’s name.
- ClickClick the Submit Now button to submit your application and display a confirmation screen.
- Multiple in year applicationsMultiple in year applications
Multiple In-Year Applications
Over the course of a year, a parent can make several different in-year applications. However, LAs can restrict applicants so that only one in-year application per child can be open at any one time, if required.
If the LA has elected to prevent applicants opening more than one concurrent in-year application, the Start new application link does not display if there is already an opened, unsubmitted application for the child.
Once the in-year application is submitted, the Start new application link displays again as normal. However, if you attempt to make a new application when there is already an opened, submitted application for the child, then a dialog displays after the In-Year Transfer page prompting you to either close or edit the existing application:
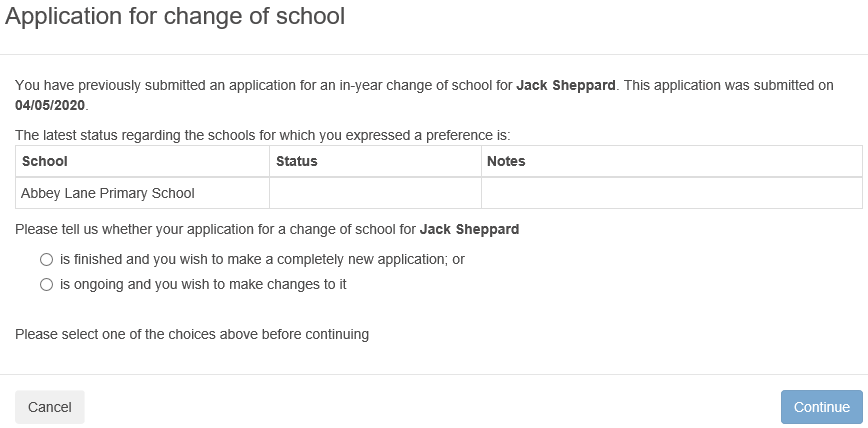
Select from the following options:- Click the is finished and you wish to make a completely new application; or radio button to make a completely new application.
-
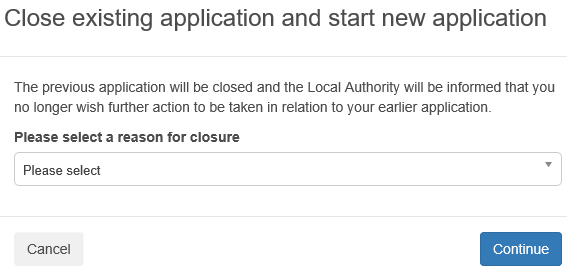
- Click the Continue button to display the Close existing application and start new application dialog.
- Select a reason for closure from the drop-down menu.
- Click the Continue button to close the existing application and continue with the new application process.
- Click the is ongoing and you wish to make changes to it radio button to make changes to the existing application.
-
- Click the Continue button to display the Change Application page.
- Click the Continue button to re-open the application at the In Year Transfer page.
- Make an applicationMake an application
- Change an applicationChange an application
To change a previously-submitted application:
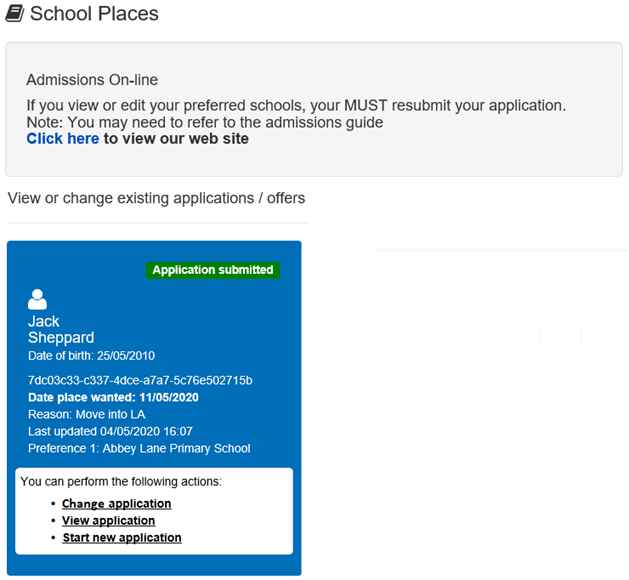
- Click the Change application link under the child’s name. A confirmation dialog is displayed.

- Click the Continue button to re-open the application at the Additional Child’s Details page for Normal Phased applications and the In Year Transfer page for In Year applications.
- Proceed through the application flow as described in Make an Application.
At this point the application reverts to an unsubmitted state. You must re-submit the application in order for it to be considered, even if you do not make any changes to it.
- Click the Change application link under the child’s name. A confirmation dialog is displayed.
- Close an applicationClose an application
The Close Applications hyperlink enables you to close in-year applications via the Citizen Portal. This hyperlink is only displayed if the LA has enabled citizens to remove in-year applications.
Normal phased applications can only be removed in A&T Back Office.
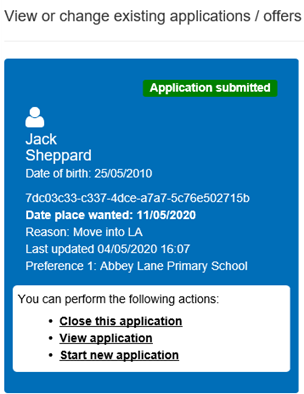
- Click the Close this application hyperlink on the application you want to close to display the Close Application page.
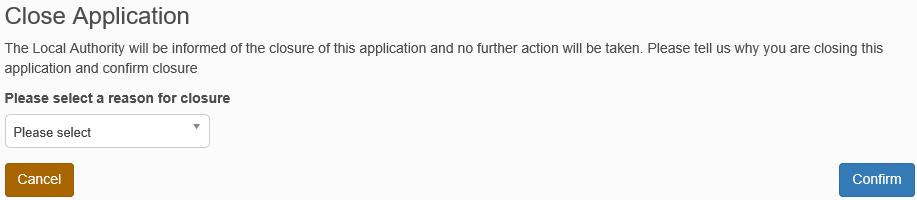
- Select a Close reason from the drop-down menu.
- Click the Confirm button to close the application.
Display Closed In-Year Applications
The Display Closed In-Year Applications button is only displayed if you have previously closed applications. Click this button to display closed applications in the View or change existing applications / offers panel.
Closed applications can be viewed, but not changed or resubmitted.
- Click the Close this application hyperlink on the application you want to close to display the Close Application page.
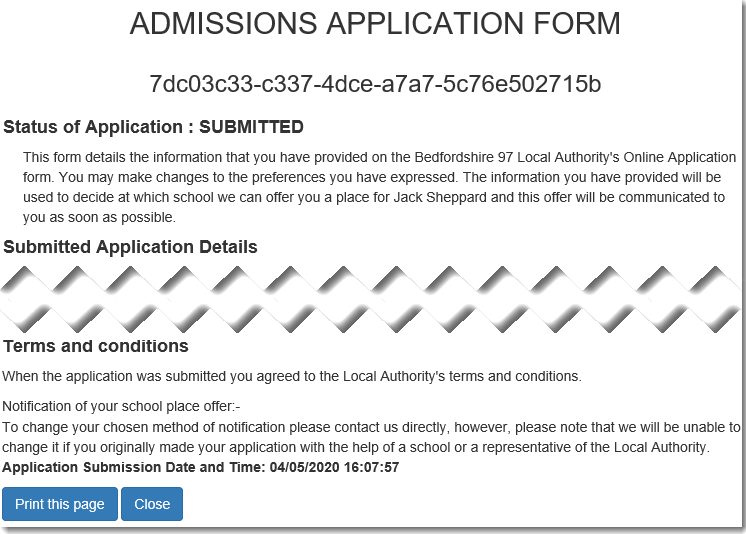
- View an applicationView an application
You can use the Citizen Portal to view details of the original application.
Select the View application hyperlink under a child’s name to view the details of that child’s application.
- View offersView offers
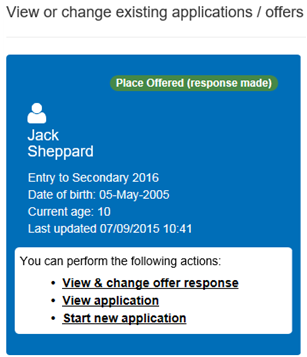
You can use the Citizen Portal to view your offers once offer information has been published. The child’s application status shows as Place Offered on the School Places page once an offer has been made.
See the Publish Offer Information Online topic of the A&T Back Office Help for more information on the process of publishing offer details online.
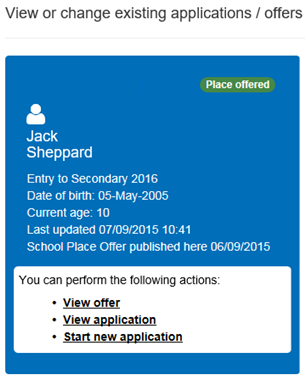
Select the View Offer hyperlink under a child’s name to view the details of that child’s offer.
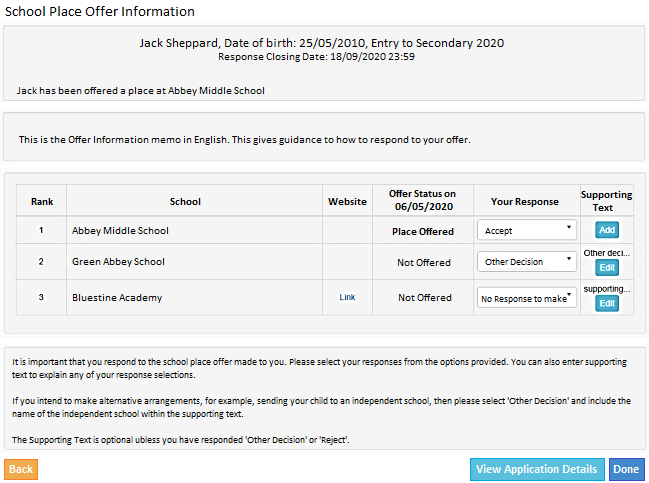
The name of the school to which the child has been offered a place is displayed in bold text at the top of the page, with a table underneath showing the offer status for each of the preferences named in that application.
Select from the following options:
- Click the Add button to add supporting text.
- Click the Edit button to edit supporting text.
- Click the View Application Details button to view the original application.
- Click the Done button to submit your response.
- Click the Back button to return to the School Places page.
- Respond to offersRespond to offers
You can use the Citizen Portal to respond to offers that correspond to applications for transfer groups that have Enable Parent/Carer Response Online selected.
- Select the View & respond to offer hyperlink under a child’s name to view the School Place Offer Information page. This page details the offer status for each of the preferences that was made in the application.
If you have already responded to the offer, then the View & Change Offer Response hyperlink is displayed instead of the View & Respond to Offer hyperlink. The View & Change Offer Response hyperlink opens the School Place Offer Information page with the details of the previous response are already filled in.
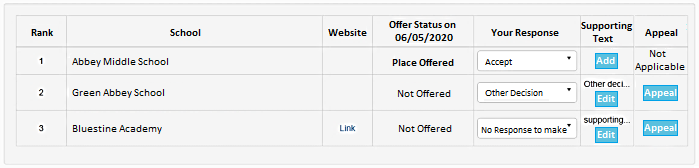
- If the Appeals functionality is enabled, an Appeals button also displays for On Waiting List or Not Offered places.
The functionality is enabled via Process | Transfer Groups | E-App Settings and checking or unchecking the Enable Parent/Carer Appeal Request Online checkbox.
- Select a response for each of the offer statuses. The available responses change depending on the offer status in question
Offer Status Available Responses Place Offered Accept Other Decision Reject Place Accepted Accept Other Decision Reject Not Offered Go On Waiting List No Response to Make Other Decision Offer Status Available Responses On Waiting List Other Decisions No Response to Make If the preference school is a Selective School (BASES.SELECTIVE=true) and the Offer Status for that preference is Refused by LA (R), then the Go On Waiting List option is not displayed, because the LA has already refused the place based on the entrance test score.
- Enter supporting text. Supporting text is mandatory for Other Decision or Reject responses, but optional for all other response types.
- Click the Add button next to an offer to display the Supporting Text dialog.
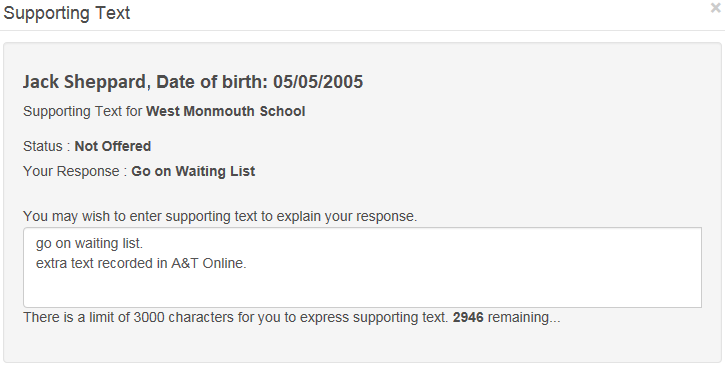
- Enter your text, then click the OK button to close the dialog and save your text.
To edit existing supporting text, click that offer’s Edit button. The existing text is displayed in the Supporting Text dialog.
- Click the Add button next to an offer to display the Supporting Text dialog.
- If you want to appeal, click the Appeal button. This allows parents to provide basic details about the type of appeal they are lodging, which is visible to Back Office users once applications are imported. This is intended only as an indication that an appeal will be lodged, rather than facilitating the actual appeal itself.
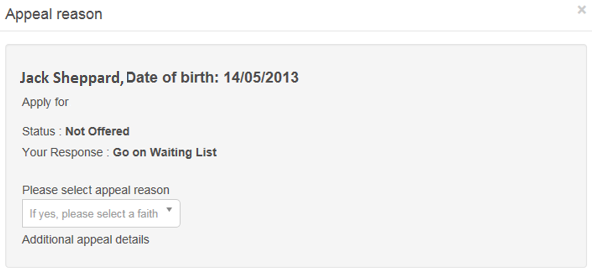
- Select the Appeal Reason.
- Enter Additional appeal details if applicable.
- Click the Done button to submit the response. A confirmation page is displayed.
- Select the View & respond to offer hyperlink under a child’s name to view the School Place Offer Information page. This page details the offer status for each of the preferences that was made in the application.
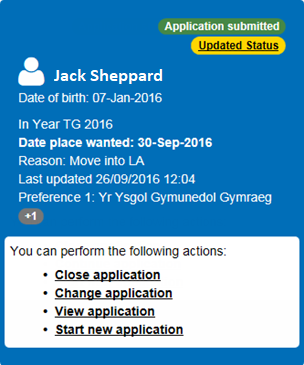
- View status updatesView status updates
You can use the Citizen Portal to view status updates sent by the LA. When your application status is updated, you are automatically sent an email and a Citizen Portal message advising you to log in to the portal to check the update.
To view the update, select School Places and click the Updated Status button on the application’s home tile to display the Status for preference schools dialog. This dialog displays the previous and current statuses for each preference, as well as any explanatory text that the LA has provided.

- Start a new application