![]()
The instructions on this page were different in the following release(s):
3.87 | 3.86
Free School Meals Administration
Release Note for Spring 2026 (3.88)
ECE outcomes added to FSM Eligibility Checking Outcomes
Create a Dummy Base
To import FSM applications from the Citizen Self Service portal, a dummy base must be created as a B2B Student Base and a user must be mapped to the dummy base to identify that a record has been received from the Citizen Self-service portal.
The User_ID is used to update the Last Updated field in the relevant area , identifying that the record was sourced from the Citizen Self-service portal.
The dummy base should have been set up by the Administrator for the User_ID set up for processing FSM applications.
More Information:
Creating ‘Dummy’ Bases topic in the Deploying and Configuring the Citizen Self Service Portal for Local Authorities technical guide, available from the Publications website via the Technical link.
Configure FSM Applications
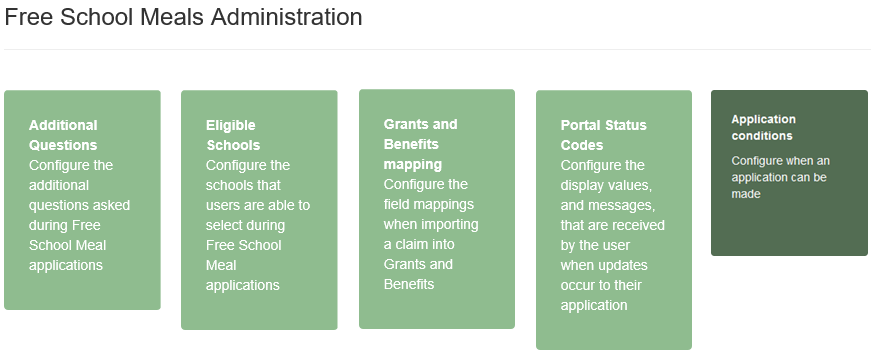
The following settings must be configured to enable Free School Meals applications to be made via the Citizen Self Service portal and subsequently processed:
Additional Questions
As part of the Free School Meals application process, additional questions can be set by the local authority. It is not mandatory to configure additional questions. However, any questions configured here are mandatory and must be answered by the applicant before the application can be continued.
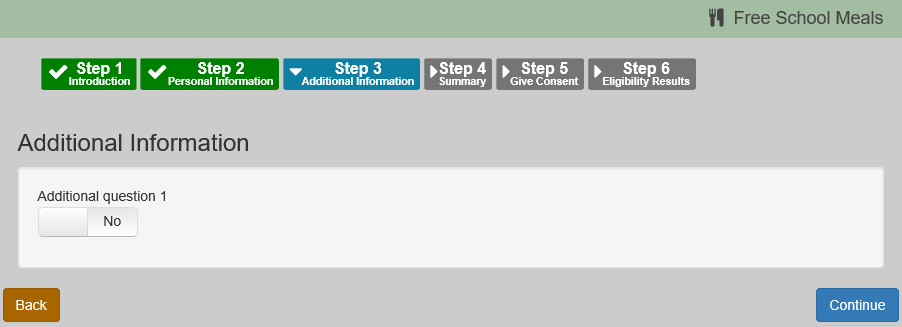
When the parent, carer or guardian makes a Free School Meals application, they will see the additional questions as Step 3 Additional Information.
Configure additional questionsConfigure additional questions
- Select v4 Online | Citizen Portal Admin | Home | Administration | Free School Meals Administration.
- Click the Additional Questions button to display the Setup Additional Questions page; existing questions are displayed in number order.
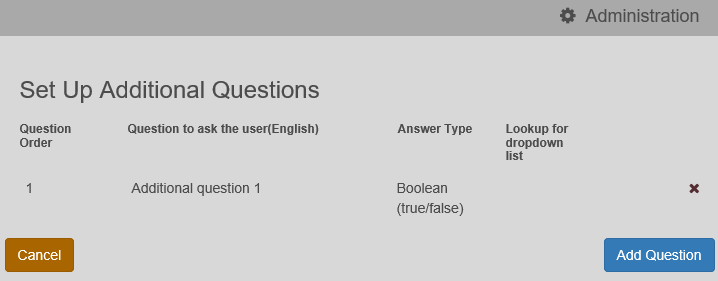
- Choose from the following options:
- Click the Add Question button to display the Additional Questions Form dialog.
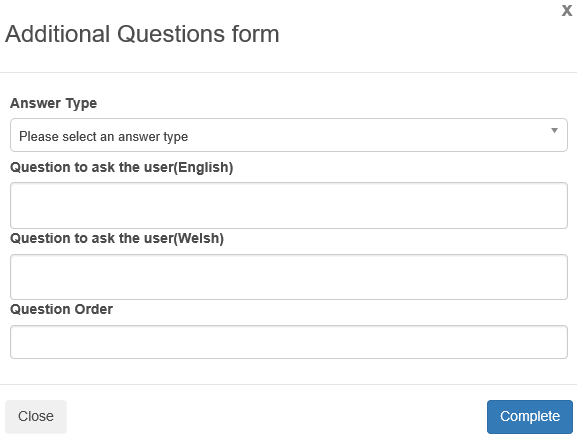
- Select an Answer Type. If you select the Dropdown list option, the Lookup for drop down list field is displayed. Enter the Table_ID from v4 Client | Tools | Administration | Lookups.
- Enter your required text in the Question to ask the user field.
- Enter the Question Order number.
If you enter a number that has already been assigned to a question, this produces a duplicate number; therefore, you must edit the numbers of the subsequent questions.The Answer Types are edited via General Administration | Edit Resources | Resource Configuration Title | Administration. String AnswerType_String Date AnswerType_Date Email AnswerType_Email Decimal AnswerType_Decimal Drop-down list AnswerType_DropDown Boolean AnswerType_Boolean Integer AnswerType_Interger
- Click the question to edit, to display the completed Additional Questions Form.
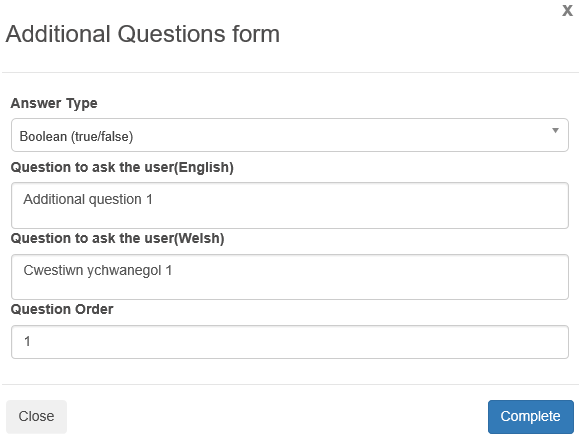
Make the required changes; all of the fields can be edited.
- Click the Add Question button to display the Additional Questions Form dialog.
Eligible Schools
Not all schools are supported by the local authority for Free School Meals. The Eligible Schools option enables your local authority to configure base groups, containing bases that can be selected by the Citizen Self Service portal user when applying for Free School Meals for their child.
Configuring the base groups means that the user is informed directly whether the school they have selected is eligible for free school meals or not.
Bases are allocated to base groups via v4 Online | Bases | Base Groups.
Configure the eligible schoolsConfigure the eligible schools
- Select v4 Online | Citizen Portal Admin | Home | Administration | Free School Meals Administration.
- Click the Eligible Schools button to display the Configure FSM Schools page.
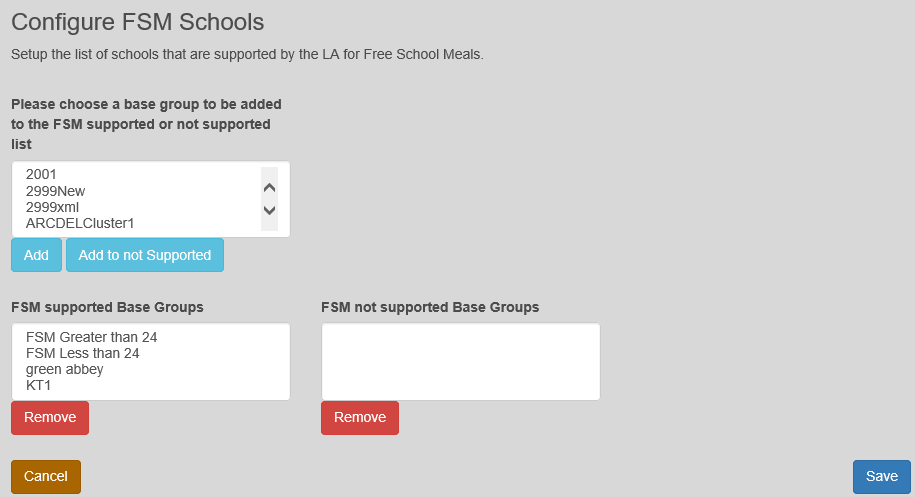
- Choose from the following options:
- To add a base group to the supported list, highlight the base group, then click the Add button to move it to the FSM supported Base Groups list.
- To remove a base group from the FSM supported Base Groups list, highlight the base group then click the Remove button to move the base group to the base group chooser list.
- To add the base group to the non-supported base group list, highlight the base group, then click the Add to not Supported button to move it to the FSM not supported Base Groups list.
- To remove a base group from the FSM not supported Base Groups list, highlight the base group then click the Remove button to move the base group to the base group chooser list.
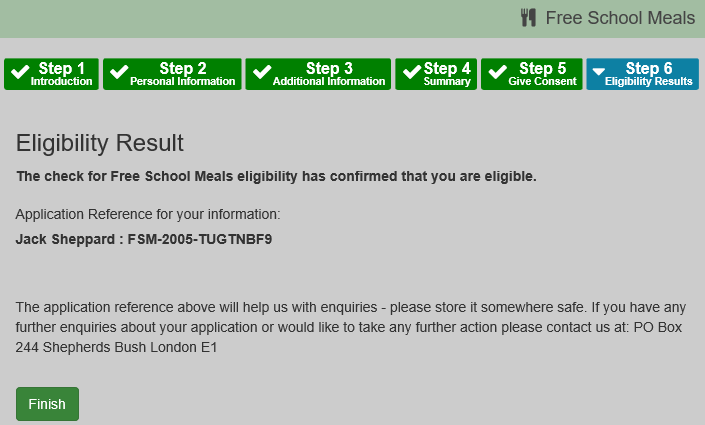
When the parent, carer or guardian makes a Free School Meals application, they will see if their application is eligible as Step 6 Eligibility Results.
| The text for the above page is edited via the Text Blocks area in Edit Resources. | |
| Eligibility Result heading | EligibilityResult |
| The check for…… | EligibleFSM |
| Application Reference for….. | ApplicationReferenceText |
| The application reference…… | EligibilityStatusFurtherInformation |
| Invalid Eligibility Result heading | InvalidEligibilityResults |
| The check for…(not eligible) | EligibleNotFound |
Grants and Benefits Mappings
When importing Free School Meals (FSM) applications from the Citizen Self Service portal to the v4 Grants and Benefits module, mappings for certain values are required in order to identify certain conditions, authorisation or claim status values.
These mappings enable local authority users to configure the outcomes from the Department of Work and Pensions (DWP) Eligibility Checking Service (ECS).
There are two types of configuration:
FSM Settings
This is the configuration of results from the DWP Eligibility Check.
FSM settings are stored in the database instead of a file as they were previously, so that they can be edited in cloud environments. The configuration is saved into the PORTAL_CONFIG_PARAM table as a new configuration with PARAM_CODE = GNB_CONFIG_SETTINGS.
After a claim is submitted via the portal, the ECS check is run with the DWP. Once the check is returned, a claim record is created that can be managed within the Grants and Benefits module. The FSM Settings page enables you to configure the default claim properties for the records created based on the outcome of the ECS check.

There are a number of Eligibility Checking Outcomes to be configured. The Not Found outcomes are returned with a qualifier of No Trace, Pending, Manual Process and Manual Query.
- Eligible
- Not Found (No Trace)
- Not Found (Pending)
- Not Found (Manual Process)
- Not Found (Manual Query)
- Not Found
- Error
- Not Found (ECE)
- Not Eligible (ECE)
Configure the FSM SettingsConfigure the FSM Settings
- Select v4 Online | Citizen Portal Admin | Home | Administration | Free School Meals Administration | Grants and Benefits Mapping to display the FSM Settings page.
- For each Outcome, enter details as required.
The Submit details to Portal Back Office? column allows a Child’s details to be submitted to Portal Back Office regardless of the Eligibility Checking Outcome.
The behaviour of selecting Yes /No in the Submit details to Portal Back Office? column for each Eligibility Checking Outcome is as follows:
- Eligible:
This option is set to Yes by default and cannot be changed to No. The child/carer details will always be submitted to Portal Back Office for matching. The application will appear in G&B applications after matching process is complete. - Not Found (xxx):
This option can be selected as Yes or No.
If Yes is selected and the ECS Check is returned as Not Found, the child /carer’s details will still be submitted to Portal Back Office for matching. - Error:
This option can be selected as Yes or No.
If Yes is selected and the ECS Check returns an error on the Declaration Form, the child /carer’s details will still be submitted to Portal Back Office for matching. The Application will appear as Incomplete and willl be accessible on the Portal for completion/resubmission.
If the Claim Status is selected as Pending for any outcome, then Submit details to Portal Back Office? will default to Yes and cannot be changed.
Exception Settings
This is the configuration of a claim status to be used when loading the claim, when an exception occurs.
The Exception Settings page is used to configure the Claim Status to be used when importing the claim and one of the following exceptions occur while being processed.
- A current FSM Claim already exists for the student.
- The National Insurance number of the applicant is different to that of the matched parent, carer or guardian.
- The National Insurance number of the applicant already exists for another person.
- The Asylum Seekers number of the applicant is different to that of the matched parent, carer or guardian.
- The date of birth of the applicant is different to that of the matched parent, carer or guardian.
- The current school of the child on the application is different from the current school of the matched student.
For those claims where the above exceptions occur, the Category, Item, Fund and Default Date values are picked up from the relevant Eligibility Checking Outcomes (Eligible, Not Found, Error) as defined on the FSM Settings page. The Claim Status is as specified against the appropriate exception and the Authorisation Status defaults to Pending for all exceptions.
Configure the Exception SettingsConfigure the Exception Settings
- Select v4 Online | Citizen Portal Admin | Home | Administration | Free School Meals Administration | Grants and Benefits Mapping | Exception Settings button to display the Exception Settings page.
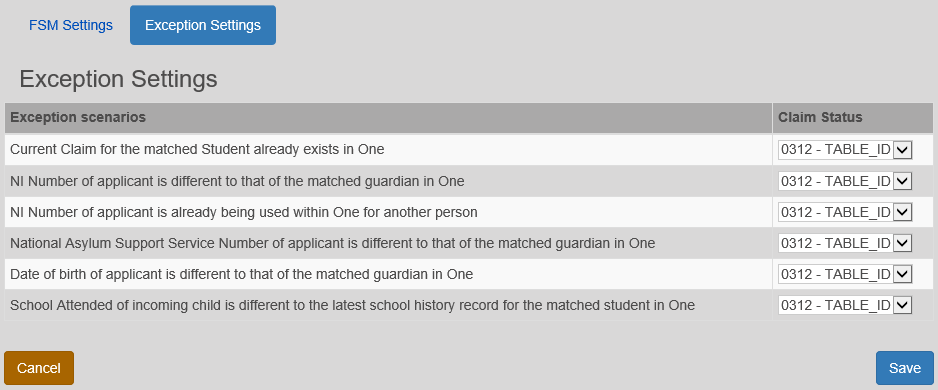
The selections in the above graphic are examples. Each LA can configure its own exception settings.
- For each of the Exception scenarios, select a Claim Status. Claim Status is populated via v4 Client | Tools | Administration | Lookup Codes | Table_ID 0312.
Portal Status Codes
Portal Status Codes enable the local authority user to configure the appropriate status to be displayed to the Citizen Self Service portal registered user, throughout the various stages of their FSM application. It also enables the LA to specify a message template that is invoked to send more detailed information to the registered user about their application.
Message details are not sent directly to the Citizen Self Service portal user. A notification is sent to the user’s mailbox, informing them that they have a message in their portal account. The user must log in and authenticate with the Citizen Self Service portal, before they can view the message details.
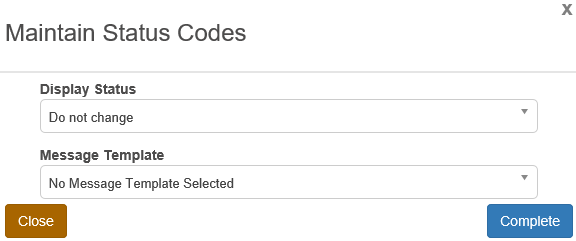
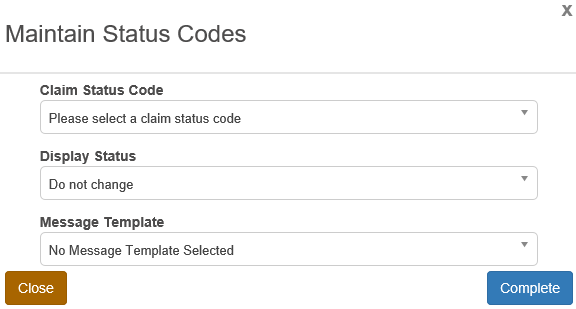
- Maintain Status Codes
This is accessed via v4 Online | Citizen Portal Admin | Home | Administration | Free Schools Administration | Portal Status Codes.
There are three stages of a Free School Meals application, against which a Status and Message Template can be specified:- Incomplete
The application is currently in progress on the Citizen Self Service portal. An Incomplete status signifies that the application is currently in progress on the Citizen Self Service portal.

It is not possible to add additional rows to the Incomplete panel. The Display Status and Message Template can be changed by highlighting the row and selecting one of the fields to display the Maintain Status Codes dialog.

Display Status options can be edited in v4 Client via Tools | Administration | Lookups | Table_ID 1183.
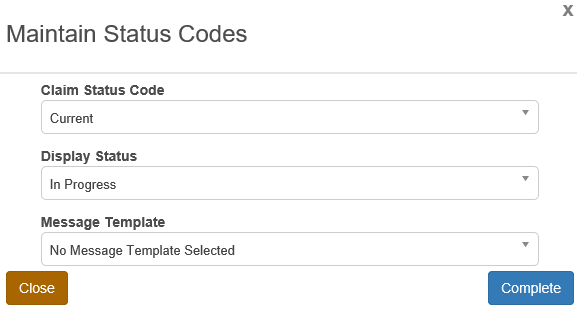
Message Template options can be edited in Template Management. - Submitted
The Citizen Self Service portal registered user has completed and submitted the application.
A Submitted status signifies that the Citizen Self Service portal registered user has completed and submitted an application.

The Display Status and Message Template can be changed by highlighting the row and selecting one of the fields to display the Maintain Status Codes dialog.
Display Status options can be edited in v4 Client via Tools | Administration | Lookups | Table_ID 1183.
Message Template options can be edited in Template Management.
For applications that are Submitted, you can configure a status and a message template against each result of the DWP Eligibility Check. This configuration can be used to immediately inform the Citizen Self Service portal user the outcome of the eligibility check.Add a New Eligibility Status
There are different Eligibility Status options for a Submitted application:- Eligible
- Not Found (xxx)
Where xxx is No Trace, Pending, Manual Process or Manual Query. - Error
- Select v4 Online | Citizen Portal Admin | Home | Administration | Free Schools Administration | Portal Status Codes to display the Maintain Status Codes page.
- For each of the Eligibility Status options, click the Add New Eligibility Status button on the Submitted panel to display a new Maintain Status Codes dialog.
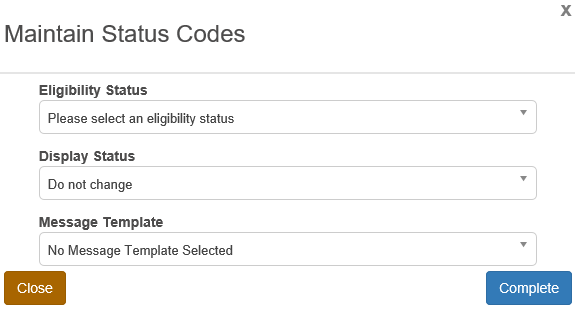
Enter details as required.
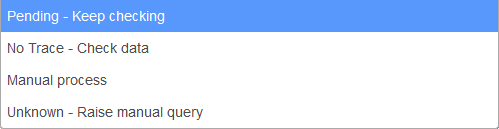
Eligibility Status of Not Found
An FSM applicant only sees the not found qualifier on the eligibility result screen e.g. No trace - check data; Pending; Manual process etc.
Once the user clicks away from this screen there is no further communication detailing the result qualifier, so all an applicant knows is they're not eligible.
LAs can customise the text an applicant receives for each status, for both portal messages and e-mails (rather than just an e-mail advising the user they need to log in to the portal). This allows users to be advised as to the full status of their eligibility check.
To configure the Eligibility Status of Not Found to add a Qualifier:
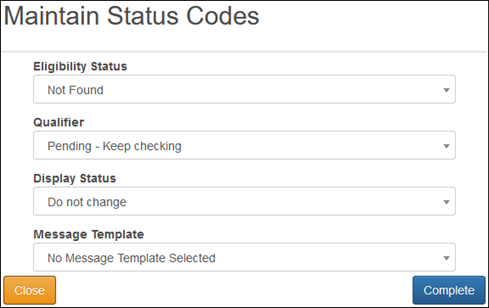
LAs can also configure a template to automatically send based on this qualifier. A Display Status and Message Template can be assigned for each Qualifier. - Received
The application has been received by the Local Authority and has been loaded as an FSM Claim into v4 Grants and Benefits.
A Received status signifies that an application has been received by the Local Authority and has been loaded as an FSM Claim into the v4 Grants and Benefits module.
For applications that are Received, it is possible to configure a Status and a Message Template against each available Authorisation Status in v4 Grants and Benefits (Authorised, Pending, Rejected). This configuration can then be used to inform the Citizen Self Service portal user of the current Authorisation Status of their claim, either when the claim is first added, or when the Authorisation Status subsequently changes in Grants and Benefits.
For applications that are Received, it is also possible to configure a Status and a Message Template against each Claim Status in v4 Grants and Benefits. This configuration can then be used, together with the configuration of the Authorisation Status, to inform the Citizen Self Service portal user of the current Claim Status of their claim, either when the claim is first added, or when the Claim Status subsequently changes in Grants and Benefits.
- Incomplete
- Maintain Grants and Benefits Claim Codes
Grants and Benefits Codes are maintained via v4 Online | Citizen Portal Admin | Home | Administration | Free School Meals Administration | Portal Status Codes.
There are three Grants and Benefits Status Codes, against which a Status and a Message Template can be specified: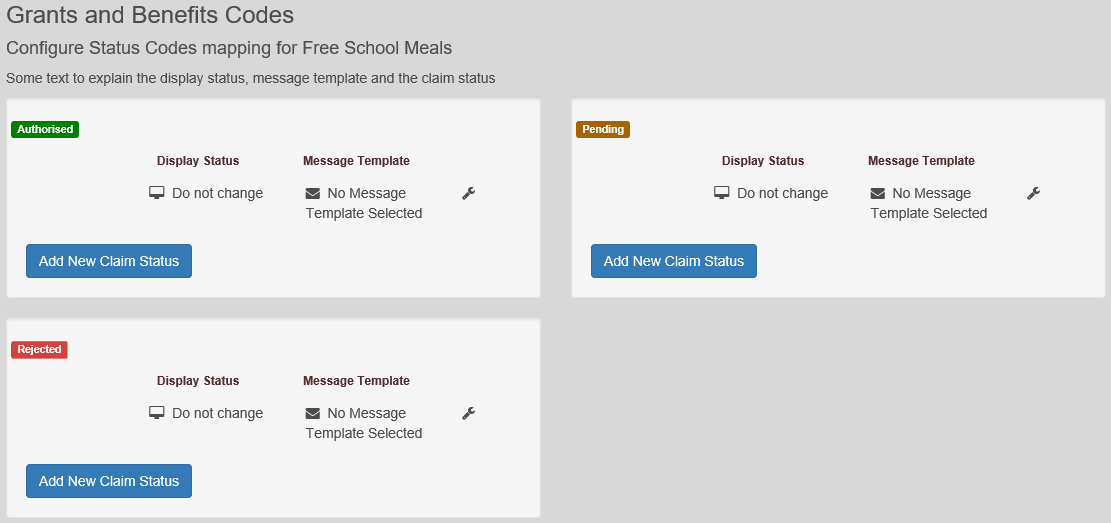
Select from the following options:- Authorised
- Pending
- Rejected
Maintain a claim status
To maintain Grants and Benefits Claim Statuses:- Select v4 Online | Citizen Portal Admin | Home | Administration | Free Schools Administration | Portal Status Codes to display the Maintain Status Codes page.
- Choose from the following options:
- In the panel for the required claim status code (Authorised, Pending or Rejected), click the Add New Claim Status button to display the Maintain Status Codes dialog.
Enter details as required. - In the panel for the required claim status code (Authorised, Pending or Rejected), highlight the required row then click the spanner icon to display the Maintain Status Codes dialog.
Select the required options from the drop-downs; all of the fields can be edited.
- In the panel for the required claim status code (Authorised, Pending or Rejected), click the Add New Claim Status button to display the Maintain Status Codes dialog.

Display Status options can be edited in v4 Client via Tools | Administration | Lookups | Table_ID 1183.
Message Template options can be edited in Template Management.
Application Conditions
This allows LAs to manage conditions applied to FSM applications.
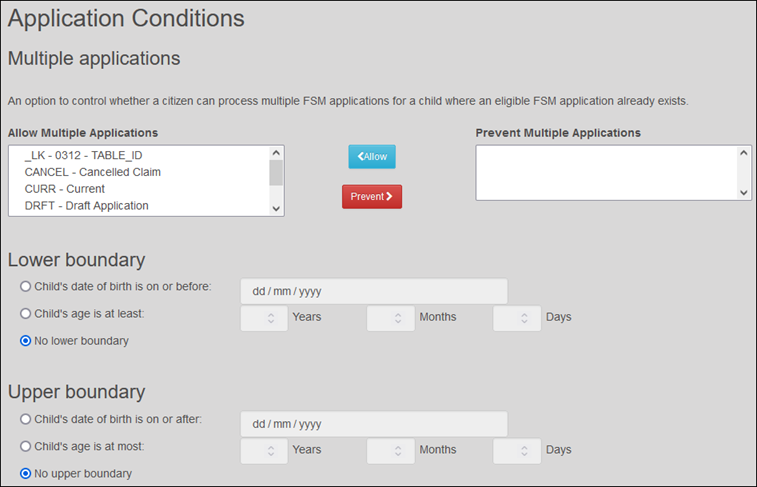
Multiple applications
This option checks on the Claim Status rather than the ECS Status of an application. Depending on the claim status, multiple applications can be allowed or denied.
To prevent multiple applications:
- Select the required claim status from Allow Multiple Applications (Lookup table 0312).
- Click Prevent to move to Prevent Multiple Applications.
To allow multiple applications:
- Select the required claim status from Prevent Multiple Applications (Lookup table 0312).
- Click Allow to move to Allow Multiple Applications.
If set to Prevent:
- Citizens cannot create FSM application for a child if an application already exists with Eligibility status, as Eligible.
- The option Include in Application is not visible for an eligible application that is already submitted. Instead, the following displays: Eligible FSM Application submitted on DD/MM/YYYY
- Citizens can create an FSM application for a child if an application already exists with an eligibility status of Not found or Error.
Exception:
If the citizen had made a previous application and their child was eligible, if they start to create another one and the LA turn off the ability to create multiple applications, the parent can still complete the application that is in progress.
If set to Allow:
- Citizens can create an FSM application for a child if an application already exists with Eligibility Status as Not found, Error or Eligible.
- Citizens can continue to complete an application that is in progress, if an application for that child already exists with Eligibility Status as Eligible.
- The option Include in Application is available.
Lower / Upper boundary
An upper and/or lower boundary to applications based on date of birth, age, or no limitation can be defined so that LAs only receive applications for eligible children, and parents expectations are properly managed.

Text Resource
There is also a text resource for the tile called FsmApplicationConditionsAdmin. It can be accessed via Administration > General Administration > Edit Site Text Resources > Markdown | Text Blocks.
