To return to the latest release, click the Back button or select it from the Table of Contents.
One IYSS System Administration Client
The One IYSS System Administration Client is linked to your network login. The system recognises you based on your network login ID. The system administrator can use the client to configure configure OneIYSS, Configure System Values and the value for YJB Connectivity.
To log in:
- Launch the One IYSS System Administration Client to display the OneIYSS System Administration Login dialog.
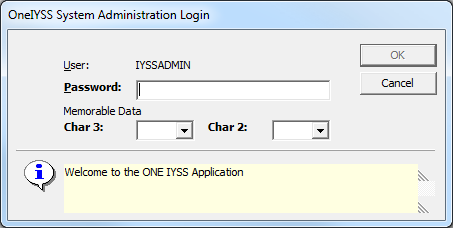
- Enter your One IYSS Password.
- Select the requested Memorable Data characters from the drop-downs.
- Click the OK button.
Configure One IYSS Using the System Administration Client
WARNING: Misconfiguration of the One IYSS System Administration Client can cause system failure. If you need to make any changes to the system and are unsure how they will affect the performance of One IYSS, check with One Application Support prior to carrying out the changes.
This is of particular importance for all system values, and any values coloured red.
The One IYSS System Administration Client enables the configuration of all elements of One IYSS, including:
- Setup and maintenance of user accounts
- Security matrix and access controls
- Values of lookup fields, radio buttons and multiple choice fields
- Connections to external resources, e.g. email and SMS service providers
- One IYSS data mapping to NCCIS specified code structures
- Setup of statistical reporting periods
- Importing bespoke Crystal Reports and search result templates
- Unlocking locked Client, Opportunity and Provider records
- Roll up of academic years for clients.
System administration updates should be done methodically. It is recommended that all changes be documented to facilitate fault identification in the event errors are made.
Changes to values within the One IYSS System Administration Client are performed through the three icons above the system administration directory tree.

These icons allow values to be added, changed, or deleted. Where an action is unavailable, the icon is greyed out to prevent the value being altered.

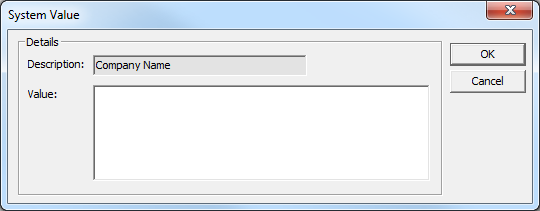
When a value is being added, the dialog contains a Description and a Long Description field. While both are mandatory fields, the Long Description is the one displayed in the One IYSS web application.
Mandatory fields in One IYSS System Administration dialogs are displayed in bold until a value has been entered. These must be completed.
Configure System Values
The central values within One IYSS are for the most part defined by system values. To adjust these in the One IYSS System Administration Client, select System | System Value. The values are displayed in the System Value pane.
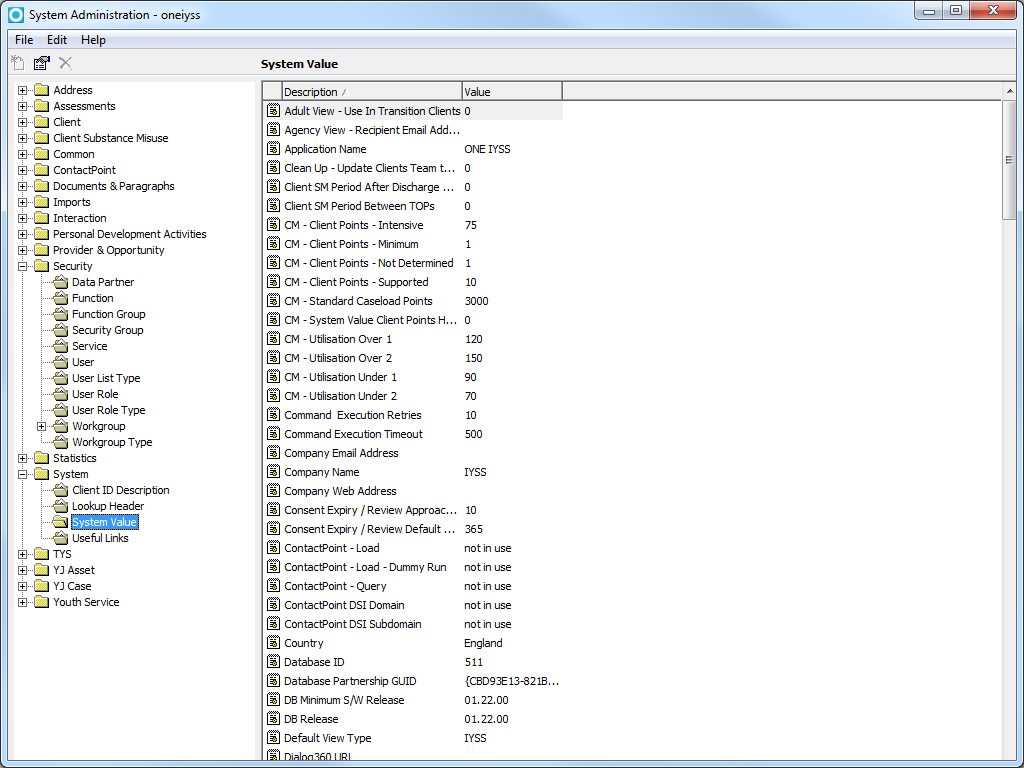
To edit a value, click the appropriate entry to display the System Value dialog. For guidance on editing these values, see System Values.
WARNING: Misconfiguration of system values can result in system failure. If you are unsure how any changes you make to the system values will affect the system stability, please contact One Application Support prior to making the changes.
YJB Connectivity
The Youth Justice Board have changed the way Connectivity currently works. A new system value called YJB Connectivity YJSM Web Service URL have been introduced to hold the URL of the YJB connectivity hub.
As part of YJB connectivity setup you will need to contact the YJB to obtain the correct URL required to configure the settings.
System Values
WARNING: Misconfiguration of system values can result in system failure. If you are unsure how any changes you make to the system values will affect the system stability, please contact One Application Support prior to making the changes.
The central values within One IYSS are for the most part defined by the system values. To adjust these in the One IYSS System Administration Client, select System | System Value to display the system values, and double-click the required value to display the System Value dialog.
For guidance on editing these values, consult the table below.
Certain fields are True/False fields, where 1=True and 0=False. Any field with two options, 1 or 0, is a True/False field.
|
Field |
Instruction |
|
Adult View - Use In Transition Clients |
Leave as 0. |
|
Agency View - Recipient Email Address |
Leave blank. This function is no longer used. |
|
Application Name |
This should be an appropriate name for the application, e.g. One IYSS. |
|
Clean Up - Update Clients Team to Lead Worker Team |
To assign clients’ managing teams as their lead workers, set to 1, otherwise set to 0. |
|
Client SM Period After Discharge Date |
Enter a numerical value to create substance abuse TOP reminders in my homepage for a set number of weeks after clients have been discharged. |
|
Client SM Period Between TOPs |
Enter a numerical value to create substance abuse TOP reminders in my homepage for a set number of weeks between TOPs. |
|
CM - Client Points - Intensive |
Enter a numerical value to define the default points value for clients with intensive need levels. If you change this field, make sure you also change the ‘CM - System Value Client Points Have Been Updated’ value to 1. |
|
CM - Client Points - Minimum |
Enter a numerical value to define the default points value for clients with minimum need levels. If you change this field, make sure you also change the ‘CM - System Value Client Points Have Been Updated’ value to 1. |
|
CM - Client Points - Not Determined |
Enter a numerical value to define the default points value for clients with undetermined need levels. If you change this field, make sure you also change the ‘CM - System Value Client Points Have Been Updated’ value to 1. |
|
CM - Client Points - Supported |
Enter a numerical value to define the default points value for clients with supported need levels. If you change this field, make sure you also change the ‘CM - System Value Client Points Have Been Updated’ value to 1. |
|
CM - Standard Caseload Points |
Enter a numerical value to define the default points value for clients with a standard needs level. If you change this field, make sure you also change the ‘CM - System Value Client Points Have Been Updated’ value to 1. |
|
CM - System Value Client Points Have Been Updated |
If you have updated the caseload points in the CM fields, change this value to 1 to recalculate the caseloads during the next Clean Up Job, following which it will reset to 0. |
|
CM - Utilisation Over 1 |
Enter a number to act as a percentage against which client over-utilisation is monitored. Clients with scores falling between 100 and this number, e.g. 110, will display a certain graphic indicating a client is over utilised. |
|
CM - Utilisation Over 2 |
Enter a number to act as a percentage against which client over-utilisation is monitored. Clients with scores falling between ‘CM - Utilisation Over 1’ and this number, e.g. 130, will display a certain graphic indicating a client is highly over utilised |
|
CM - Utilisation Under 1 |
Enter a number to act as a percentage against which client under-utilisation is monitored. Clients with scores falling between 100 and this number, e.g. 90, will display a certain graphic indicating a client is under-utilised. |
|
CM - Utilisation Under 2 |
Enter a number to act as a percentage against which client under-utilisation is monitored. Clients with scores falling between ‘CM - Utilisation Under 1’ and this number, e.g. 70, are flagged as highly under-utilised. |
|
Command Execution Retries |
Leave as ‘not in use’. |
|
Command Execution Timeout |
500 |
|
Company Email Address |
Leave as ‘not in use’. |
|
Company Name |
This is used to validate your licence code. It should only be changed after consulting with One Application Support. |
|
Company Web Address |
Leave as ‘not in use’. |
|
Consent Expiry | Review Approaching Days |
Enter a number in this field to determine how many days’ notice users get before their clients’ Data Protection consent expires. Beginning at this number of days prior to consent expiration, affected clients are displayed in the my homepage Reminders list until consent expires or is updated. |
|
Consent Expiry | Review Default Days |
Enter a number to create a default data protection consent period, in days. The system calculates the consent expiry date based on this many days after consent was given. |
|
ContactPoint - Load |
Leave as ‘not in use’. |
|
ContactPoint - Load - Dummy Run |
Leave as ‘not in use’. |
|
ContactPoint - Query |
To grant user access to ContactPoint query facilities, set to 1, otherwise set to 0. |
|
ContactPoint DSI Domain |
Enter the DSI Domain assigned to ContactPoint. |
|
ContactPoint DSI Subdomain |
Enter the DSI Subdomain assigned to ContactPoint. |
|
Country |
Leave as ‘not in use’. |
|
Database ID |
Enter the database ID issued by DCFS. This is used when processing the NCCIS XML file. |
|
Database Partnership GUID |
Leave as ‘not in use’. |
|
DB Minimum S/W Release |
Do not change this value. It is used by the system to verify database compatibility with One IYSS. |
|
DB Release |
Do not change this value. It is used by the system to verify database compatibility with One IYSS. |
|
Default View Type |
Leave as IYSS. |
|
Dialog360 URL |
This identifies the website containing the eLearning materials available to the user. The default is http://my.dialog360.com. |
|
Display previous x assessments |
Enter the number of previous assessments to be displayed in the Assessments panel. Any assessments not displayed can be accessed by clicking the more button in the panel header. |
|
DX Start time |
Enter the default time (hh:mm) for AspireDX jobs to run when not governed by a ‘Run Immediately’ command. |
|
DX/TidyNet - IYSS Network UserID |
Enter the Capita One ID for the account used to process DX/TidyNet requests. |
|
DX/TidyNet - IYSS Network User ID Password |
Enter the encrypted Capita One password for the account used to process DX/TidyNet requests. Contact One Application Support for assistance with encryption. |
|
Filter Lookups By User LEA |
To filter Team and Centre Lookup fields by LEA, set this to 1, otherwise set to 0. It is recommended that you seek advice from One Application Support before implementing this filter. |
|
Guarantee Display Critical Days |
Leave as ‘not in use’. |
|
Guarantee Display in Days Days |
Leave as ‘not in use’. |
|
Guarantee Display Info Days |
Leave as ‘not in use’. |
|
Guarantee Display Warning Days |
Leave as ‘not in use’. |
|
Guarantee Weeks |
Leave as ‘not in use’. |
|
Is Connexions |
Do not change. For Capita use only. |
|
Is DB Connection Kept Open |
Do not change. For Capita use only. |
|
Is System Available |
To enable users to access the One IYSS, set to 1. To prevent access, e.g. during system upgrade, set to 0. |
|
IYSS.net Additional Header Information |
If required, enter text here to create a header bar displayed following login to the system. You may want to use this to differentiate between live and test systems, for example. |
|
IYSS.net Base URL |
Enter the web address used to access One IYSS. Ensure that SSL certified addresses use the https:// prefix, not http://. |
|
IYSS.net Initial Number of Interactions Shown |
Enter the default number of interactions displayed when a client record is accessed. Any interactions not displayed can be accessed by clicking the more button in the panel header. |
|
IYSS.net Interaction Timeout Minutes |
Enter a number to determine, in minutes, how long sessions can remain inactive before being automatically closed. If no data is passed between the pc and the server during this time span, the user will be logged out. |
|
IYSS.net Interaction Timeout Warning Minutes |
Enter a number to determine, in minutes, how much notice users get before session timeout due to inactivity. |
|
IYSS.net Login Contact Details |
Identify who users should contact in case of login issues, and how to reach them, e.g. “your system administrator on 01234 123456”. |
|
IYSS.net Login Message |
Enter a welcome message here to be displayed as a header on the login dialog. |
|
IYSS.net Use Role Based Security |
To deploy role based security, set this value to 1, otherwise set to 0. Please consult with One Application Support if you feel role based security is necessary. |
|
Key Client Update Sender Address |
Enter the email address used to notify advisers of Key Client updates. It must be able to send and receive emails. |
|
Lead LEA 1 |
Do not change. For Capita use only. |
|
Lead LEA 2 |
Do not change. For Capita use only. |
|
Licence Code |
Enter the licence code you have obtained for the system. This should only be changed after consulting with One Application Support. |
|
Location - DX |
Enter the location to which exported files are saved. The location must be accessible to all One IYSS users who import or export files. This is used to validate the licence code, and should not be changed without consulting One Application Support. |
|
Login Message - Change |
Enter the message displayed to users when they are prompted to change their login credentials. |
|
Login Message - Initial |
No longer used. |
|
Long Running Task Interval Seconds |
|
|
Max Rows per Page - IYSS.net |
Enter the number of rows to be displayed on each page of search results. |
|
Max Rows per Page - IYSS.net condensed view |
Enter the number of rows to be displayed on each page of search results in the condensed view. |
|
Max Rows per Page - My Homepage |
Enter the number of rows to be displayed on my homepage. |
|
Max Rows to Return - IYSS |
Leave as ‘not in use’. |
|
MIAP - Password |
Leave as ‘not in use’. |
|
MIAP - UKPRN |
Leave as ‘not in use’. |
|
MIAP - Username |
Leave as ‘not in use’. |
|
MIAP Organisational Ref |
Leave as ‘not in use’. |
|
Multiplier - Hours Per Day |
Enter a number to determine calculations of opportunity pay when levelling hourly, daily or weekly pay. |
|
MX - Administrator Email Address |
Enter the email address of a One administrator. This should be a mailbox accessible by all One IYSS administrators. |
|
MX - Deliver Messages |
To enable AspireMX’s delivery functions, set to 1, otherwise set to 0. |
|
MX - Earliest Time to Send Text Message |
Enter a time (hh:mm) before which the system will not send text messages to clients. |
|
MX - IYSS Network User ID |
Enter the Capita One ID for the account used to process AspireMX requests. |
|
MX - IYSS User ID Password |
Enter the encrypted Capita One password for the account used to process AspireMX requests. |
|
MX - Latest Time to Send Text Message |
Enter a time (hh:mm) beyond which the system will not send text messages to clients. |
|
MX - Number of Days to Keep Job History |
Enter the number of days that message history is to be kept. Message history informs senders when clients have responded to messages they have sent. |
|
MX - POP3 Password |
Enter the password of the POP3 account used to receive emails from clients. |
|
MX - POP3 Port |
Enter the port number of the POP3 account used to receive emails. This defaults to 110. |
|
MX - POP3 Server |
Enter the name or IP address of the POP3 server. |
|
MX - Tracking Number Prefix |
Do not change. For Capita use only. |
|
NCCIS Default Address |
This is an address entered into the monthly XML file for clients with no fixed or known address. NCCIS guidelines recommend that this is the address of your main office. Each line of the address should be separated by a semi colon. You can enter up to six lines. |
|
Neighbourhood Description |
Enter a description to be used as the legend for the neighbourhood. |
|
No. of days before Currency date to display alert |
Enter a number in this field to determine how many days’ notice users get before their clients’ currency is due for review. Beginning at this number of days prior to the currency review, affected clients are indicated by a warning icon in client search screens until their currency is updated. |
|
No. of times to revive Docs or Notes session |
The number entered here is multiplied by the IYSS Interaction Timeout Minutes field to extend the effective timeout value while users are working on documents and notes. |
|
Number of Previously Accessed Clients |
Enter a number here to determine how many previously viewed clients are displayed in the Last N Clients Viewed section of my homepage. |
|
Number of Previously Accessed Providers |
Enter a number here to determine how many previously viewed providers are displayed in the Last N Providers Viewed section of my homepage. |
|
Number of YS Sessions to become a Participant |
Enter a number here to determine the number of sessions in one year clients need to attend to be automatically marked as participants. The automatic markup is performed by an overnight job. |
|
ONE IYSS - Map Link |
Enter the valid URL of a map provider. The following values have been tested and can be used if desired: |
|
Opp Search - Common Opportunity Info |
This enables personalisation of the Vacancy module. |
|
Opp Search - Explanation Notes |
Enter any instructions or information relating to the Opportunity search section of the Vacancy module to be displayed to users/clients. |
|
Opportunity Follow-up Days |
Enter the number of days between an opportunity’s Created On date and the default Follow-up On Date. |
|
PD Provider Follow-up Days |
Enter the number of days between a provider’s Created On date and the default Follow-up On Date. |
|
PostcodeAnyWhere AccountCode |
Leave as ‘not in use’. |
|
PostcodeAnyWhere Licence Key |
Leave as ‘not in use’. |
|
PostcodeAnyWhere Use Per-User Licensing |
Leave as ‘not in use’. |
|
Qualification Points for A Level |
Enter a number here to calculate the points gained from individual qualifications to determine if clients have achieved an overall academic level of A Level or equivalent. |
|
Qualification Points for Higher Education |
Enter a number here to calculate the points gained from individual qualifications to determine if clients have achieved an overall academic level equivalent to higher education. |
|
Qualification Points for NVQ Level 2 |
Enter a number here to calculate the points gained from individual qualifications to determine if clients have achieved an overall academic level of NVQ Level 2 or equivalent. |
|
Recordset CacheSize |
Do not change. For Capita use only. |
|
Re-run month end MI Routine |
Set as 0 for normal month end statistics processing, set as 1 to re-run the month end routine. |
|
Security - Failed Login Attempts to Lock Out |
Enter the number of unsuccessful login attempts permitted before users are locked out. |
|
Security - Force Change Password Days |
Enter the number of days for which a password may be used before the system demands it to be changed. |
|
Security - Memorable Data Description |
Enter the text to be displayed in the legend of the memorable character selection field at login. |
|
Security - Memorable Data Minimum Length |
Enter the minimum permissible number of characters in users’ memorable data. This field should not be changed without One Application Support consultation. |
|
Security - Password Format Alpha/Numeric/CAPS |
To require passwords to include alpha, numeric and uppercase characters, set to 1, otherwise set to 0. |
|
Security - Password Minimum Length |
Enter the minimum permissible number of characters in user passwords. This field should not be changed without One Application Support consultation. |
|
Security - Stop Re-Use of Passwords |
Enter the number of password changes required before a password may be reused. |
|
Session afternoon starts |
Enter a time here (hh:mm) to mark the cut-off point beyond which all new sessions are considered afternoon sessions. |
|
Session all day threshold |
Enter a number to determine how long, in hours, a session must be to class as an all-day session. |
|
Session Description - Overall Reason for Grade |
Enter own text description for display of text box on session. Blank = not in use and will not be displayed. |
|
Session Description - Personal Outcomes |
Enter own text description for display of text box on session. Blank = not in use and will not be displayed. |
|
Session Description - Topic Outcomes |
Enter own text description for display of text box on session. Blank = not in use and will not be displayed. |
|
Session Description - Unexpected Outcomes |
Enter own text description for display of text box on session. Blank = not in use and will not be displayed. |
|
Session Description - YP Reason for Grade |
Enter own text description for display of text box on session. Blank = not in use and will not be displayed. |
|
Session evening starts |
Enter a time here (hh:mm) to mark the cut-off point beyond which all new sessions are considered evening sessions. |
|
Style - Default Activity |
No longer used. |
|
Style - Future Interaction |
No longer used. |
|
Style - Historic Interaction |
No longer used. |
|
Style - Interaction Notes |
No longer used. |
|
Style - Interaction Outcome |
No longer used. |
|
Style - Overdue Interaction |
No longer used. |
|
Substance Misuse Agency Code |
Enter the code used in the NDTMS data extract. |
|
Substance Misuse Core Data Set Version |
Enter the data set version here. This is used in the NDTMS data extract. |
|
Summary Bar Layout - Client |
Leave as ‘not in use’. |
|
Summary Bar Layout - Opportunity |
Leave as ‘not in use’. |
|
Summary Bar Layout - Provider |
Leave as ‘not in use’. |
|
TYS - X Days before plan review due |
Enter a number here to determine the number of days before plan reviews are due that they are displayed in the Plan Review portal. |
|
Use Address PostCode Search |
Set as 1 to enable addresses to be searched by postcode, otherwise set to 0. |
|
Use Vacancy Search Email Address Only |
To use a separate email address for vacancy searches, set to 1. To use the email address of the user managing the vacancy, set to 0. If this field is set to 1, you need to configure the Vacancy Search Email Address system value. |
|
Vacancy Search Confirmation Message |
Enter a message to be displayed confirming successfully sent vacancy applications. |
|
Vacancy Search Email Address |
If the Use Vacancy Search Email Address Only field is selected, enter the vacancy search email address in here. |
|
WEX - Requires Active Slot to Place Client |
Leave as ‘not in use’. |
|
Work Experience Placement Duration |
Leave as ‘not in use’. |
|
X Days User Activity Log Details |
Enter the number of days that the activity records are to be stored in the activity log. Records exceeding this time are deleted. |
|
YJ - Case Review - Default Due Days |
Enter the number of days after creation cases are to be reviewed. |
|
YJ - Case View - Court Appearances Per Page |
Enter the number of court appearances to be displayed on each page in the Court Appearances section. |
|
YJ - Case View - Documents / Notes in Less View |
Enter the number of documents and notes to be displayed in the ‘less’ view. The rest of the documents or notes are displayed by clicking the more button in the panel header. |
|
YJ - Case View - Events Per Page |
Enter the number of events to be displayed on each page in the Court Appearances section. It is module specific. |
|
YJ - Case View - Future Events |
Enter the number of future events you want to be displayed in the Events panel on client records. The other events are accessible through the more button. |
|
YJ - Case View - X AssetPlus Stages Shown in Less |
Enter the number of stages to be listed in the AssetPlus panel on client records in the ‘less’ view. The other stages are displayed by clicking the more button. |
|
YJ - Client Assets requiring review in future |
Enter the number of days before the event that the information is displayed in the alerts view in the YJ Case Managers tool. This function is module specific. |
|
YJ - Clients Appearing in Court in Future |
Enter the number of days before the event that the information is displayed in the alerts view in the YJ Case Managers tool. This function is module specific. |
|
YJ - Clients Nearing Intervention Completion Days |
Enter the number of days before the event that the event information is displayed in the alerts view in the YJ Case Managers tool. This function is module specific. |
|
YJ - Clients with Report due in court in future |
Enter the number of days before the event that the information is displayed in the alerts view in the YJ Case Managers tool. This function is module specific. |
|
YJ - Countersign Asset Assessments, Plans and Reviews |
To require a countersignature in addition to the author’s signature to lock assessments, plans or reviews, set this field to 1. To enable authors to lock assessments, plans or reviews with their signature only, set to 0. This function is module specific. |
|
YJ - Countersign RMP/ROSH/VMP |
To require a countersignature in addition to the author’s signature to lock RMP, ROSH or VMP records, set this field to 1. To enable authors to lock RMP, ROSH or VMP records with their signature only, set to 0. This function is module specific. |
|
YJ - Disable YJ Assets |
To prevent all system users from adding or changing assets or new forms, set this field to 1. To permit users to continue using the assets, set to 0. |
|
YJ - Enable AssetPlus |
To activate the AssetPlus function, set this field to 1. To disable it, set to 0. |
|
YJ AssetPlus – Enable Case Transfers
|
Default setting set to 0. Set the value to 1 when Case Transfers is live. |
|
YJ AssetPlus – Enable Case Transfers for Schema V5.0.1 |
Default settings set to 0. Set the value to 1 when Case Transfers is live. |
|
YJ - Highlight YP Approaching 18 |
Enter the number of days before the event that the information is to be displayed in the alerts view in my homepage. This function is module specific. |
|
YJ - My Assets - Review Approaching Days |
Enter the number of days before the event that the information is to be displayed in the alerts view in my homepage. This function is module specific. |
|
YJ - My Assets - Show ROSH required reminders |
Set to 1 to display ROSH required reminders in my homepage, otherwise set to 0. |
|
YJ - My Assets - Show ROSH review due reminders |
Set to 1 to display ROSH review reminders in my homepage, otherwise set to 0. |
|
Show Vulnerability plan due reminders |
Set to 1 to display Vulnerability Plan reminders in my homepage, otherwise set to 0. |
|
YJ - My Clients Nearing Inter Completion Weeks |
Enter the number of weeks before the event that the information is to be displayed in the alerts view in my homepage portal, Client Interventions Ending Within N Weeks. This function is module specific. |
|
YJ - Pre-court Interviews/Decisions n days |
Enter the number of days before the event that the information is displayed in the alerts view in the YJ Case Managers tool. This function is module specific. |
|
YJ - Pre-populate Stage Rules |
To always pre-populate stage data in any stage following a case closure stage, set this field to 1. To never pre-populate these stages, set to 2. To enable users to decide on a case-by-case basis, set to 3. |
|
YJ - Referrals Received in last Number of Days |
Enter the number of days in the past for which you want to display the information in the alerts view in the YJ Case Managers tool. This function is module specific. |
|
YJ - Signoff Criteria Explanations |
To require the stage section to be signed off prior to completion, leave blank. To remove the need for signoff, set to ‘none’. See Stage Signoff for more details. |
|
YJ - Signoff Criteria Pathways |
To require the stage section to be signed off prior to completion, leave blank. To remove the need for signoff, set to ‘none’. See Stage Signoff for more details. |
|
YJ - Situation Hours Required for <=16 |
Enter the number of hours required for a situation to be deemed suitable for a client less than 16 years old. This function is module specific. |
|
YJ - Situation Hours Required for |16 |
Enter the number of hours required for a situation to be deemed suitable for a client 16 years old or above. This function is module specific. |
|
YJ - Use Automated Message Functionality |
Set to 1 to enable the automated message functionality, otherwise set to 0. |
|
YJ - Use Messaging Functionality |
Set to 1 to enable the messaging functionality, otherwise set to 0. |
|
YJ - Use new values for FOC |
Set to 1 to use the new values for FOC, otherwise set to 0. |
|
YJ - X Number of future events/client |
Enter the number of future events to be displayed for each client. |
|
YJB Connectivity Admin Email Address |
Enter the email address to be used in the Connectivity messages for the YOT’s administration contact. |
|
YJB Connectivity Archive History Days |
Enter the number of days the XML sent/received via Connectivity archive is to be kept. Anything older than this is cleared down. NOTE: The communication record is retained. |
|
YJB Connectivity Hub System ID |
Enter the credentials issued by the YJB. |
|
YJB Connectivity Maximum Submission Attempts |
Enter the number of attempts Connectivity is to attempt to send an XML message before reporting a failure. |
|
YJB Connectivity Message Expiry Minutes |
Enter the number of minutes Connectivity is to attempt to send or wait to receive a response for XML messages before reporting a failure. |
|
YJB Connectivity Organisation Unit Code |
Enter the credentials issued by the YJB. |
|
YJB Connectivity Process EYE Submission |
To activate Connectivity, set this value to 1. To deactivate Connectivity, set it to 0. When set to 0, Youth Justice does not send EYE documents via Connectivity, so the Destination field in the EYE Submission screen is not displayed. |
|
YJ – YJMIS Active Schema Version
|
Latest version updated from 5.0.1 to 6.0.1. This flag will be set to 4.0.0 by default. When the YJB are ready to use the new schema this should be changed to 5.0.1. If any other value is set, or it made blank, system will generate the YJMIS return with 4.0.0 schema. |
|
YJB Connectivity Process YJMIS Submissions |
To automatically send newly-generated YJMIS files to the YJB via Connectivity, set this value to 1. If the value is set to 0, newly-generated files are not sent to the YJB. In this circumstance, the files have no destination, and the Completed On values are determined by the date that the DX processing is completed. |
|
YJ - YJMIS Include Records After Year |
Enter the cut-off year (YYYY) for records to be included in the YJMIS reporting. |
|
YJB Connectivity System ID |
Enter the credentials issued by the YJB. |
|
YJB Connectivity Systems Web Service URL |
Enter the credentials issued by the YJB. |
|
YJB Connectivity YJSM Web Service URL |
Contact YJB for the require URL |
|
YJB MIS Cases Per Part |
Enter the number of MIS cases to include per part. |
|
YJB MIS Configuration |
Do not change this value without consulting with second line support. This value enables you to configure the parameters controlling the optional elements of the YJB submission. By default all optional elements are switched off. |
| YJB MIS - Refresh YJMIS Cache | Default value = 0. Set the value to 1 to refresh the cache data in the tables. The value will automatically reset to 0 after the refresh is complete. |
|
YSMI Contact % |
Set this value for the current rates. |
|
YSMI Participant % |
Set this value for the current rates. |
|
YSMI Participant Accredited % |
Set this value for the current rates. |
|
YSMI Participant Recorded % |
Set this value for the current rates. |
|
YSMI Population Accredited % |
Set this value for the current rates. |
|
YSMI Population Recorded % |
Set this value for the current rates. |