![]()
Results Organiser
The purpose of the Results Organiser is to allow the user to view and save. a Results data analysis for a selected student or group of students based on Student Criteria, or those populating an AreaArea, ClusterCluster, Aspects, Gradesets, Marksheets and TemplatesTemplates.
The Results Organiser comprises, the Results Organiser grid area, the Populate Grid side panel and function icons. It allows students to be selected and results data to be displayed in spreadsheet format. An analysis is created by adding a new analysis, setting up and inserting your own information or by loading a Template or Marksheet. The Populate Grid panel provides the options for defining your Results analysis.
The Populate Grid side panel is divided into six groups: Set Result DateSet Result Date, Choose Students byChoose Students by, Choose an Area, Cluster or GroupChoose an Area, Cluster or Group, Choose Aspects byChoose Aspects by, Choose a TemplateChoose a Template and Choose a MarksheetChoose a Marksheet.
The Results Analysis Function icons along the top of the grid allow you to manipulate the analysis. Further options are offered by the Save as and Clear Grid.
- Results Organiser GridResults Organiser Grid
When the Results Organiser menu is selected, a blank page is opened with the Students column header in the top left hand corner. All analyses focus around students. Use the options in the Populate Grid panel to set up your analysis and the function icons to manipulate the data.
A simple analysis could be to view results for a single student:
To do this click the Student Enquiry (QBE) option to search for the required student. When selected the student’s name will be displayed on the Y-axis. To find results for the selected student click the Populate Results icon. The system will populate the X-axis with Aspects and associated results. Alternatively, you may wish to view results against one or more Aspects. In this scenario, select the required Aspect(s) and click Populate Results. This will produce all students and associated results held in the database for those Aspects.
To create an analysis for student(s) that are known to you, choose student by selecting the Student Enquiry (QBE) or where students have a common attribute select by Student CriteriaStudent Criteria. To use UDFs as search criteria you must check the Include UDFs box at the top of the page.
Alternatively, you may already have placed the students in a Grouping or they fall within a geographical Area or a Cluster, in which case select the appropriate option.
You may wish to populate the grid by selecting individual Aspects, an Aspect Hierarchy, Gradeset or by choosing a Template.
Selecting a Marksheet will populate the grid with both Students and Aspects.
Once you have set up your requirement, clicking the Populate Results icon will offer you the choice to return All Results data or Results Filtered by Date. The filter option will return results data within the defined date range set on the Populate Grid panel.
The data may be edited by adding new results and changing existing results; copy and paste functionality is available by right clicking on a cell and selecting appropriately. If an invalid result value is entered in a cell an error message is displayed. Some columns may be defined as Read-Only which may not be edited unless you are the author; such columns have a different background colour.
Each column has click sortclick sort functionality, which orders the grid by the selected column.
Edited data may be saved to the database by clicking the Save icon. Results History can be viewed by right clicking on a cell. Where more than one result per Aspect per Student is stored in the database a small RED triangle is displayed in the cell; the hover information will indicate (Multiple Results). Right click to view the history.
Contextual data columns may subsequently be added to the grid by right clicking on a student name and selecting Contextual Data. This will open the Choose Contextual Data dialog.
Hovering on a cell containing a result will display the Result Date.
- Choose Contextual DataChoose Contextual Data
This dialog is opened by right clicking in the student column and selecting Contextual Data. It allows you to add student information columns to the grid from Student DataStudent Data, Student HistoryStudent History and Student School HistoryStudent School History.
All options are checkbox controlled. A ticked box will include that item as a column in the grid.
- Results HistoryResults History
Right clicking on a cell allows you to view the Results History. This lists results in date order showing the actual result and Resultset Name. Double clicking on a results row will open the Result Details panel. This contains a Result Notes panel which allows the import and export of Result Notes from PULSE. Result Notes are included in the Attainment Result entity and will be displayed in this panel.
- Populate GridPopulate Grid
Populate Grid is a side panel which allows you to define your Results analysis by populating the X and Y axes with Aspects and Students. Your requirements are selected by choosing from the available options.
There are three options for Student selection:
Student Enquiry (QBE) This option allows you to select individual students. Student Criteria Student criteria can currently be by NCY, Gender, SEN Stage, FSM Status, Base, Home Language, Religion and Ehtnicity. Area, Cluster or Grouping This will return students in a geographical Area, those included in a Grouping or School Cluster. Aspects can be populated from any of the following options:
Aspects This option allows you to select individual Aspects. Gradeset This allows you to populate the X axis (top) with individual gradesets. Aspect Hierarchy An Aspect Hierarchy is a set of Aspects. Selecting a Hierarchy will insert all Aspects contained within it. Template Opens a modal version of the Templates Enquiry, allowing you to search on Template Name, Author or Date Created criteria. Marksheet A Marksheet contains both Students and Aspects. These will populate both X and Y axes. If a Results analysis has been saved as a Marksheet, this will be prepopulated with results data. Filter by Date The Date From and Date To fields allow you to define a date range of results. The Date To field will default to the current system date (today) and the default Date From field will be two years earlier. Contextual data may also be selected with an effective date outside the date range selected, however, a warning will be displayed but you may continue.
- Right Click FunctionalityRight Click Functionality
Use this functionality to manipulate the analysis.
Copy Results This option will copy all results in a column to the clipboard. Paste Results This will paste the results on the clipboard into the column. Paste Value into Results This will paste a single valuesingle value into all cells in a column. Blank Results Select this option to remove all results from a column. View Aspect Details This option opens the Aspect Definition Details dialog which allows you to change aspect details. View Column Properties This will open the Edit Template Column dialog allowing you to change column properties and save them to a new Template. Select Grade for Results This opens the Select Grade dialog which will display grades for the associated GradeSet. The selected Grade will be applied to all cells in the column. Show Grade Distribution This will show a percentage ratio of the column. Refresh Results This will return the column to its original results. Calculate Results This option is only available for Formulae columns, marked with f. - Edit Template Column PropertiesEdit Template Column Properties
This dialog is opened from the Results Organiser page by selecting View Column Properties from the right click menu pointing to a column header. It allows you to change the Column Heading label and, in some cases, the Read Only and Hidden properties of the selected Template. The Aspect Name cannot be edited.
Save your changes and close the dialog. To put your changes into the Results Organiser, now select Save As | Template (Aspects) and apply a new name.
Click Template in the Property Grid and search for your new Template. When Select is clicked the message, Are you sure you wish to apply the selected Template? The current selection criteria will be cleared, will be displayed. Selecting Yes will clear the grid, replacing the original Template with the newly defined Template headers. The Aspect properties of the column will not change and the re-populated results and students will be the same.
Alternatively, you can select the Clear Grid | All function icon before selecting your newly defined Template.
- Results Analysis Function IconsResults Analysis Function Icons
The function icons along the top of the grid allow you to manipulate the analysis. Further options are offered by the Save as and Clear Grid.
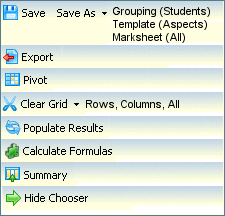
Save Saves the Analysis to the database, incorporating any edited results. Save As Gives the options to save the Students as a Grouping, the Aspects as a Template or Hierarchy and save Students and Aspects (All) as a Marksheet. Export This exports the Analysis as an XML spreadsheet.The spreadsheet will automatically be displayed. Pivot This option will transpose the axes. It will not allow you to transpose the axes if there are too many students (Max. 250). Clear Grid Gives options to clear the whole grid (All), clear Columns or Rows. Populate Results Automatically starts a background process to gather data for the analysis. If the data is subsequently edited or one or more rows (students) are deleted from the grid and this button is clicked again, the process will be repeated and the edited data will be overwritten. This method will once again generate data using the original cohort. Calculate Formulas Formulae fields are indicated by f. Data can be edited and recalculated as required. Populate Results allows you to gather the original data. Summary Clicking Summary inserts a group of rows at the foot of the grid showing calculations based on the Number of Results, Total Points, Mean Points, Maximum and Minimum result. Hide Chooser This is Show/Hide which toggles the Populate Grid panel. - Delete ResultsDelete Results
The Delete Results routine is accessed via the Results Management menu. It allows users, with appropriate rights, to define a series of selection criteria on which results can be identified and subsequently deleted from the database.
The Delete Results page allows you to set the required parameters under which Results will be deleted for students where any combination of the selection criteria specified is true.
Select the criteria in the following panels, according to your requirements, and click the Delete Results icon, located at the top of the page. A message will be displayed informing you that the delete process is irreversible. Click OK to proceed.
The system will only allow you to delete one year's worth of results at a time. The delete process will search the system for student results according to the criteria, after which a message box will be displayed informing you to check your workflow messages which will state how many results have been deleted from the system.
All delete processes are logged and displayed in the Delete Results Log. This is opened by clicking the View Log icon.
Result Base Options
By default this will be set to All Bases but users will be able to limit the Bases selection availability or identify a specific Base, by selecting an appropriate Base Type or Base in the Result Base panel, for which student results will be deleted.
The filter options are:
No Recorded Base With this option the criteria set for the delete process will be applied to all students who do not have a recorded Registered Base. Base Type With this option, select a Base Type from the drop-down list, eg PRI, MID. This option will delete results according to the criteria, for all students at Bases of the selected type. (The Base Lookup will not be enabled.) Specific Base (School History) Select a Base by clicking the Base Lookup browse icon. This will open the Base Enquiry dialog, allowing you to search for a specific Base. This option references School History in conjunction with Result Date to identify the results for a Base that are to be deleted. This option does not use the LA and School Numbers linked to the results, and will therefore allow you to delete results imported from CTF files. For inclusion in the delete process the system will look at the Start and End Dates of the selected Base and then reference the Result Date for Results, to determine if a Result Date falls between the Start and End Dates - only these results will be deleted. If there is no End Date the current system date will be used. (Base Type will not be enabled.) Specific Base (Results) Select a Base by clicking the Base Lookup browse icon. This will open the Base Enquiry dialog, allowing you to search for a specific Base. This option references the RESULTS table using the LA Number and School Number from the selected Base. (Base Type will not be enabled.) All This option will select all results for deletion according to the criteria specified, regardless of Base Groupings
The default setting in this panel is none. This will include All Students irrespective of Grouping. You may be specific, if required, by selecting students in an Area, Cluster or Grouping. To do this click the Add icon which will open the Area, Cluster and Groupings Enquiry dialog.
Date Options
If this area is left blank, the system will not look for date specific students results. This is the default setting.
If required enter a Date Range in the From and To date fields. These dates represent the Result Dates recorded in the Results Organiser. The system will only allow one year's worth of results to be deleted at a time. If the date range is greater a message will be displayed in the Status Bar at the foot of the page. This data is held in the RESULTS Table.
Combined with other criteria, eg Specific Base (School History), all results falling within the date range will be deleted.
Result Set Option
If this area is left blank, the system will not look for results associated with a specific Result Set. This is the default setting.
To select a Resultset click the browse icon. This will open the ResultSet Enquiry dialog. Any results for deletion will then be those linked to the selected Resultset.
Selected Aspects
The Aspect Options panel allows you to set an Aspect criterion. By default All Aspects will be included in the delete process. Clicking the Add icon will open the Select Aspects Enquiry dialog, allowing you to select specific Aspect(s) for which you wish to delete results.
If multiple Aspects are selected and you wish to simply remove the Aspect, highlight the Aspect and click the Remove icon.