![]()
Introduction to Transport Administration
Access to the Home to School Transport Administration page is via v4 Online | Citizen Portal Admin | Administration.
Parents, guardians and carers can make an application for transport from home to school and vice versa. Applications are loaded into the Transport module for processing and batch checking.
Transport applications are made in the Citizen Self Service portal. The students involved in the applications are matched via the Portal Back Office functionality before the applications are loaded into the database.
Transport uses the same import method as B2B:Student. Before this import process can begin, a dummy base must be created as a B2B:Student Base. This can be done via v4 Client | Focus | Bases | Base Definition or v4 Online | Bases.
Once the dummy base has been created a user is mapped to it. The user’s User_ID is used to identify that a record has been received from the Citizen Self Service portal.
In addition, the following settings must be configured in order to enable Transport applications to be made on the Citizen Self Service portal and subsequently processed:
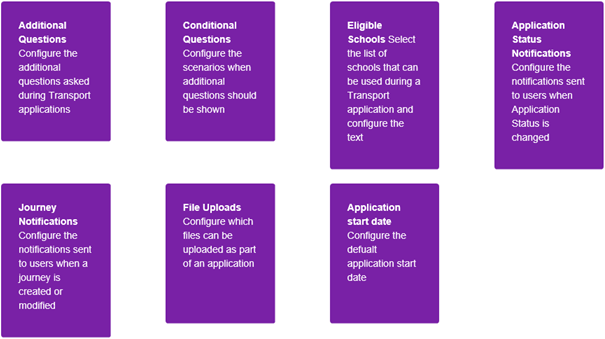
Additional Questions
Configure the additional questionsadditional questions asked during Transport applications.
As part of the transport application process, additional questions can be set by the local authority. It is not mandatory to configure additional questions. However, any additional questions that are set must be answered by the applicant before the application can be continued.
When the parent, carer or guardian makes a Transport application, they will see the additional questions on Step 4 | Additional Info.
![]()
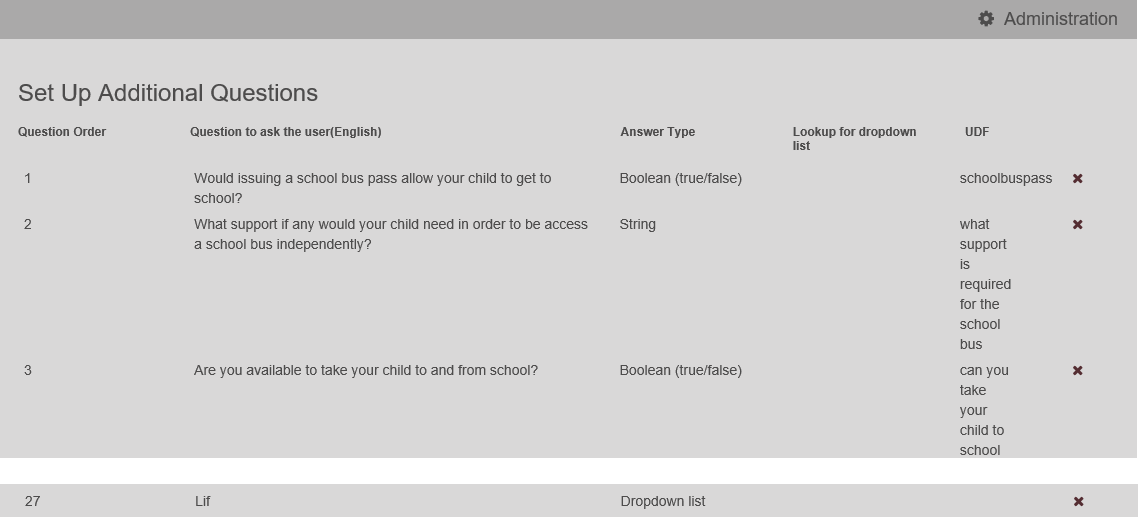
To configure additional questions:
- Click the Additional Questions button to display the Setup Additional Questions page. Existing questions are displayed in number order.
Disbursement, SEND and LIF questions are now configurable in this area.
- Select from the following options:
- Add a question
- Click the Add Question button to display the Additional Questions Form dialog. Questions can be added in either English or Welsh.
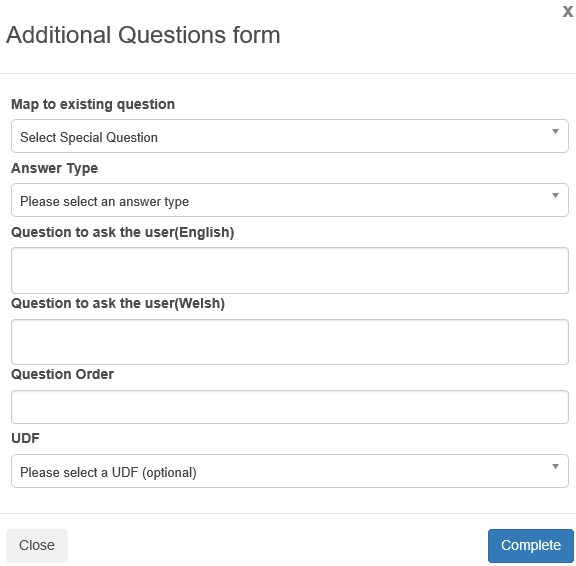
- Enter details as required.
- Click the Complete button to return to the Setup Additional Questions page.
The Answer Types are edited via General Administration | Edit Resources | Resource Configuration Title | Administration. String AnswerType_String Date AnswerType_Date Email AnswerType_Email Decimal AnswerType_Decimal Drop-down list AnswerType_DropDown Boolean AnswerType_Boolean Integer AnswerType_Integer - Click the Add Question button to display the Additional Questions Form dialog. Questions can be added in either English or Welsh.
- Edit a question
- Click the question to edit to display the completed Additional Questions form.
- If there are responses associated with the chosen question a warning will be displayed:

- Make the required changes. All of the fields can be edited.
The Answer Types are edited via General Administration | Edit Resources | Resource Configuration Title | Administration. String AnswerType_String Date AnswerType_Date Email AnswerType_Email Decimal AnswerType_Decimal Drop-down list AnswerType_DropDown Boolean AnswerType_Boolean Integer AnswerType_Integer - Click the question to edit to display the completed Additional Questions form.
- Add a question
Conditional Questions
Configure the scenarios when additional questionsadditional questions should be shown.
Conditional questions can be set by the local authority to be displayed as part of the Additional Question section of the transport application. It is not mandatory to configure conditional questions. However, any conditional questions that are set must be answered by the applicant before the application can be continued.
When the parent, carer or guardian makes a Transport application, they will see the conditional questions on Step 4 | Additional Info.
![]()
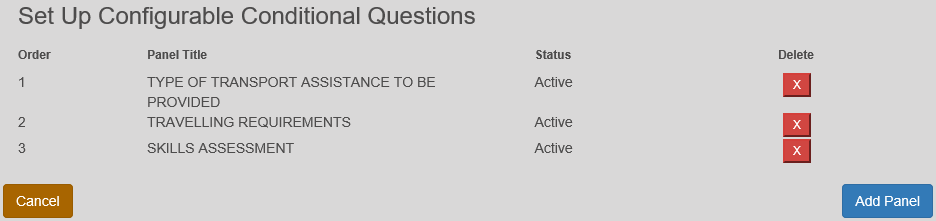
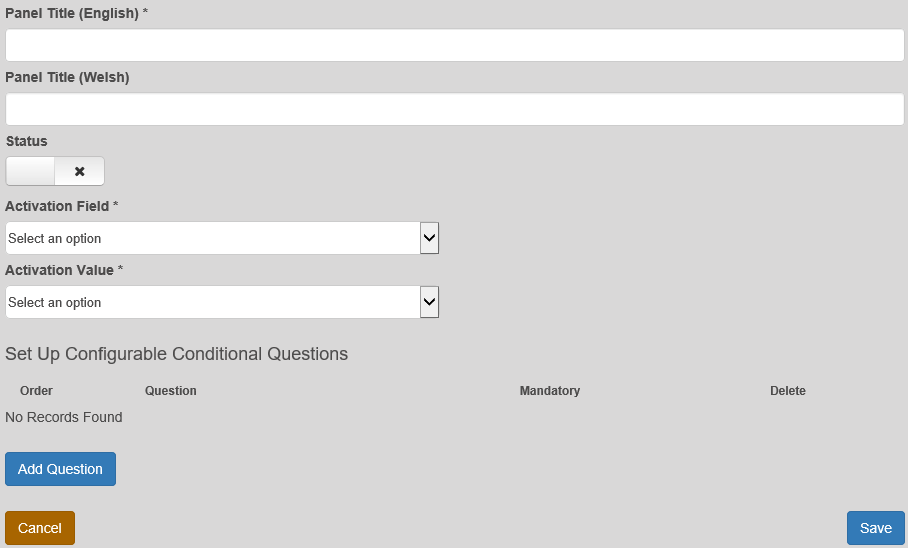
- Click the Conditional Questions tile to display the Set Up Configurable Conditional Questions page.
Existing questions are displayed in number order.
- Select from the following options:
- Add a question
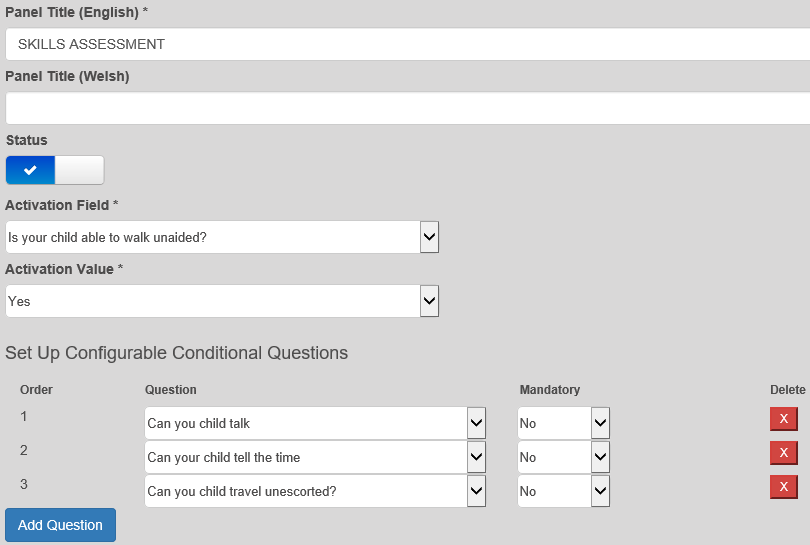
- Click the Add Panel button to display a blank panel.
Panel Title can be added in either English or Welsh.
- Click the Add Question button to display the Set Up Configurable Conditional Questions section.

- Enter details as required.
- Click the Add Panel button to display a blank panel.
- Edit a question
- Click the question to display the completed Conditional Questions panel.
Select from the following options:- Make the required changes. All of the fields can be edited.
- Click the Add Question button to add additional questions.
- Click the X button to delete existing questions.
- Click the question to display the completed Conditional Questions panel.
- Delete a question
Click the X button to delete a question from the panel.
- Add a question
Eligible Schools
Select the list of schoolslist of schools that can be used during a Transport application and configure the confirmation text shown to users.
Not all schools are supported by local authorities for transport. The Eligible Schools option enables your local authority to configure groups of bases that can be selected by the Citizen Self Service portal user when applying for transport for their child.
Configuring the base groups means that the user is directly informed whether or not the school they have selected is eligible for transport.
Bases are allocated to base groups via v4 Online | Bases | Base Groups.
Eligible schools and base groups are configured via v4 Online | Citizen Portal Admin | Administration | Transport Administration | Eligible Schools. There are two parts to configuring eligible schools:
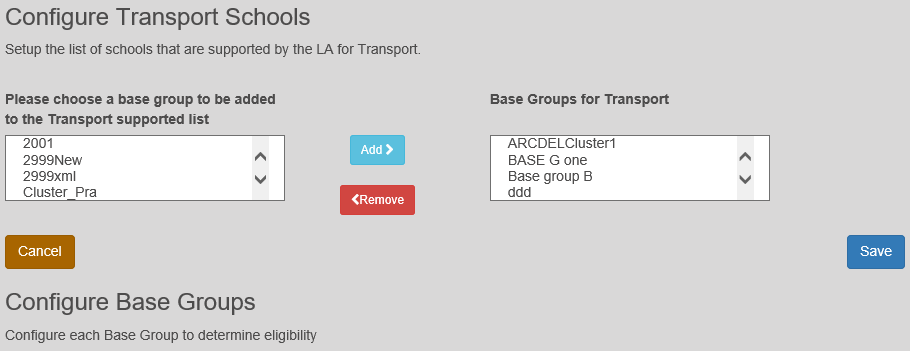
- Configure Transport Schools
On the Configure Transport Schools panel: -
- In the left hand panel, highlight the required base group(s).
Click the Add button to transfer the base group to the Base Groups for Transport panel.
The base group displays in the Configure Base Groups panel when Save is clicked. - In the right hand panel, highlight the required base group(s).
Click the Remove button to remove the base group from the Base Groups for Transport panel.
- In the left hand panel, highlight the required base group(s).
-
Configure Base Groups.
Base groups can be configured to display text to the Citizen Self Service portal user when that user selects a school belonging to a particular base group as part of their transport application.This feature enables the local authority to immediately inform the parent, guardian or carer whether the chosen school is supported in their transport application. Additional information is provided to explain why their chosen school is or is not supported. This is useful, for example, if the local authority provides transport to mainstream schools, but not to faith schools.
To configure base group display text:
- On the Configure Base Groups panel, click the required base group button to display the message options for the base group.
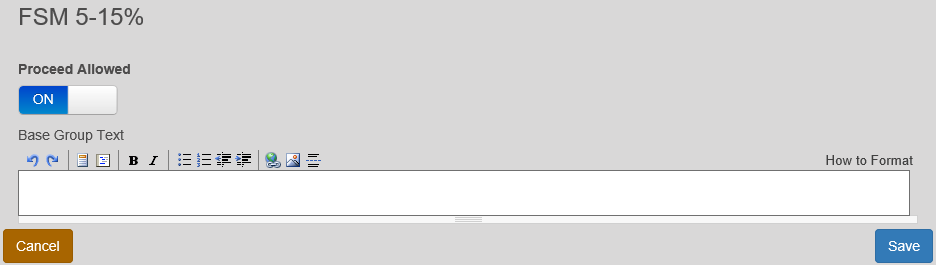
- Ensure that the Proceed Allowed button is set to the ON position.
- Enter the required text in the Base Group Text field. The formatted message is displayed below the memo field.
- On the Configure Base Groups panel, click the required base group button to display the message options for the base group.
Application Status Notifications
Configure the notificationsnotifications sent to user when the application status is changed.
Updates are sent to the relevant parent, carer or guardian when a transport application is processed in the Citizen Self Service portal
The Application Status Notifications page enables the local authority to configure which status is displayed to the Citizen Self Service user at each stage of the application process.
The page also enables the local authority to define which message templates are sent to the user when the status of an application changes.
Message details are not sent directly to the Citizen Self Service portal user. A notification is sent to the user’s email address, informing them that they have a message in their portal account. The user must log in and authenticate with the Citizen Self Service portal before they can view the message details.
- Select the Application Status Notifications tile to display the Transport Application Status Notifications page.
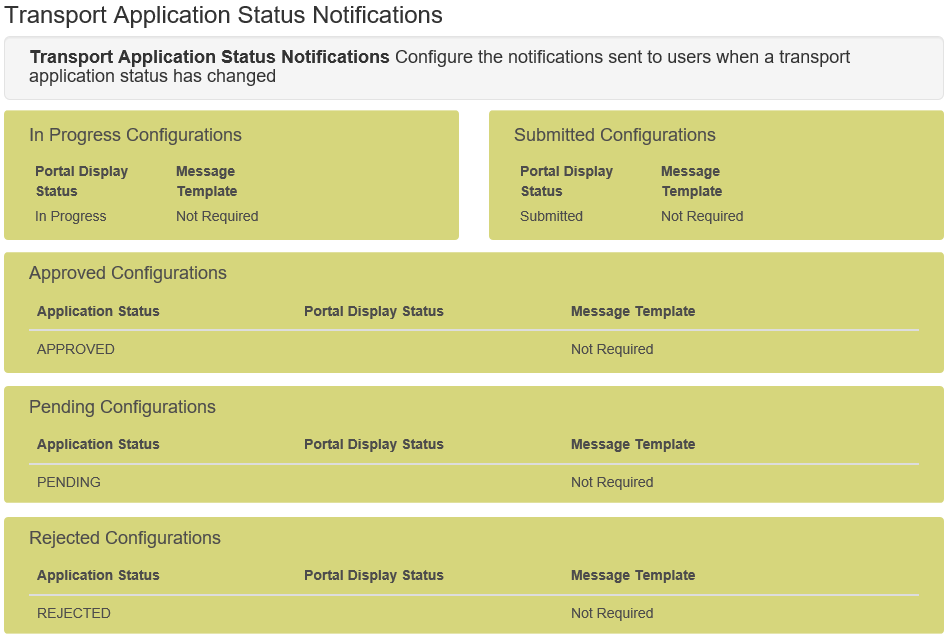
- Select the status configuration you wish to edit notifications for. There are five available options:
- In Progress Configurations:
Applications which are incomplete (i.e. not yet submitted). - Submitted Configurations:
Applications which have been submitted but have not yet been added to Transport Back Office. - Approved Configurations:
Applications with a status code of Approved. - Pending Configurations:
Applications with a status code of Pending. - Rejected Configurations:
Applications with a status code of Rejected.

Applications can be rejected from the Citizen Self Service portal itself (if they contain conflicting address or person data that is subsequently discarded from Portal Back Office during the import process) as well as from Transport Back Office. The applicant will receive the communication in either case.
- In Progress Configurations:
- Select details as required.
Journey Notifications
Configure the notificationsnotifications sent to users when a journey is created or modified.
Journey Notifications enable LAs to notify Citizen Self Service portal users when a journey related to their application is either created or updated.
This section deals with configuring the circumstances in which a message would be sent to a user.
Message details are not sent directly to the Citizen Self Service portal user. A notification is sent to the user’s email address, informing them that they have a message in their portal account. The user must log in and authenticate with the Citizen Self Service portal before they can view the message details.
- Select the Journey Notifications tile to display the Journey Notifications page.
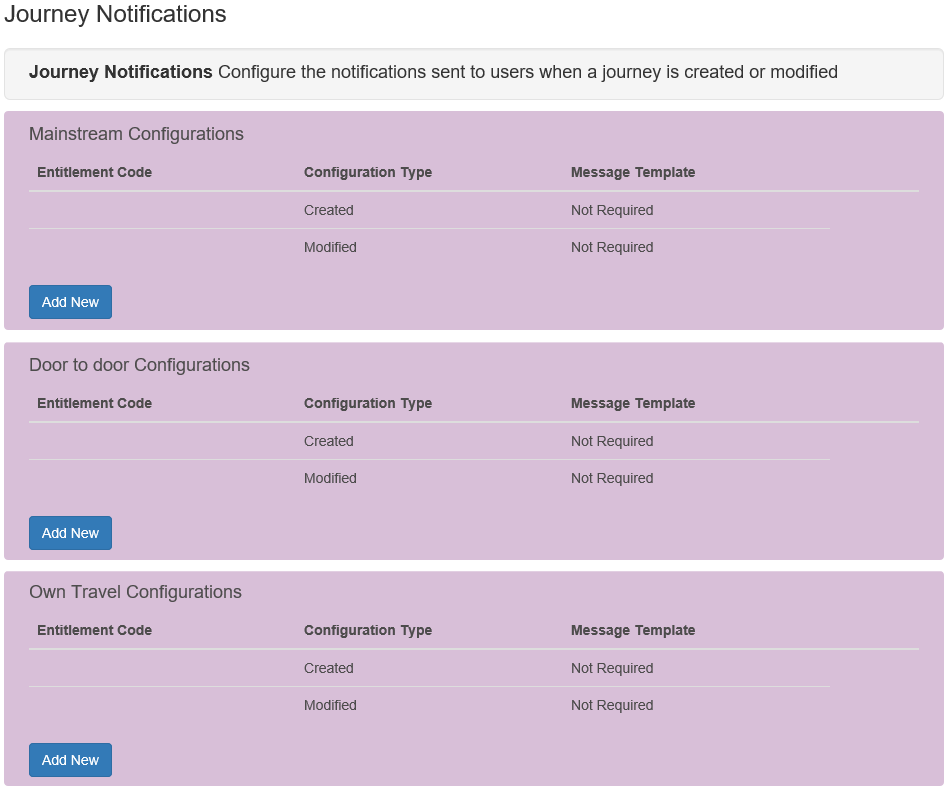
- Select from the following options:
- Add a notification
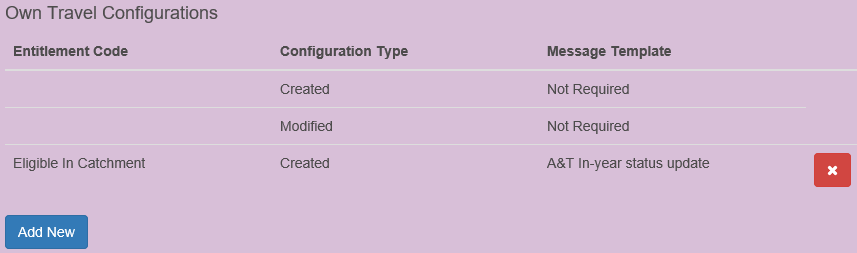
- Click the Add New button in either the Mainstream Configurations, Door to door Configurations or Own Travel Configurations sections, depending on the type of journey notification you wish to create. The Add/Edit Journey Notification Configuration dialog is displayed.
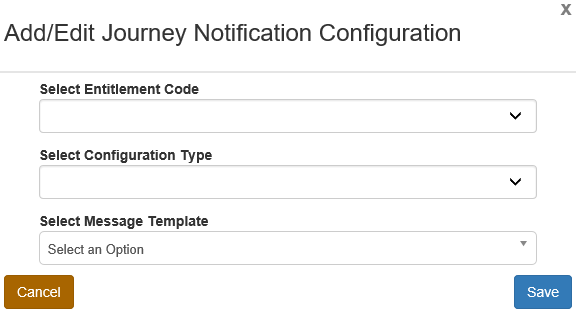
- Select details as required.
- Click the Add New button in either the Mainstream Configurations, Door to door Configurations or Own Travel Configurations sections, depending on the type of journey notification you wish to create. The Add/Edit Journey Notification Configuration dialog is displayed.
- Edit a notification
- Select a notification to display the Add/Edit Journey Notification Configuration dialog.
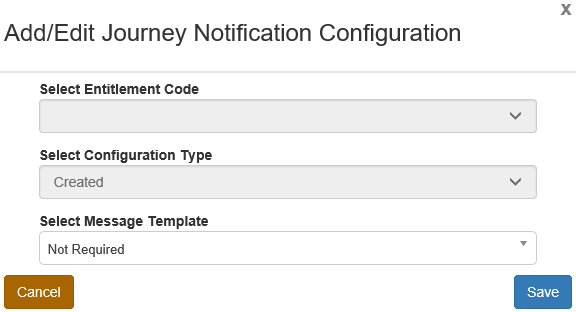
- Make the required edits.
Each of the journey types (Mainstream, Own Travel and Door-to-door) has pre-populated notifications for created and modified journeys. You can only edit the Message Template used in these notifications. The Entitlement Code and Configuration Type field are disabled.
- Select a notification to display the Add/Edit Journey Notification Configuration dialog.
- Delete a notification
- Click the cross next to the notification you wish to delete. A confirmation dialog is displayed.
- Click the Confirm button to delete the notification and close the dialog.
You cannot delete the pre-populated journey notifications.
- Click the cross next to the notification you wish to delete. A confirmation dialog is displayed.
- Add a notification
File Uploads
ConfigureConfigure which files can be uploaded as part of an application.
Applicants can upload documents to support their application. Options presented will be Accepted File Types, Maximum File Size and Maximum Number of Files.
To configure file uploads:
- Click the File Uploads tile to display the Setup File Uploads page.

- Select options as required.
Application Start Date
ConfigureConfigure the default application start date.
Applicants can now select the start date that they would like the application to start from. Options presented will be Start of school year and Another Date. More than one option can be configured for the start of the school year.
To configure application start dates:
- Select the Application Start Dates tile to display the Configure application start dates page.
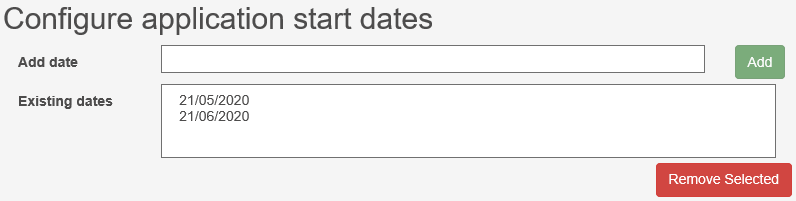
- Select from the following options:
- Add Application Start Dates
Click the Add date field and select a start date from calendar.
Click the Add button to add the date to the Existing dates field. - Remove Application Start Dates
Highlight a date in the Existing dates field.
Click the Remove Selected button to delete the date.
- Add Application Start Dates