![]()
Record a Provision
Release notes for Spring 3.88
Prevent transaction payments being deleted when issued or authorised
Prevent base change if provision has Authorised or Issued transactions
View Provision ID in Provision Summary and Provision Details
Charge Type column added to Charge/Cost Details
Prevent Charge/Cost data from retained entries being updated
Although SEN v4 enables you to record a provision against a student, the following procedure assumes you want to create a provision against an involvement.
If you record a provision directly against a student, you will not be able to report on provisions recorded against student’s involvements.
Before you start
Decide which provision method to use, i.e. Service Provider Link or Charge Type and Service. Make sure that the relevant entities have been set up, e.g. service providers, services, charge types etc.
Other prerequisites for creating provision records are:
- You must have the appropriate access rights.
- Provision years (academic or financial) with start and end dates must be defined.
- A service category must be set up and linked to your SEN service team.
- Lookup codes must be populated during the service team definition.
Add a Provision to an Involvement
- Open the Student's record you want to record the provision against.
- Click Involvements link from Links panel to display the Involvement Summary dialog showing all active involvements for this student.
- Select the required completed involvement.
- Click the Provision link from the Links panel to display the Provision Summary dialog.
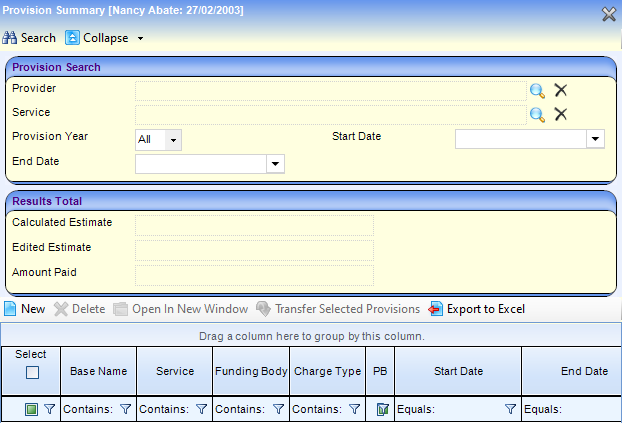
The Provision Summary dialog displays provision records which already exist for this student’s involvement and enables you to create new provision records.
- Click the New button to display the Provision Allocation dialog.
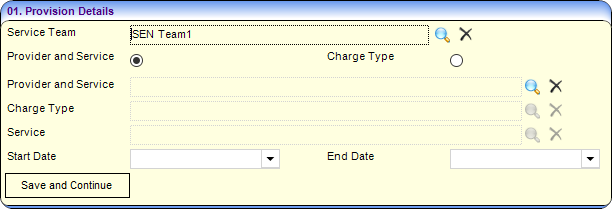
- Select the required Service Team.
- Select the provision method you want to use for this student, i.e. Provider and Service or Charge Type.
You can use only one provision method, i.e. either ‘Service and Provider Links’ or ‘Charge Type and Service’
Enter the next fields on this panel depending on which provision method you chose. - Select the Start Date for the provision. If the provision is for a limited period, you can select an End Date, but it may be left blank for ongoing provision needs.
- To save and generate the provision, click the Save and Continue button to display the full Provision Details panel and the Charge/Cost Details panel.
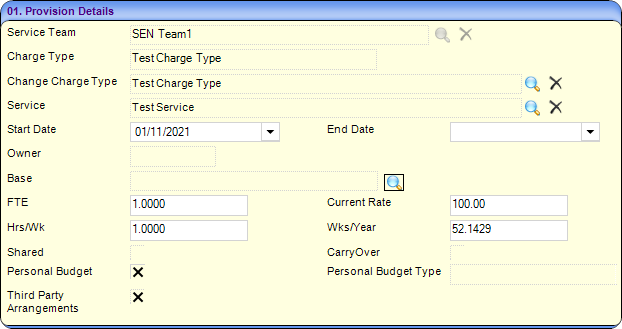
Charge Type and Service:
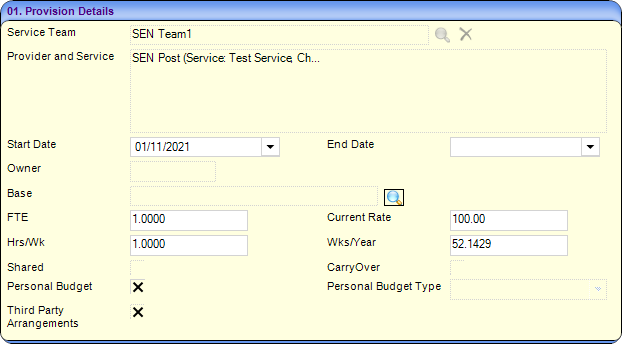
Provider and Service:
Change the Charge Type
If you are used the Charge Type and Service method, after you save, an additional Change Charge Type field is displayed, and the Charge Type field is made read-only. You can change the Charge Type, if necessary, and a new Service can then be selected. The Charge Type field is updated when saved.
When you click the Change Charge Type browse button, a dialog is displayed from which you can select an alternative charge type. If you select a new charge type, a Preview dialog is displayed so you can see the effects of the new charge type on the provision costs:

Personal Budget
When you add the provision record, a Personal Budget check box enables you to identify the provision as a personal budget.

To record the provision as a personal budget:
- Select the Personal Budget check box.
- Select one of the following Personal Budget Types:
- Direct Payment – Education
- Direct Payment – Health
- Direct Payment – Integ Funding
- Direct Payment – Social Care
- Organised Arrangements
- If the personal budget provision for a direct payment is a direct payment made to other people, select the Third-Party Arrangements check box.
Edit Charges
To change the charges to reflect new costs, if required, click the Edit icon. This opens the Cost Details dialog where you make the required changes.
Changes made in the Edit dialog affect all records using that charge type.
Record payments against a provision
- In the Charge/Cost Details panel, highlight the required provision.
- Click the Payments button to display the Provision Transactions dialog.
- Complete the Transaction Details panel, as required.
- Click the Save button to display the transaction details in the top panel in the Provision Transactions dialog.
- Close the window to return to the Provision Allocation dialog.
- Enter details in the remaining panels on the Provision Allocation page as required:
- Payee Details: Record the payee details against a provision.
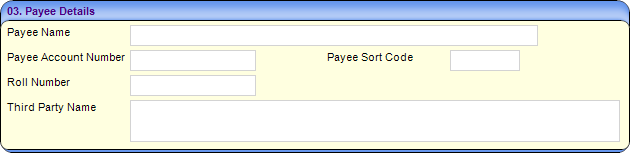
- Payee Name: Free text with a maximum of 50 characters.
- Payee Account Number: Numeric only, with a maximum of 15 characters.
- Payee Sort Code: Numeric only, with a maximum of 8 characters in the format 00-00-00.
- Roll Number: If the payee is a building society you can enter the account roll number. Numeric only, with a maximum of 15 characters.
- Third Party Name: Free text with a maximum of 100 characters.
- Funding Body:
- Click the Add button to display the Provision Funding Details dialog.
- Funding: Select the required funding body.
- Percentage: If required, change the default to reflect the percentage provided by this funding body.
- Click the Save button.
- Funding LA: It is mandatory to add the Local Authority that is funding the provision.
- Click the Add button to display the Lookup Codes – LEA Name dialog.
- Highlight one or more local authority codes.
- In the Key Contacts tab window, you can add key contacts by selecting the required check boxes.
- Click the Select button.
- Provision Reasons:
- Click the Add button to display the Provision Reason Chooser dialog.
- Highlight one or more Reason Codes.
- Click the Select button.
- Specialist:
- Click the Add button to display the Person Enquiry dialog.
- In the Person Enquiry tab window, you can search for and add people on the people database.
- In the Key Contacts tab window, you can add key contacts by selecting the required check boxes.
- Click the OK button.
- Payee Details: Record the payee details against a provision.
- Click the Save button.
Funding bodies are defined via Tools | Administration | Lookups; the lookup only displays those defined with an external code of LEA. If only one funding body is listed for the provision, it automatically populates this field.
Provision Transfer Wizard
The Provision Transfer Wizard lets you transfer one or many provisions for a subject if they move from one base to another.
The permissions for Provision Transfer are set up via Tools | Permissions | User Group Processes | Main Business Process – CSS Administration | Provision Base Transfer.
To transfer a provision:
- Select Focus | People | Student/Person/ICS Person | Provision to display the Provision Summary screen.
- Select the provisions for the subject that you wish to transfer; the Transfer Selected Provisions button is activated.

- Click the Transfer Selected Provision button to display the Provision Base Transfer Wizard (1 of 3) dialog.
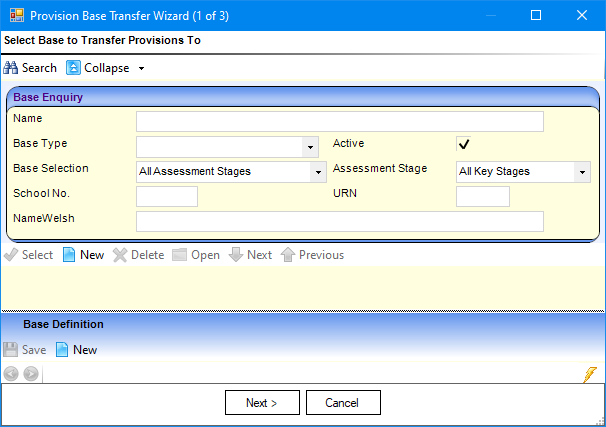
- In the Base Enquiry panel, search for the base to which you wish to transfer the selected provision.
- Enter the search criteria fields, e.g. Name.
- Click the Search button to display the results in the results panel.
- Select the base to which you want to transfer the selected provision.
- Click the Next button to display the Provision Base Transfer Wizard (2 of 3) dialog.
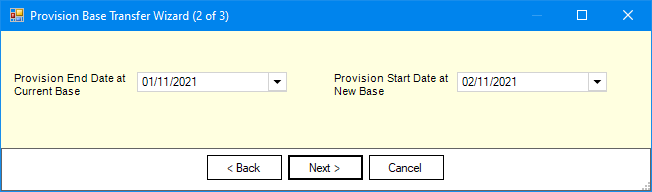
- If required, change the dates.
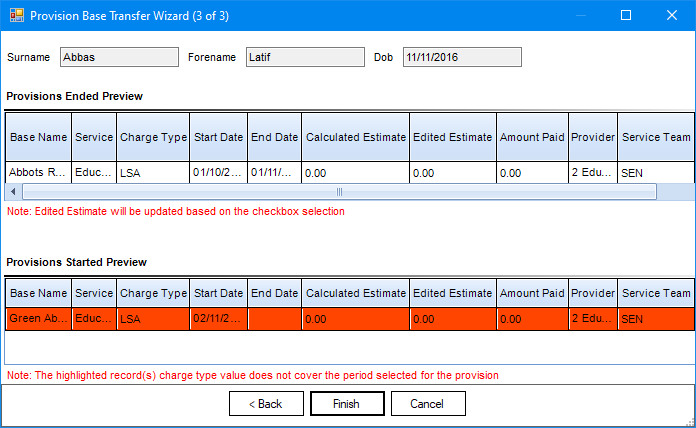
- Click the Next button to display the Provision Base Transfer Wizard (3 of 3) dialog.
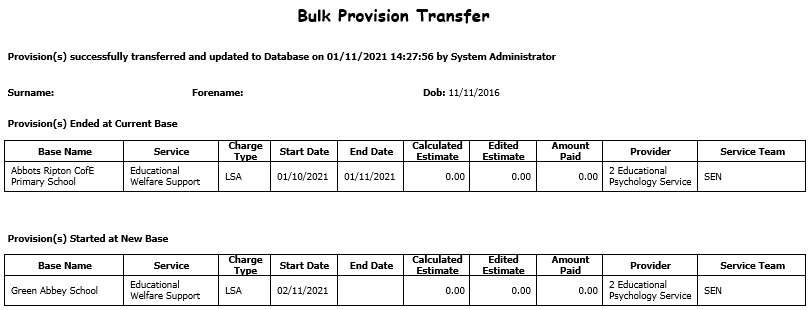
The Provision Base Transfer Wizard (3 of 3) displays the changes made to the original base in which the provision is ended, and the provision being transferred to the new base.
If a provision year has not been set up to cover the date range of the provision, the following warning message is displayed:
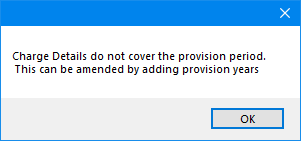
To acknowledge the message, click the OK button.
Panel messages:- The Provisions Ended Preview panel warning message (in red) is a reminder that if you do not select the Update Edit Est check box, then the Edited Estimate field is not updated when the provision is transferred.
- The Provisions Started Preview panel warning message is a reminder that the Start Date and End Date of the Charge Type Value do not span the provision date.
- Click the Finish button to display the following message:
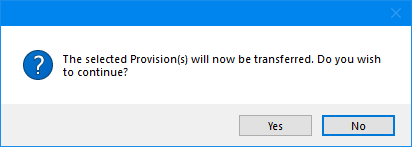
- Click the Yes button to display the following confirmation message:
- Click the OK button to display the following message:
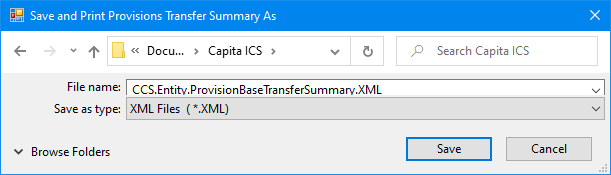
- Click the Yes button to save the record to a specified folder. The report displays.