![]()
Complex Lookups
Complex lookups perform different functions within the system. This section explains how to configure them in IYSS System Administration Client.
Aspiration Types
If you only use high level data, aspiration types can exist without being linked to aspiration sub-types. Where it is to be linked to sub-types, these must be created before changes are made to the aspiration type.
Aspiration Types can interact with aspiration subtypes. Changes should not be made to these values without prior consultation with Application Support.
Existing aspiration can be edited. New types cannot be created.
- Select Client | Aspiration Type in sysadmin client.
- In the Value column, double-click the required type to display the Aspiration Type dialog.
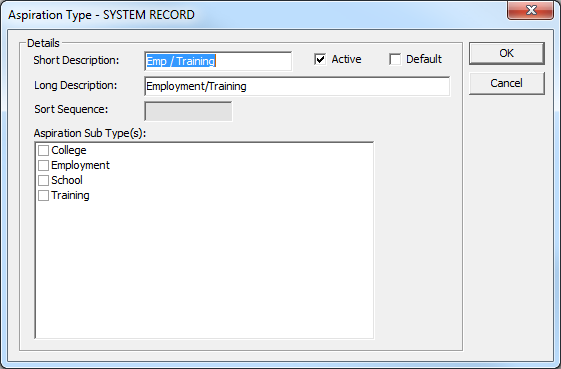
- If required, edit the Short and Long Description fields.
- Ensure the Active check box is selected.
- In the Aspiration Sub Type(s) list, select or deselect the subtypes as required.
- Click the OK to save the changes and close the dialog.
Assessments
Assessments are made up of value sets, elements and progress sets. All parts are required for, and must exist prior to, the creation of assessment templates.
To create a new assessment, the stages below must be completed in order.
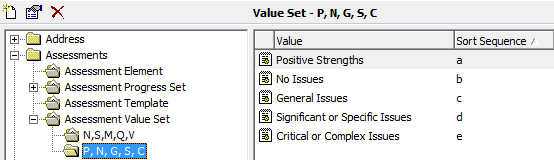
Value Set
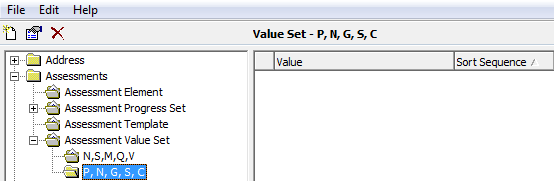
Check whether a suitable value set already exists. Value sets provide a five point rating scale for assessment elements. There are two preloaded value sets: N,S,M,Q,V and P,N,G,S,C.
The P,N,G,S,C value set offers the rating values below:
- Positive Strengths
- No Issues
- General Issues
- Significant or Specific Issues
- Critical or Complex Issues
The N,S,M,Q,V value set offers the rating values below:
- Not Associated at all
- Slight Association
- Moderate Association
- Quite Strongly Associated
- Very Strongly Associated.
If you need to create a new set of values, follow the steps in this section. The P,N,G,S,C value set is used as an example. The ratings are abbreviated using the first letter of each value.
To create a new value set:
- Select Assessment | Assessment Value Set in sysadmin client.
- Click the Add Value icon to display a blank Assessment Value dialog.
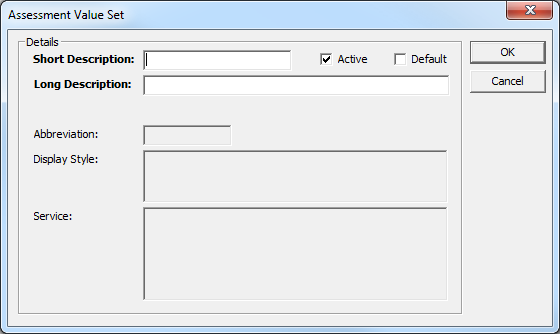
- Complete the Short and Long Description fields.
- Ensure the Active check box is selected.
- Click the OK to save the changes and close the dialog.
- Select the newly created Assessment Value Set.
- Click the Add Value icon to display the Assessment Value dialog.
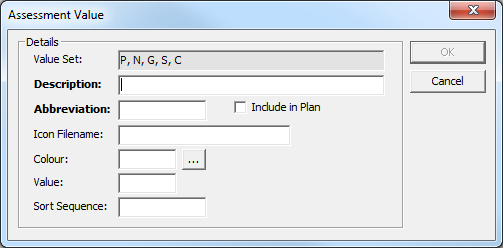
- In the Description field, enter the rating level for the value.
- Enter an Abbreviation.
- If required, enter an Icon Filename to select an image to represent the progression.
The icons are picked up from the aspirenet\views\default\imagesuser folder on the IIS server. Ensure the filename you enter in this field matches the filename in the folder.
- To colour-code the value:
- Click the … button to display a colour browser.
- Select a colour for the value.
Further colour options are available by clicking the Define Custom Colours >> button. You might find it useful to assign brighter, bolder colours to values requiring more urgent attention
- Click the OK button to return to the Assessment Value dialog.
- In the Value field, enter a number from 1 (negative or low) to 5 (positive or high) to determine the rating level.
- To sort the values, in the Sort Sequence field enter a letter from a to e to enable the values to be sorted by level in the Value Set table in the IYSS System Administration Client.
TIP: The sort sequence values should mirror the numbers entered in the previous step, i.e. Value 1=Sort Sequence a, Value 2=Sort Sequence b, etc.
- Click the OK to save the changes and close the dialog.
The new value is displayed when the relevant Assessment Value Set folder is selected. You must repeat the steps to create each additional value for the value set.
Assessment Element
There are several preloaded system assessment elements. Check whether a suitable one already exists (Assessment | Assessment Element). If you need to create a new element, follow the steps in this section.
- Select Assessment | Assessment Element in sysadmin client.
- Click the Add Value icon to display the Assessment Element dialog.
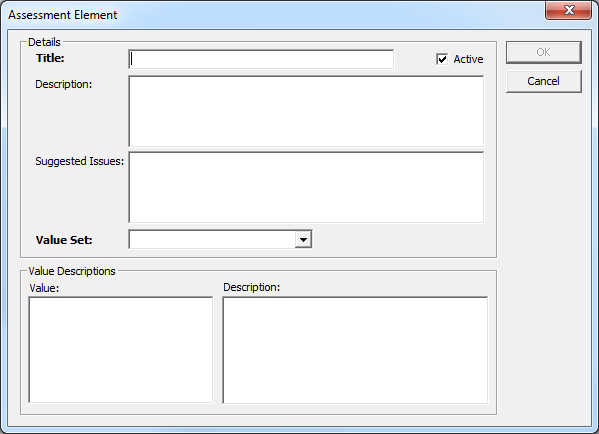
- Enter a Title for the element.
- If required, provide a Description.
- In the Suggested Issues field, enter prompts to suggest related issues that users might need to discuss with affected clients.
- Select the appropriate Value Set from the drop-down.
- Assign Value Descriptions for each of the assessment values. To do this:
- Select the required Value.
- In the Description field, describe what that value means in context of this assessment element.
- Repeat for all remaining values.
- Click the OK to save the changes and close the dialog.
Assessment Progress Set
Check whether a suitable assessment progress set already exists. The assessment progress set Y,N,MIR is preloaded. This contains the values Yes, No and More Info Req, abbreviated as Y, N and ? respectively. This set will be used as an example for this section.
- Select Assessment | Assessment Progress Set in sysadmin client.
- Click the Add Value icon to display a blank Assessment Progress Set dialog.
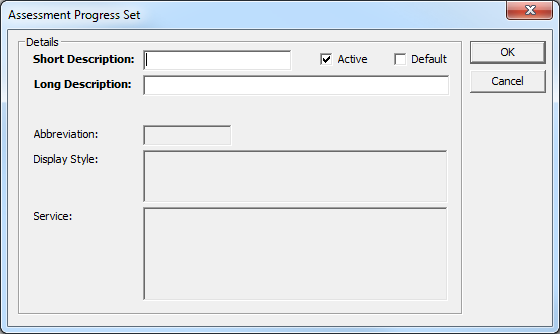
- Complete the Short and Long Description fields.
- Ensure the Active check box is selected.
- Click the OK button to save the changes and close the dialog.
- Select the newly-created Assessment Progress Set folder.
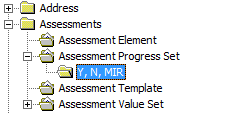
- Click the Add Value icon to display the Assessment Progress dialog.
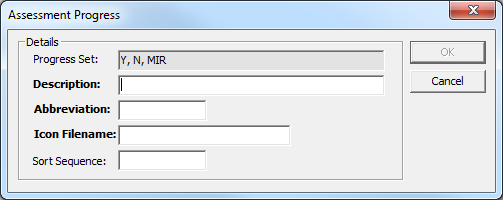
- Enter a Description for the value, e.g. Yes.
- Enter an Abbreviation, e.g. Y.
- Enter an Icon Filename to select an image to represent the progression.
The icons are picked up from the aspirenet\views\default\imagesuser folder on the IIS server. Ensure the filename you enter in this field matches the filename in the folder.
- Click the OK to save the changes and close the dialog.
Assessment Template
If the previous conditions have been satisfied, you can create a new template.
- Select Assessment | Assessment Template in sysadmin client.
- Click the Add Value icon to display the Assessment Template dialog.
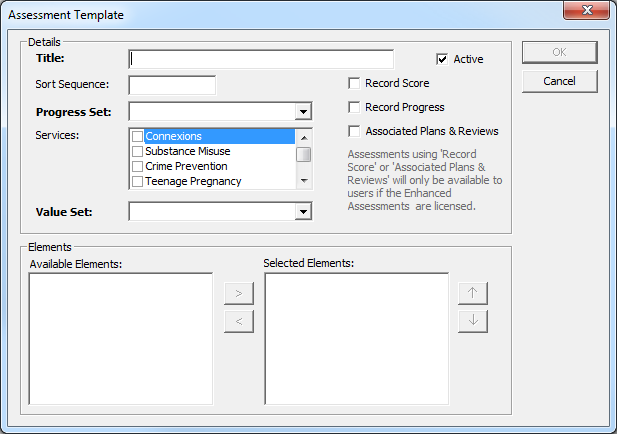
- Give the assessment a Title.
- Select the Progress Set from the drop-down.
- In the Services list, select the services that will use the assessment.
- Select the required Value Set from the drop-down to populate the Available Elements list.
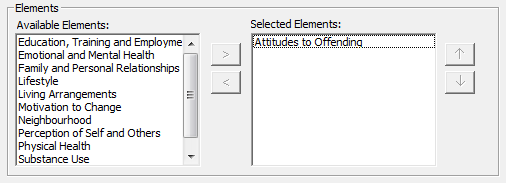
- To select elements for the template:
- In the Available Elements list, select the required element.
- Click the > button to add the element to the template.
- Repeat for all other required elements.
- To re-order the elements in the template:
- In the Selected Elements list, select the required element.
- Click the up or down arrows to move the element accordingly.
- Click the OK to save the changes and close the dialog.
Attributes
Attributes can be held against client, provider and opportunity records. If required, one attribute can be used across all record types.
- Select Common | Attribute in sysadmin client.
- Click the Add Value icon to display the Attribute dialog.
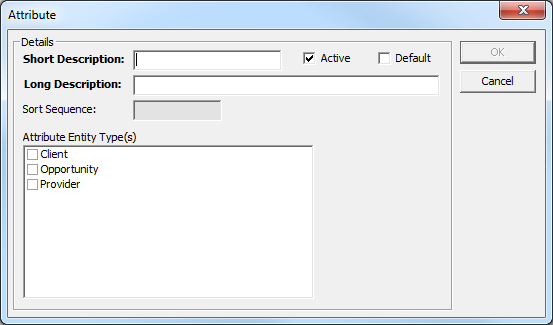
- Complete the Short and Long Description fields.
- Ensure the Active check box is selected.
- Select the Attribute Entity Type(s) from the list.
- Click the OK to save the changes and close the dialog.
Baseline Management
Baselines deal primarily with the recording of the September Guarantee and for Annual Activity Survey returns. Baseline facilities also enable the creation of other reportable client cohorts. The clients in the baseline are controlled by System Administrators. Users can update the status of clients within the baseline but not add or remove clients within it.
There are three baseline elements that must be configured in the order as follow:
- Baseline header
- Baseline status group
- Baseline status
Baseline Header
- Select Client | Baseline Header in sysadmin client.
- Click the Add Value icon or double-click an existing value to display the Base Line Header dialog.
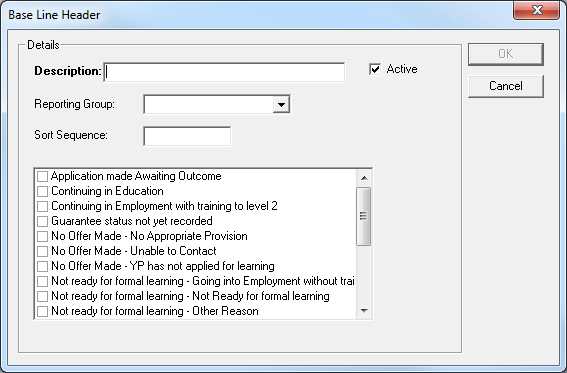
- Complete the Description field.
- Ensure the Active check box is selected.
- If the baseline is being used to produce statutory returns (the September Guarantee or Annual Activity Survey), select the appropriate Reporting Group from the drop-down to ensure the output file is produced.
- Select the statuses to be made available to users from the list.
- Click the OK to save the changes and close the dialog.
Baseline Status Group
These are groupings of related statuses and are used in reporting, for example, the Guarantee Statuses group comprises the statuses below:
- No Offer Made
- Not ready for formal learning
- Offer of Education or Training to start.
To configure a baseline status group:
- Select Client | Baseline Status Group in sysadmin client.
- Click the Add Value icon or double-click an existing value to display the Baseline Status Group dialog.
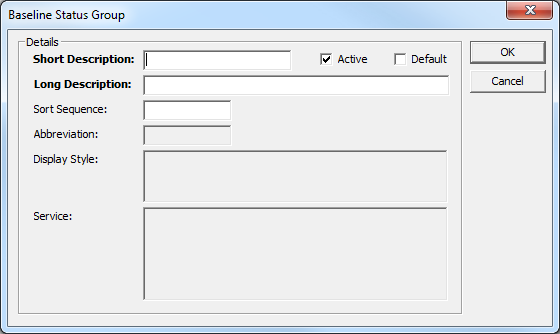
- Enter a name for the baseline status group in the Short and Long Description fields.
- Ensure the Active check box is selected.
- Click the OK to save the changes and close the dialog.
Baseline Status
- Select Client | Baseline Status in sysadmin client.
- Click the Add Value icon or double-click an existing value to display the Baseline Status dialog.
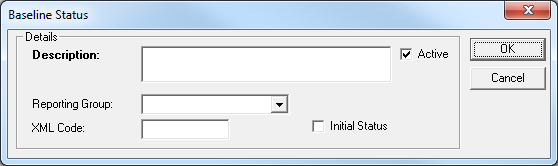
- Complete the Description field.
- Ensure the Active check box is selected.
- Select the required baseline status group from the Reporting Group drop-down.
- Enter the correct DCSF-supplied XML Code to ensure output files can be translated.
- Click the OK to save the changes and close the dialog.
Caseload Type
Caseload types are used in conjunction with lead worker to define a level against the client. The type determines the percentage points used in a standard caseload.
The two caseload types are both system records. You cannot add new types, but you can change the existing types from active and passive if required. Certain clients might be considered as high-need, and be weighted as to be worth a larger percentage of a user’s caseload. Too many, too few or too high-need clients can result in unequal distribution of caseloads. A certain level of deviance from the percentage of standard points indicates over or under utilisation.
- Select Client | Caseload Type in sysadmin client.
- Double-click the required type to display the Caseload Type dialog.
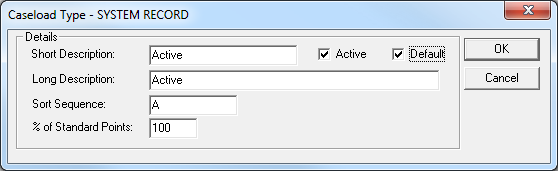
- Complete the Short and Long Description fields.
- Ensure the Active check box is selected.
- Enter the % of Standard Points a typical caseload should use.
- Click the OK to save the changes and close the dialog.
Centres
Centres are used to determine a client’s responsible LA when it cannot be worked out from the client’s resident postcode or current situation provider postcode.
- Select Common | Centre in sysadmin client.
- Click the Add Value icon to display the Centre dialog.
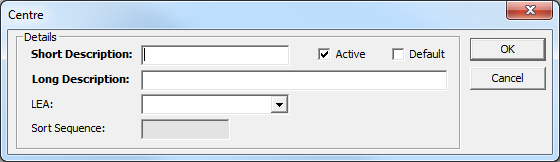
- Complete the Short and Long Description fields.
- Select the LEA from the list.
- Ensure the Active check box is selected.
- Click the OK to save the changes and close the dialog.
Client Type
Client type interacts with attributes, centre, health issues and workgroups and defines which of these values are displayed for each client type. It was employed for systems that support both young people and adult contracts but only needs configuring for young person records.
Any attribute, centre, health issue and workgroup options you need must exist before you change the client type. You cannot add new client types, but if necessary you can amend the current one.
- Select Client | Client Type in sysadmin client.
- Double-click the value to display the Client Type dialog.
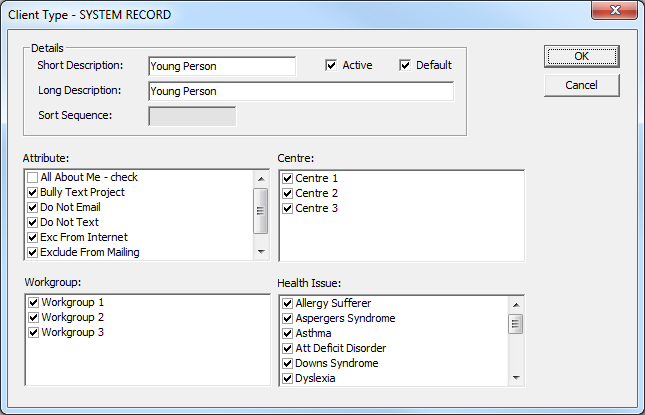
- Complete the Short and Long Description fields.
- Ensure the Active check box is selected.
- Select all the required options from the Attribute, Centre, Workgroup and Health Issue lists.
- Click the OK to save the changes and close the dialog.
Document Type
The document type lookups provide templates for one to one documents.
Refer to: One to One Document Templates for more information.
- Select Documents and Paragraphs | Document Type in sysadmin client.
- Click the Add Value icon to display the Document Type dialog.

- Complete the Short and Long Description fields.
- Ensure the Active check box is selected.
- Select the Service to which the template pertains. A document type can only be applied to a single service. Only users of this service can access the template.
- Select an Entity Type from the drop-down.
- Click the OK to save the changes and close the dialog.
Event Type
Events cover physical meetings, correspondence, and procedural steps. The event type must be configured to reflect the nature of the event to ensure the fields displayed in YJ are event appropriate.
- Select YJ Case | Event Type in sysadmin client.
- Click the Add Value icon to display the Event Type dialog.
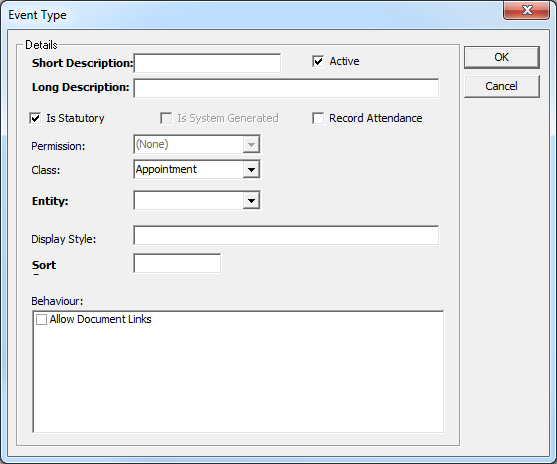
- Enter a name for the event type in the Short and Long Description fields.
- Ensure the Active check box is selected.
- If required, select the Is Statutory check box.
- If the event requires client attendance, select the Record Attendance check box.
- Select the Class and Entity from the drop-downs.
- To be enable documents to be attached to the event, select the Allow Document Links check box.
- Click the OK to save the changes and close the dialog.