![]()
The instructions on this page were different in the following release(s):
3.79 | 3.75
Single Passengers
Release Note for 3.80
Dates repositioned in assessment and link journey to the ticket pop ups
To search for a passenger:
- Select the Processes area.
- Ensure that the Single passenger page is selected.
- Search by Personal DetailsSearch by Personal Details
- Select the Personalinfo tab.

- Enter search criteria for the passenger you want to select.
When searching for Active people in this authority, Transport returns passengers whose Home LA number, or the LA number of their correspondence address, matches your authority’s LA number.
- Click the Search button to display a list of passengers who match your search criteria.
Click the export hyperlink at the bottom of the list to export the returned search results into a spreadsheet file.
- Highlight the passenger you want to view to display their details on the right-hand side of the page.
- Select the Personalinfo tab.
- Search by Process StatusSearch by Process Status
- Select the Process Status tab.
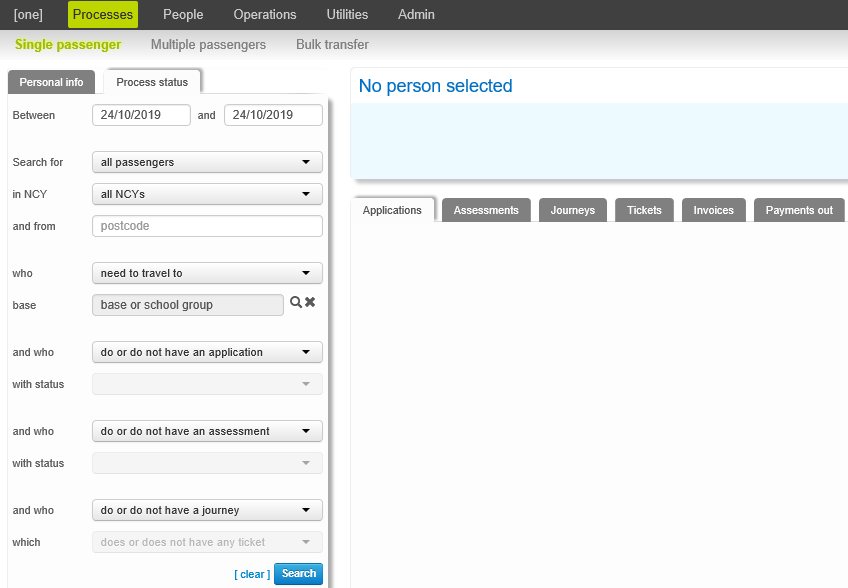
- Enter search criteria for the passengers you want to select.
- Click the Search button to display a list of passengers who match your search criteria.
Click the export hyperlink at the bottom of the list to export the returned search results into a spreadsheet file.
- Highlight the passenger you want to view to display their details on the right-hand side of the page.
- Select the Process Status tab.
- Search by Personal DetailsSearch by Personal Details
Select from the following options:
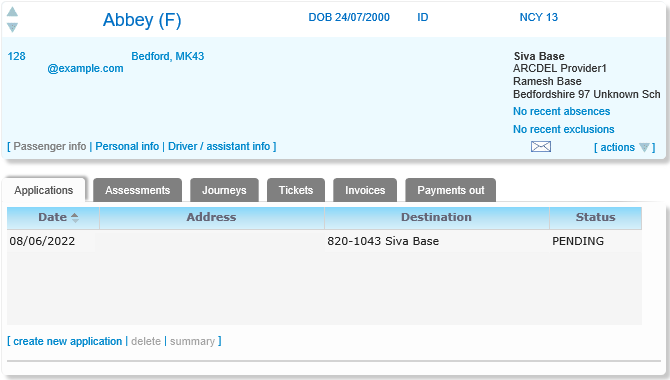
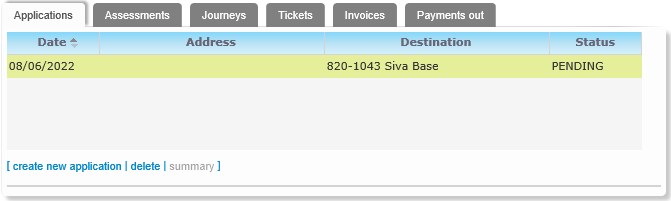
Applications
Applications (Processes | Single passenger | Applications) can be received directly from carers via the Transport Portal. Alternatively, they can be entered by transport officers transcribing from paper forms or receiving application details from phone calls.
Select one of the following options:
- Create an ApplicationCreate an Application
Applications can be created by parents and guardians directly from the Citizen Portal. Once Transport has matched a Citizen Portal transport application to the correct Transport Transport passenger, the details of that application show up in that passenger’s Applications tab.
You can also use the Create New Application function to record a transport application manually.
- Click the create new application hyperlink to display editable fields relating to applications.

- Enter details as required.
There are three approval status values for applications: Pending, Approved and Rejected.
The Pending value is used by default when an application is first created on the system. Therefore, you should not change this value manually. It is recommended that you set up your own internal codes for approval status, which can then be specified against the Pending, Approved and Rejected external codes. - Click the create new application hyperlink to display editable fields relating to applications.
- Approve or Reject an Individual ApplicationApprove or Reject an Individual Application
- Highlight the application you want to approve or reject. Editable fields related to that application are displayed.
- Open the Status section and select either APP-APPROVED or REJ-REJECTED from the drop- down menu.
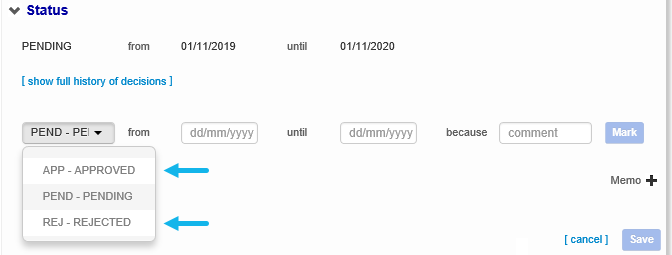
- Enter remaining details as required.
- Click the Mark button to change the application’s status.
From and Until dates do not need to correspond to the dates requested on the application. You can approve or reject a sub-period of the application by entering different dates to those requested.
Changing the status of an application may cause a message to be sent to the applicant in the Citizen Portal, in line with the LA’s messaging settings.
- Highlight the application you want to approve or reject. Editable fields related to that application are displayed.
- Delete an Application for TransportDelete an Application for Transport
- Highlight the application you want to delete.

- Click the delete hyperlink. A warning dialog is displayed.
- Click the delete button the delete the application and close the dialog.
- Highlight the application you want to delete.
Overlapping Dates
When you save a new application for the first time, a new approval status record with a value of Pending is created. Transport Transport then checks for existing assessments that have overlapping dates and the same passenger, address and destination details. If any such assessments are found, Transport Transport displays a dialog with the option to approve the newly-created application immediately.
In this scenario, the application is approved for the period in which it overlaps with the assessment. For example, assume that the application runs from 01/09/2013 - 31/08/2014:
- Sub-scenario 1:
The assessment runs from 01/09/2013 - 31/08/2014. In this case, the entire application is approved, as both assessment and application have the same daterange - Sub-scenario 2:
The assessment runs from 02/09/2013 - 31/08/2014. In this case, the application is approved from 02/09/2013 - 31/08/2014, as this is the date range that overlaps with the assessment. - Sub-scenario 3:
The assessment runs from 01/08/2013 - 31/12/2013. In this case, the application is approved from 01/09/2013 - 31/12/2013, as it does not begin until 01/09/2013. - Sub-scenario 4:
The assessment runs from 01/01/2014 - 31/12/2014. In this case, the application is approved from 01/01/2014 - 31/08/2014.
![]()
The option to approve is only offered when:
- The application is created for the first time.
- There is a single current or future assessment – either eligible or issued – for the same passenger and with the same destination and address details as the newly-created application, whose details overlap either fully or partially with that application.
- The user has permission to approve applications.
Assessments
Assessments determine a candidate’s eligibility for transport. To perform an assessment, a candidate’s assessment criteria are entered in Transport Transport’s Assessment tab (Processes | Single passenger | Assessments). These are evaluated against a set of pre-defined criteria to determine the candidate’s eligibility for transport. Assessments can be run either on an individual basis or for several candidates at once (Processes |Multiple passengers | Perform assessments).
Approvals mark an application as accepted, confirming that the authority will provide transport for the candidate who made that application.
Select one of the following options:
- Create an Individual AssessmentCreate an Individual Assessment
- Click the create new assessment hyperlink to display editable fields related to assessment details.
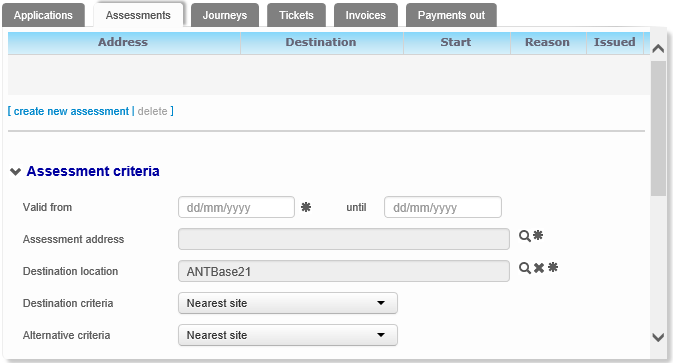
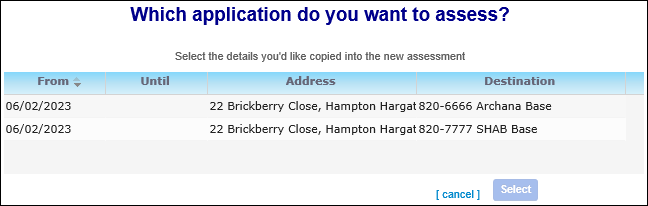
If the selected passenger has a pending application, that application’s address, destination and date details are copied automatically into the new assessment.
If the selected passenger has more than one pending application the Which application do you want to assess? dialog displays. Highlight an application and click Select to close the dialog and copy the selected application’s details into the assessment. Alternatively, click cancel to create a blank assessment.
- Click the Calculate button to run the assessment. The assessment results are displayed in the
Assessment results (summary) and Assessment results (details) tabs.

- If required, click the Show calculated nearest schoools hyperlink. The Nearest Schools dialog displays, showing the five nearest schools to the selected passenger’s address. Select a school’s name in the list to highlight that school’s location on the map. You can alter the map display using the Show catchment area on map, show walking routes and driving routes check boxes. When you have finished reviewing the schools, click the Close button to return to the assessment.

You can only see map data for assessments that have been created in Transport Transport v4. Assessments created in v3 do not have map data available.
- Select one of the following options:
- Click the Save button to save the assessment without issuing it.
- Click the Issue button to issue the assessment.
- Click the cancel hyperlink to discard the assessment.
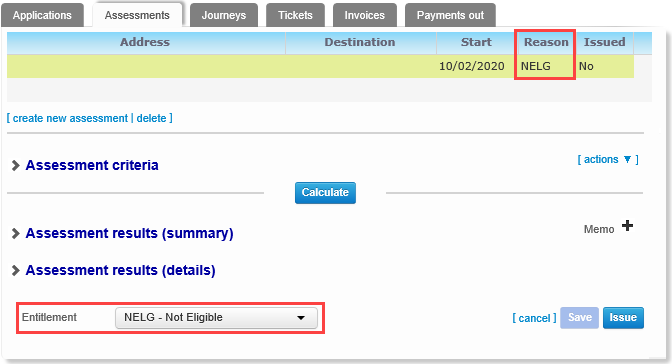
To edit the student’s assessed entitlement manually, select a new entitlement status from the Entitlement menu. The status is displayed in the Reason column of the Assessments Summary.
- Click the create new assessment hyperlink to display editable fields related to assessment details.
- Delete an AssessmentDelete an Assessment
- Select the Assessments tab to display a list of the student’s assessments.

- Highlight the assessment you want to delete and click the delete hyperlink. A warning dialog is displayed.
- Click the Delete button to delete the assessment and close the dialog.
- Select the Assessments tab to display a list of the student’s assessments.
Overlapping dates
When you either create a new assessment or change the entitlement status of an assessment from Non-Eligible to Eligible, Transport checks for existing applications with overlapping dates and the same passenger, address and destination details. If any such applications are found, Transport displays a dialog with the option to approve the existing application immediately.
In this scenario, the application is approved for the period in which it overlaps with the assessment. For example, assume that the application runs from 01/09/2013 - 31/08/2014.
- If the assessment runs from 01/09/2013 - 31/08/2014, the application is approved for the same dates.
- If the assessment runs from 02/09/2013 - 31/12/2013, the application is approved for the same dates.
- If the assessment runs from 01/08/2013 - 31/12/2013, the application is approved from 01/09/2013 - 31/12/2013.
- If the assessment runs from 01/01/2014 - 31/12/2014, the application is approved from 01/01/2014 - 31/08/2014.
The option to approve the existing application is only offered when:
- There is a single application for the same passenger with the same destination and address details as the assessment, whose details overlap either fully or partially with that assessment.
- There is not already an Approved period – either partial or full – for the existing application.
- The user has permission to approve applications
Journeys
More informationMore information
In Transport Transport, journeys are added through the Journeys tab. The Journeys tab enables you to create mainstream journeys, door-to-door journeys, and journeys using a carer’s own transport. Mainstream journeys are delivered using either standard or network routes. A standard route is a route on which the LA have supplied a “school bus”; that is, employed a contractor to supply vehicles with which to service an LA-specified route. A network route is an existing commercial, scheduled road or rail route. The LA buys passes to enable transport using these routes. On a door-to-door route, the LA supplies transport to pick up a passenger at a specific address or stop and then take that passenger to another address or stop.
LAs may decide to sell spare seats to carers. To help with this process, Transport Transport has the capability to invoice carers for their purchased seats. If an LA is unable to provide transport to a student at a reasonable cost, it may choose to pay a carer to supply suitable transport. Transport Transport provides an outgoing payments function to assist with this process.
The first part of the journey creation process is the same no matter what type of journey you are creating. However, the last few fields differ depending on the journey type selected.
Journey allocation is based on the evaluation of user-supplied information about the origin and destination of journeys. For users with GIS, Transport Transport’s Suggest function can suggest a possible route based on the criteria provided (Processes | Single passengers |Journeys).
The allocation process can also be performed in bulk, with transport officers choosing a group of candidates to allocate journeys to using selection criteria (Processes | Multiple passengers | Allocate journey).
Select one of the following options:
- Create a journeyCreate a journey
- Click the add new journey hyperlink to display editable fields related to journey details.

- Enter details as required.

- Click the add new journey hyperlink to display editable fields related to journey details.
- Set a journey's frequencySet a journey's frequency
All journeys in Transport Transport v4 must have a journey frequency recorded, detailing the days of the week that the journey takes place on.
This information was not mandatory in v3, meaning that some journeys that were created in v3 may not have their days of the week recorded. By default, Transport Transport assigns the days Monday through to Friday to these journeys during migration, meaning that these journeys have Monday to Friday selected in the every field when viewed in v4.
However, Transport Transport also takes the opening times of the destination base into account to determine whether a journey happens on a particular day. For example, if a migrated journey involves a base that is not open on Fridays, Transport Transport will assign a Monday-Thursday frequency to the journey.
If a journey in Transport v3 has no journey frequency information and runs with a pattern other than that assigned by Transport Transport during migration, the journey frequency must be amended manually.
Highlight a journey and then select the desired journey frequency using the every check boxes.
You cannot select days that are outside of the frequency defined for the route.

- Duplicate a journeyDuplicate a journey
- Highlight the journey you want toduplicate.
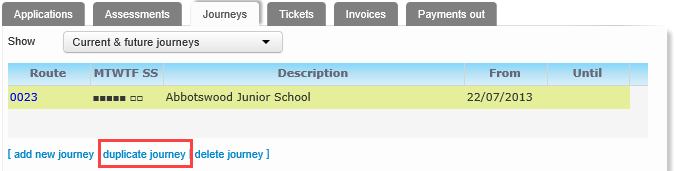
- Click the duplicate journey hyperlink to display the Select from all available routes dialog.

- Edit journey details as required.
- Highlight the journey you want toduplicate.
- Delete a journeyDelete a journey
- Highlight the journey you want to delete.

- Click the delete journey hyperlink. A warning dialog is displayed.
- Click the Delete button to delete the journey.
- Highlight the journey you want to delete.
Tickets
Tickets in Transport Transport v4 can be either journey-related or standalone. Journey-related tickets are only valid for a specific passenger journey. Standalone tickets, on the other hand, are valid for a selected route or contractor.
Likewise, passenger journeys can be either ticketed or unticketed. A ticketed journey is a journey that has a linked ticket, while an unticketed journey does not. However, unticketed journeys can still be valid for travel, as the passenger may use a contractor or route-linked ticket. Door-to-door journeys do not usually require a ticket at all.
Transport Transport automatically assigns ticket serial numbers in order to prevent duplication. However, you can specify a serial number prefix. For example, of you were to specify the prefix “TICKET”, Transport would create tickets with the serial numbers “TICKET1”, “TICKET2”, and so on. You can also specify a manual ID for the ticket if required.
Select one of the following options:
- Create a ticketCreate a ticket
- Click the Issue New Ticket hyperlink to display editable fields related to ticket details.
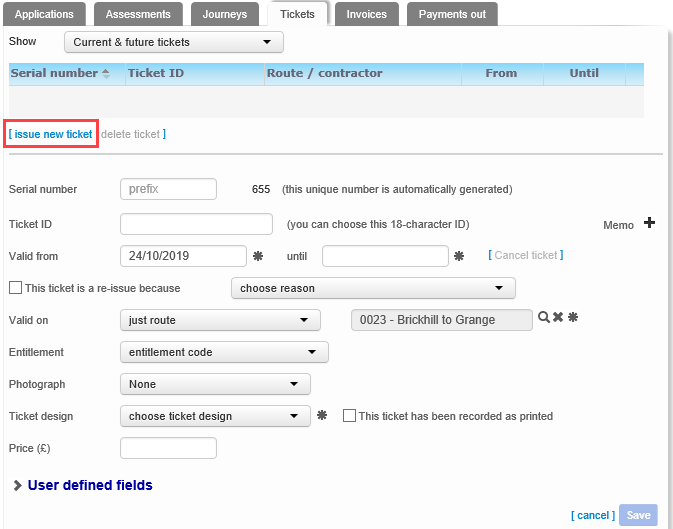
- If the passenger has one or more journeys, the Which journey do you want to link this ticket to? dialog displays when the Issue New Ticket hyperlink is clicked. Choose one of the following options to proceed:

- To create a ticket based on a pre-existing journey, highlight that journey and then click the Copy & Create button. Transport pre-populates the Valid on field with the route used by the selected journey.
- To create a standalone ticket, click the create a blank ticket hyperlink.
- Enter details as required.
- Click the Issue New Ticket hyperlink to display editable fields related to ticket details.
- Print a ticketPrint a ticket
- Select the Tickets tab. A list of the selected passenger’s tickets is displayed.

- Highlight the ticket you want to print.
- Click the send for printing hyperlink. A printable version of the ticket is displayed in the report viewer.
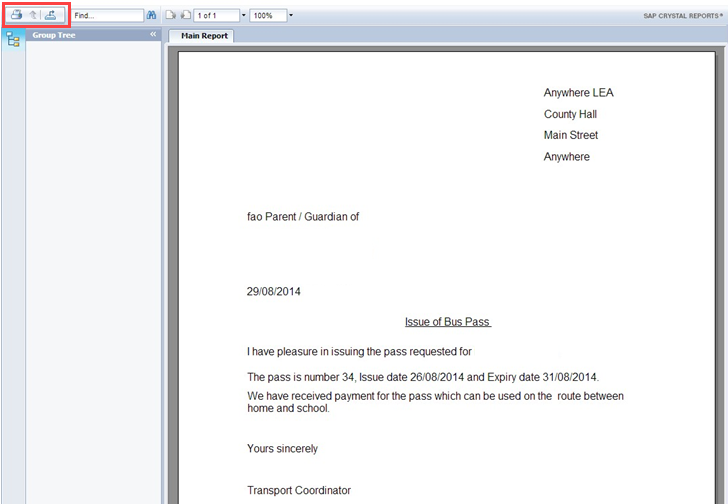
- Click the printer icon to print the ticket. An entry is made in the entity history to show that the ticket was printed.
- Select the Tickets tab. A list of the selected passenger’s tickets is displayed.
- Delete a ticketDelete a ticket
- Select the Tickets tab.
- Highlight the ticket you want to delete.
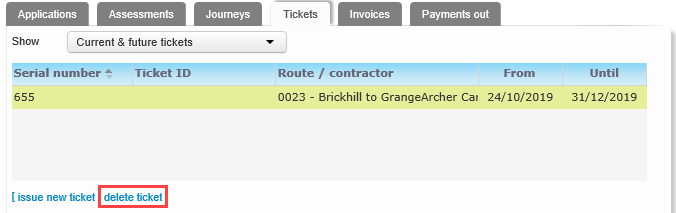
- Click the delete ticket hyperlink. A warning dialog is displayed.
- Click the Delete button to delete the ticket.
Invoices
Transport Transport uses the same numbering scheme for invoices as for tickets, automatically assigning serial numbers but enabling you to specify a serial number prefix and manual ID if required.
Select from the following:
- Create new invoiceCreate new invoice
- Select the Invoices tab to display a list of invoices that have been created for the passenger.
- Click the create new invoice hyperlink to display editable fields relating to invoice details.
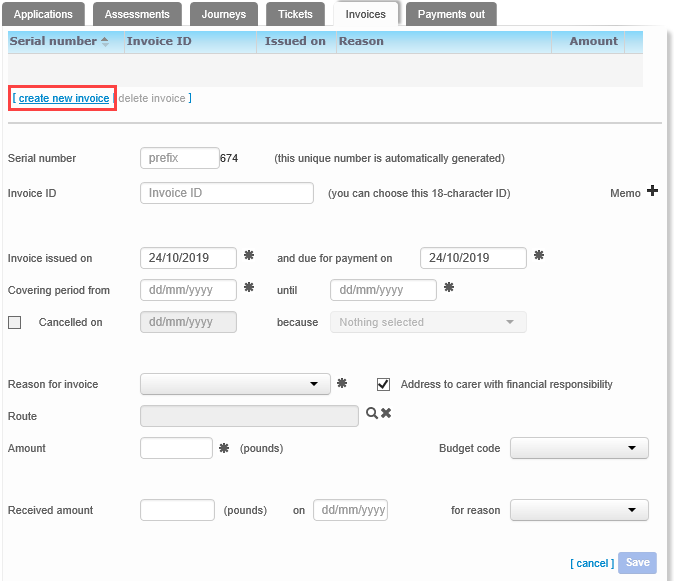
- Enter details as required.
If required, you can configure the Serial Number field’s default value.
More information:
Configure Default Invoice Settings - Record a paymentRecord a payment
- Select the Invoices tab. A list of the passenger’s current invoices is displayed.
- Highlight the invoice you want to record payment for. Editable fields relating to that invoice are displayed.

- Enter details as required.
- Delete an invoiceDelete an invoice
- Select the Invoices tab. A list of the passenger’s current invoices is displayed.
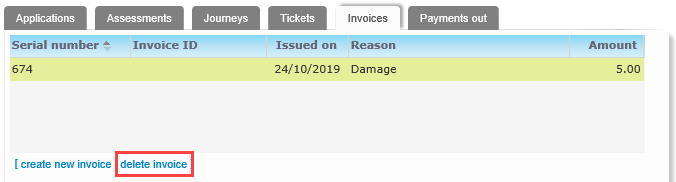
- Highlight the invoice you want to delete.
- Click the delete invoice hyperlink. A confirmation dialog is displayed.
- Click the Delete button to delete the invoice.
- Select the Invoices tab. A list of the passenger’s current invoices is displayed.
Payments
LAs may also wish to pay a carer to provide transport. This usually happens where it is cheaper to pay a carer to provide transport than to organise transport by other means. The Payments Out function enables the LA to make these payments.
Select from the following:
- Create a Passenger PaymentCreate a Passenger Payment
- Select the Payments out tab. A list of payments that have been made to the passenger is displayed.
- Click the add new payment hyperlink. Editable fields related to payment details are displayed.

- Enter details as required.
- Cancel a Passenger PaymentCancel a Passenger Payment
- Select the Payments out tab. A list of payments that have been made to that passenger is displayed.
- Highlight the payment you want to cancel. Editable fields related to that payment are displayed.
- Click the Cancelled on check box.

- If required, add a cancellation date into the field next to the Cancelled on check box and select a cancellation reason from the because menu.
- Delete a Passenger PaymentDelete a Passenger Payment
- Select the Payments out tab. A list of payments that have been made to that passenger is displayed.

- Highlight the payment you want to delete.
- Click the delete payment hyperlink. A confirmation dialog is displayed.
- Click the Delete button to delete the payment.
- Select the Payments out tab. A list of payments that have been made to that passenger is displayed.