Click the back button to return to the previous page or use the Table of Contents.
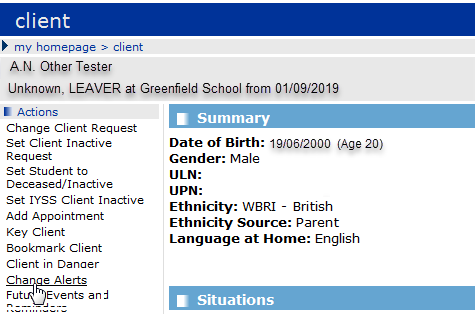
The Client Record
When you open a client record, it displays automatically in ‘less’ mode, i.e. only summary information is displayed for the different client sections.
The IYSS client record includes data from the core One young person record, e.g. school history, attendance and attainment data. Data that has been accessed from the young person’s core Capita One record, is shown with an information icon  . See: Navigate around the recordNavigate around the record
- Click the more button on a header bar to display the detailed information contained in the section.
- If there is no information entered in a section for a client, the section title bar and button are shown in grey, e.g. the No Provisions section in the record below:

- Click the top button
 to return to the top of the client record.
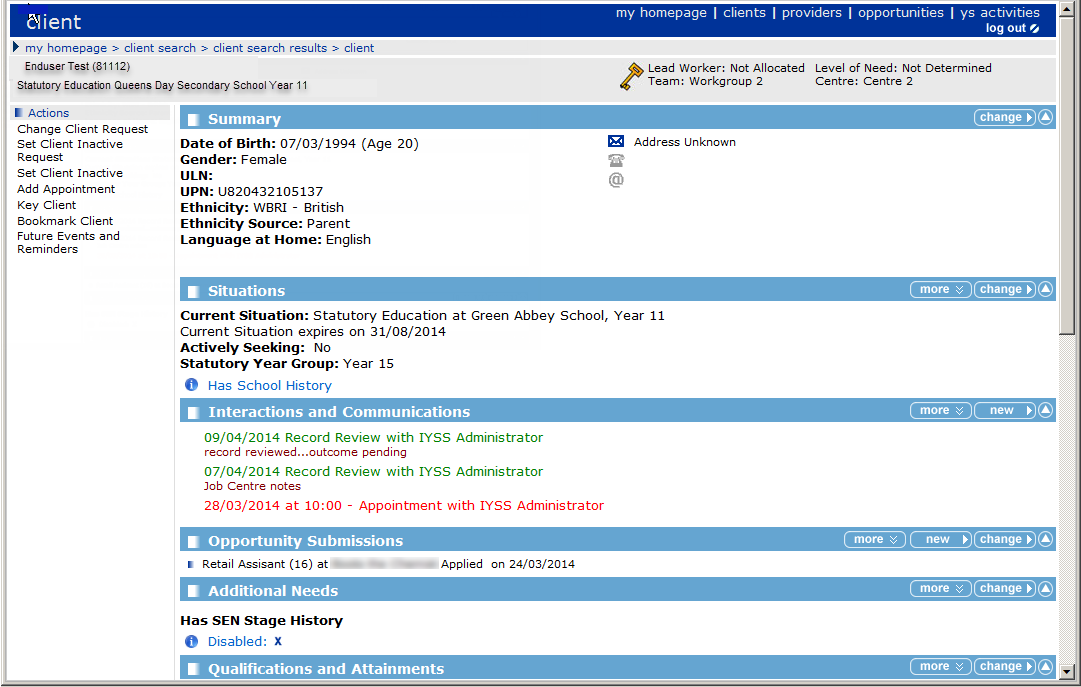
Summary section
The Summary section displays the basic information held for the client, such as address, date of birth, etc.
- To amend or add information in this section, click the change button on the Summary section header bar to display the Change Summary screen.
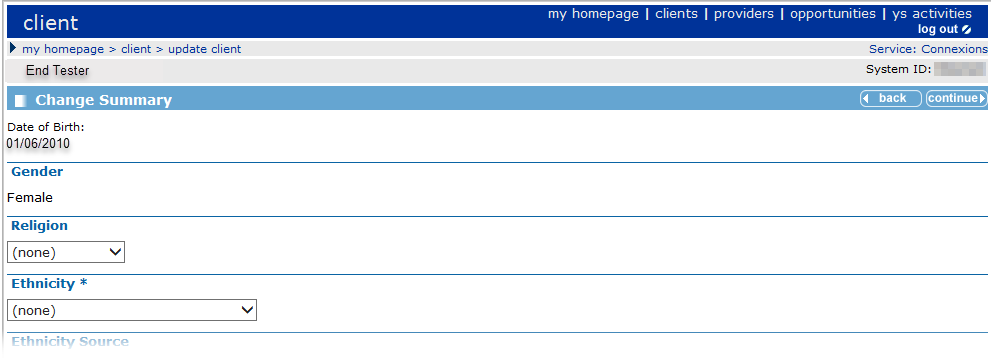
- Amend or add the relevant information as required.
- To add an alias, click the new button in the Aliases section to display the Client Alias page. Enter the required Alias and click the continue button.
- Add a new Contact AddressContact Address if required.
- Click the new address button to display a new Change Summary screen.
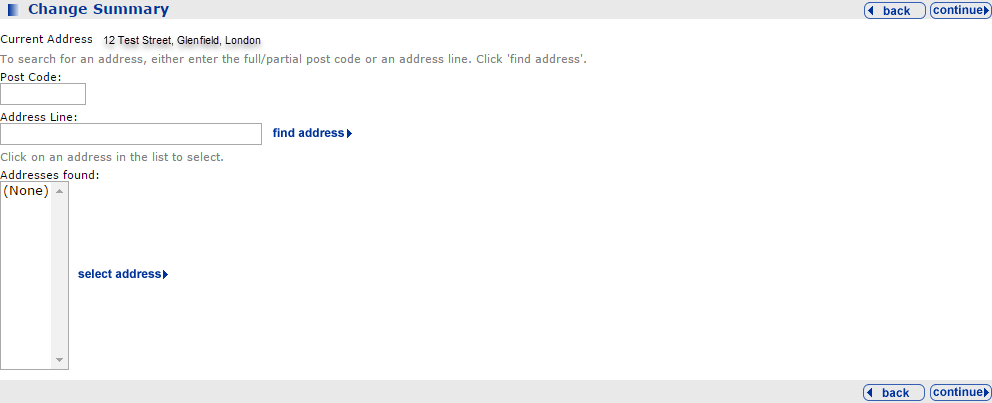
- Enter the Post Code or part of the Address Line (number and road name) in the new Change Summary screen.
- Click the continue button to list the address under the Contact Address section.
If you are recording a change of address, ensure you deselect the Mail check box and enter an End date in the previous address entry.
If this is the client’s only address, Home Address must be selected from the Type menu and the Mail check box selected.

- Enter the Start date and select the address Type from the menu. If the address is to be used for written correspondence, select the Mail check box.
- To mark a client as having no fixed or known address, click the new button in the Address Unknown / No Fixed Abode. Enter the relevant information in the Address Unknown / No Fixed Abode screen.
When you change the address, details of previous address information is displayed by clicking the more button. If required, you can enter an alternative address (and an explanation for the alternative).
- Enter the Contact Details for the young person. Select the Preferred Contact check box next to the number through which the client prefers to be reached. The email address and mobile number must be unique to the client.
- Select the relevant Immigration Status radio button.
- If required, enter any LAC Status Notes in the text field.
- If the appropriate YOT is not displayed in the YOT Residence Status panel:
- Click the new button to display the YOT Residence Status panel.
- Select the required Status.
- If the Status is Other, select the required YOT from the Other YOT drop-down list.
- Enter an Effective Date.

- When you have completed the changes, click continue to save the changes and return to the client page.
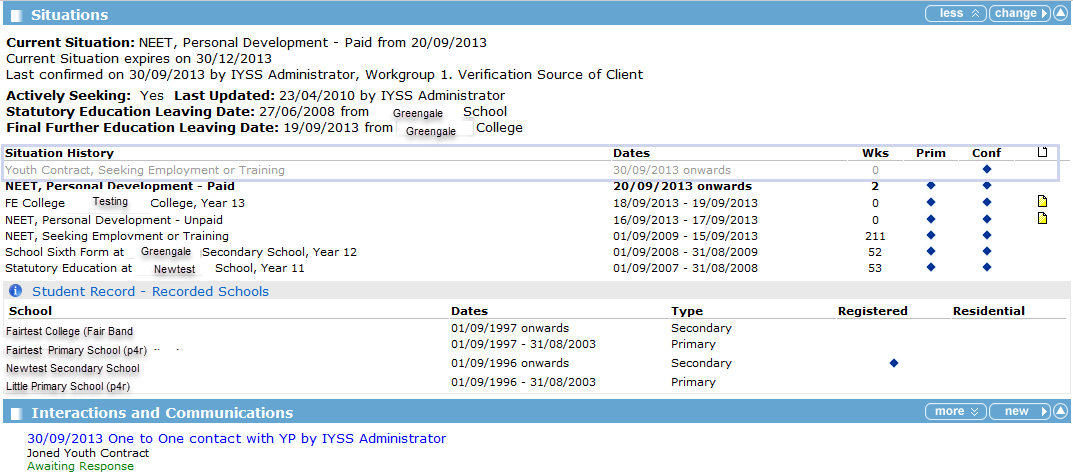
Situations
A Client's current situation is displayed in the Situations section in their record. This section is used to amend and view information on the client’s current education, employment or training status.
For more information, select the relevant link below to:
Interactions Simple Activities
The procedure below shows how to add an interaction and simple activities to the client record.
- In the client's record, select the new button on the Interactions and Communication section to display the New Interaction dialog.
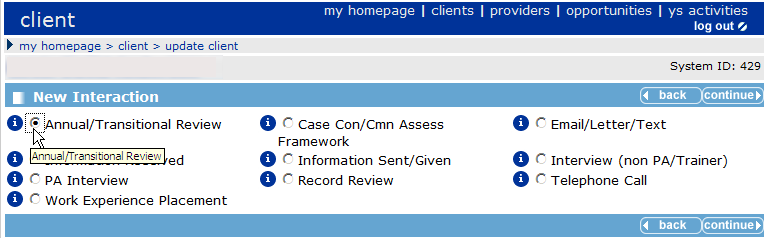
To display help text, hover over the information  icon next to the interaction types.
- Select an Interaction Type and click continue to display the relevant interaction dialog, e.g. New Annual/Transactional Review dialog.
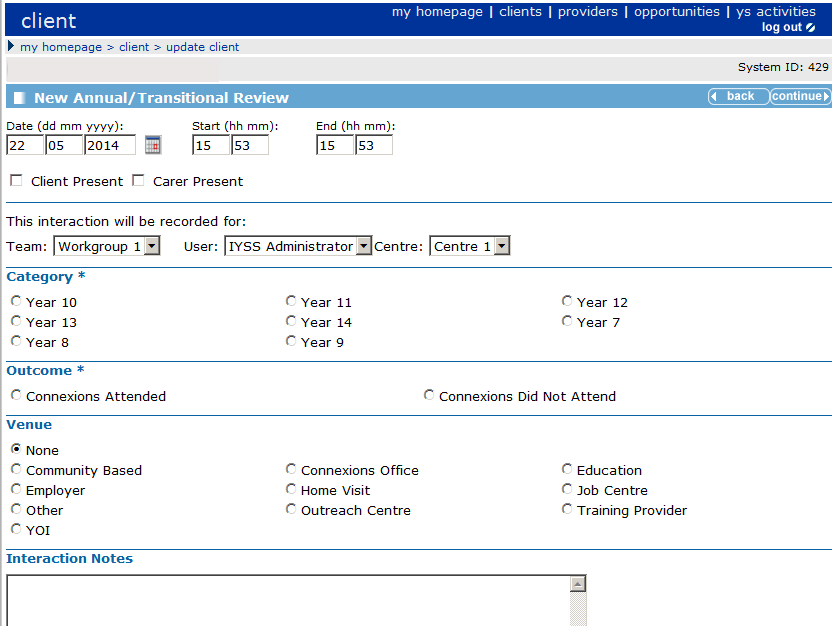
- Enter a Date and time or leave as ‘today’.
- Select a Category, an Outcome and a Venue. You can enter Interaction Notes now or later if you want.
- Click continue to display the client page. In the panel on the left side of the dialog, the interaction you have just added is displayed in the Current InteractionCurrent Interaction panel.
This screenshot also shows examples of activities that you can associate with this interaction in the Activities panel.
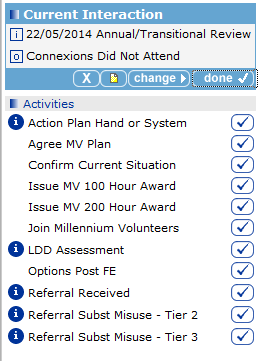
- Select activities from the list of Activities to add them to the interaction by clicking the tick button.
- Click the notes button on the Current Interaction panel to enter free text notes, (if you have not already added some notes earlier).
- Click continue to return to the Current Interaction panel.
- Once you have completed this interaction, click Done to save it. The interaction is displayed in the Interactions and Communications section of the client record.

Youth Contract Interactions
This procedure describes how to record Youth Contract interactions with clients on the Interactions and Communications panel of the client record.
Before you start:
Make sure the following has been done in the OneIYSS system administration module:
- Add Situation Sub Groups and link to Situation Group of Youth Contract.
- Link the Youth Contract Situation Group in Situation Super Groups to Secondary.
- To capture additional data for Youth Contract, go to the Client/Project of Youth Contract area and link the items below to the appropriate Interaction Types:
- Youth Contract – Join
- Youth Contract – Leave
- Youth Contract – Change Interaction Activities.
Record Interactions
- In the client's record, go to the Interactions and Communications panel, then click the new button to display the New Interaction dialog.
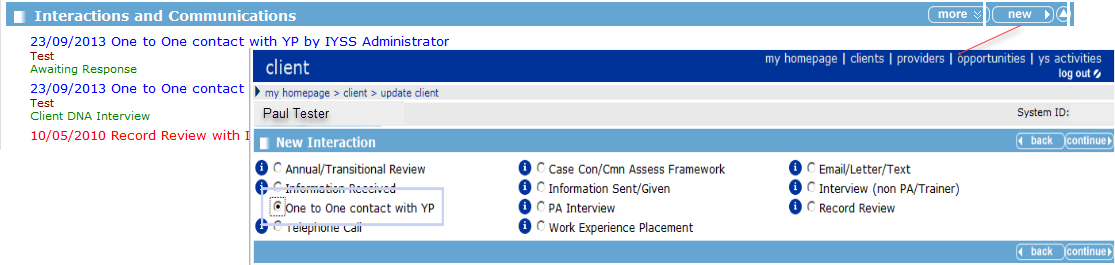
- Select One to One Contact with YP, then click continue to display the New One to One contact with YP dialog.
- Enter the relevant information for the interaction as shown in the screenshot below.
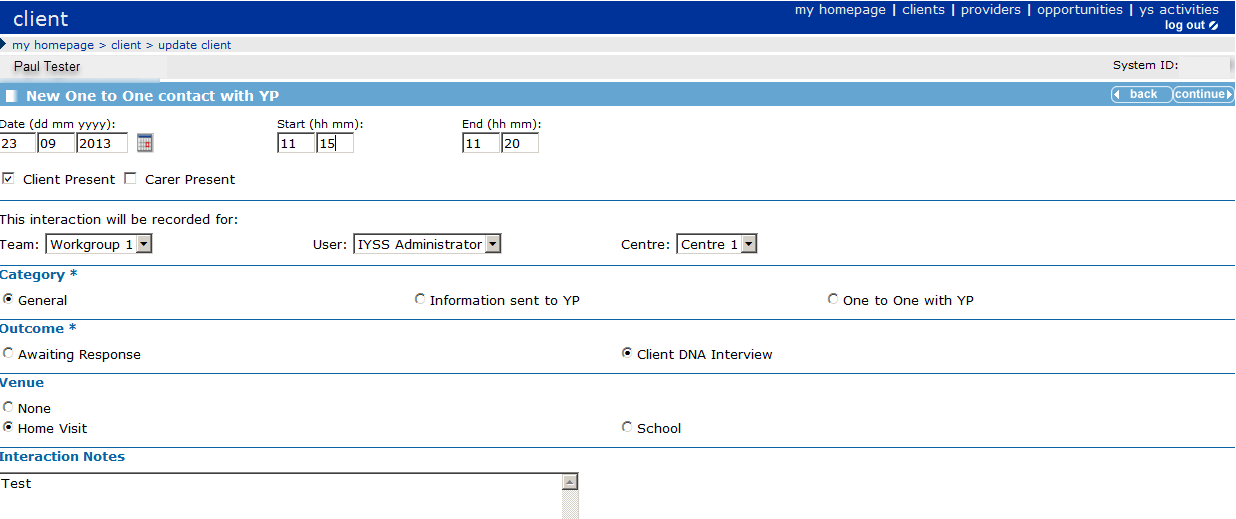
- Click continue to display the client record which shows the Youth Contract – Join link in the Activities panel on the right-side of the dialog.
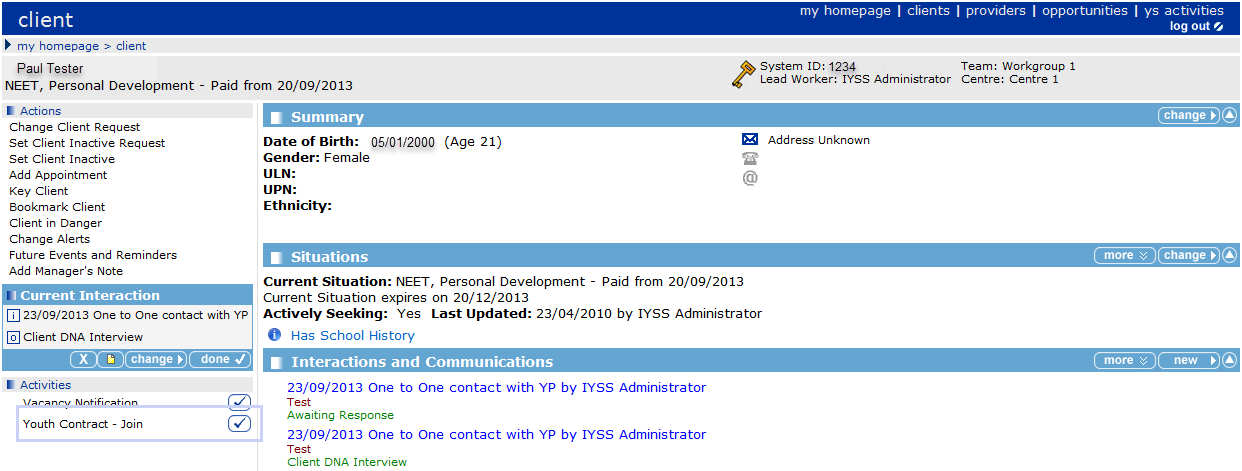
- Click the Youth Contract – Join link in the Activities panel to display the Join Youth Contract panel.
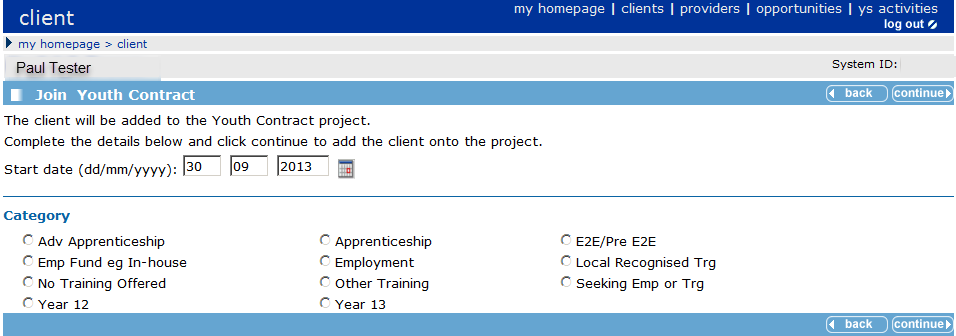
- Select the appropriate Category from the list.
- Click continue to display the client record which shows the Joined Youth Contract link in the Current Interaction panel on left-side.
As required for the NCCIS return, the Youth Contract Indicator and Start Date are created.
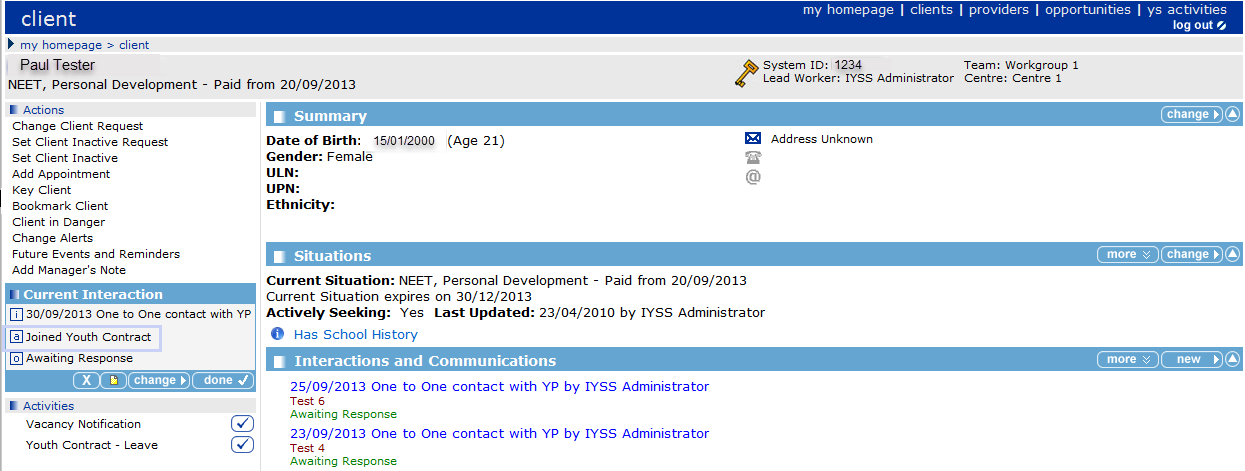
Under Activities, the Youth Contract – Leave field is used when the young person leaves the Youth Contract.
- In the Current Interaction panel, click the done button to display the Interactions and Communications panel showing Joined Youth Contract (in grey). This is shown in the example (below) against the interaction of 30/09/2013:

- In the Situations panel, click the more button to display the Situations dialog. The young person’s Situation History displays the item, Youth Contract, Seeking Employment or Training for 0 weeks, as the young person has only just started.
Appointments
The procedure below shows how to add or update an appointment in a client record, as required.
Add Appointment
- In the client's record, select the Add AppointmentAdd Appointment in the side Actions menu.

- Enter the Date and Time and any other details required. Click continue to return to the client page.
- The appointment is displayed in green in the Interactions and Communications section of the client’s record:
![]()
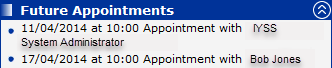
The appointment is also displayed in My Homepage on the Future Appointments panel.

Update an Appointment
The procedure below shows how to update an appointment, for example how to re-arrange an appointment or to create a new interaction.
- In your Missed Appointments or Future Appointments panel on My Homepage, click on the client name to display the client’s record.
- Look for the appointment in the Interactions and Communications section in the client’s record.
- Open the interaction and select the required option.
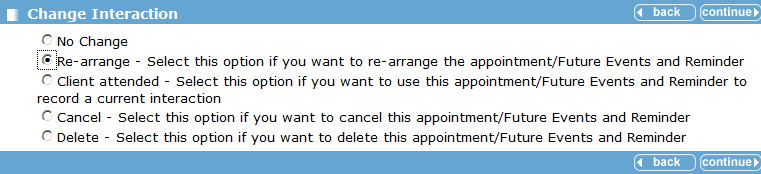
Select Re-arrange if you want to re-arrange the appointment.
- Click continue to return to the client page.
You can generate an automatic SMS when you book an appointment for a young person. The message goes out the day before the appointment date. You only get this option if a mobile number is recorded in the young person’s record.
Additional Needs
It is important to record and update a client’s additional needs regularly to make sure the client receives the support they require.
SEN stage history and disability information is pulled through from One v4 and is read-only in IYSS.
The procedure below shows how to add or update a client’s additional needs.
- In the client's record, click the change button on the Additional Needs section to display the Change Additional NeedsChange Additional Needs dialog.
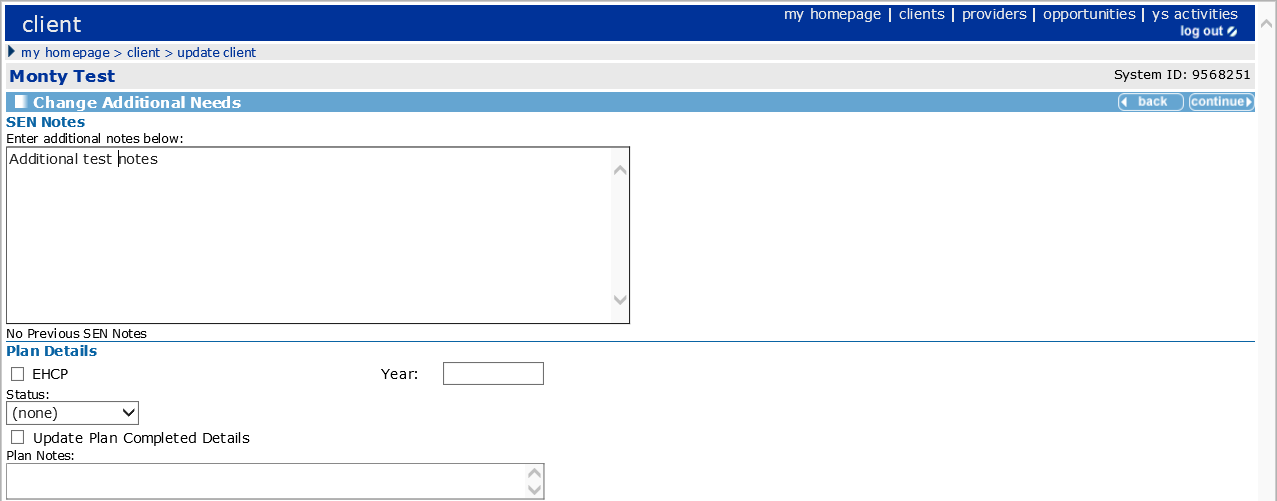
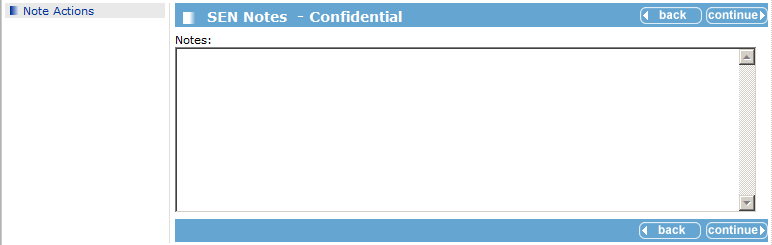
Additional information can be added to the record in the SEN Notes section. These notes will also be available through the Documents, Notes and Assessments section.
- Enter all the details relating to the client’s additional needs.
- Click continue to return to the client’s record.
Individual Circumstances section
Recording individual circumstances logs important issues for the young person. They also form an important part of reporting to government and can affect funding.
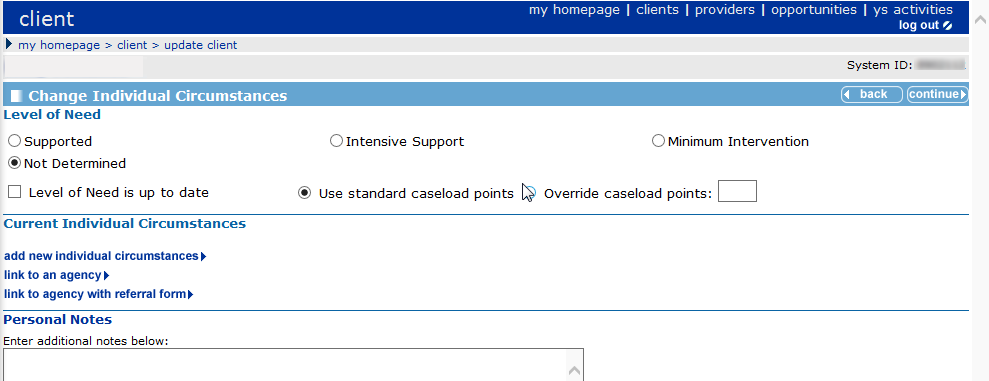
- In the client's record, click the change button on the Individual Circumstances section to display the Change Individual Circumstances dialog.
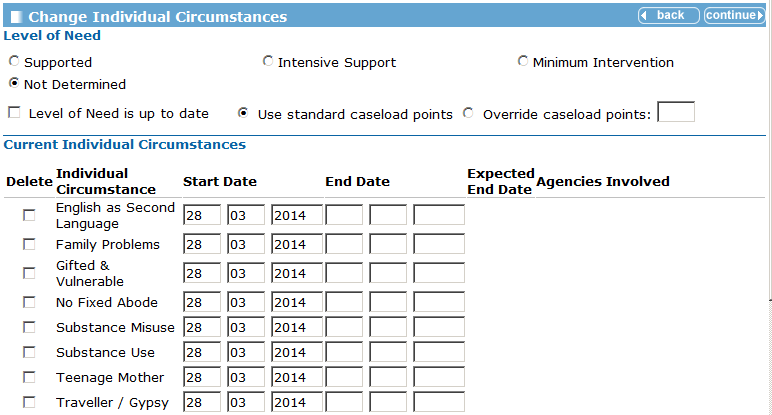
- Complete the Level of Needs panel.
- Click the add new individual circumstances link to add a new circumstances.
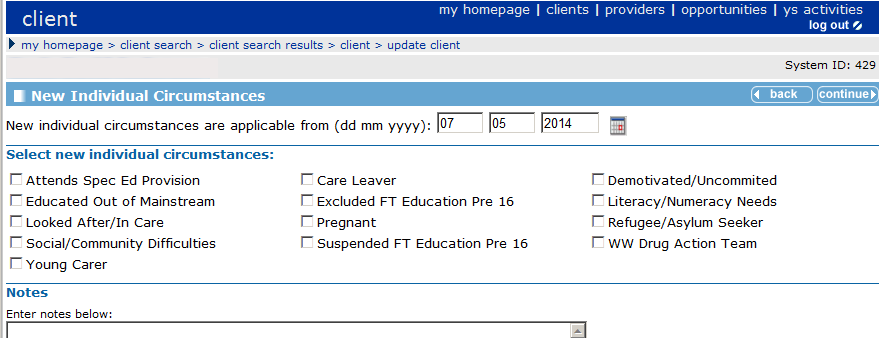
The above dialog is where issues that may affect a young person’s progress are recorded.
- Select one or more individual circumstances.
- Add personal Notes to support the new individual circumstances (these notes can also be viewed and updated from the Document, Notes or Assessment section of the client’s record.
- Click continue to return to the Individual Circumstances dialog.
- Change the Level of Need if appropriate.
If you do not change the level of need but add individual circumstances you need to check that the level of need is up-to-date.
- Click continue to return to the client record page.
Sexual Health section
The Sexual Health section is used to identify sexual health advice, referrals and products given. Due to the sensitive nature of this information, the section is not visible to all staff. Permissions to use the Sexual Health section are granted in the OneIYSS System Administration module.
- In the client's record, click the change button on the Sexual Health section to display the Change Sexual Health Records dialog. This dialog lists any previous sexual health records.

- Click the add new sexual health record link to display the New Sexual Health Record dialog.
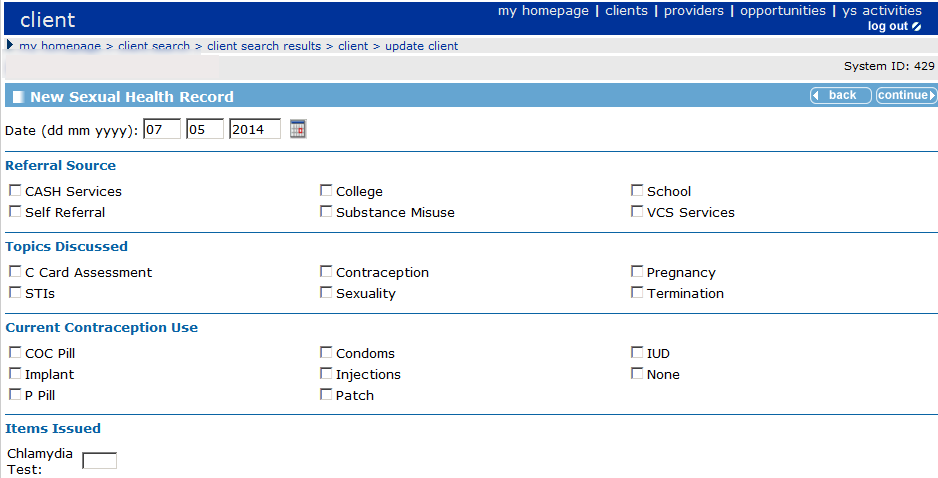
- Enter all details relating to the sexual health session.
The Items Issued section allows you to specify the number of items issued.
- Click continue to display the Change Sexual Health Records dialog.
- Click continue to return to the client record page.
Carer Contacts section
Use the Carer Contacts section to record parent/guardian contact details and make notes about family relationships. This may be particularly important if the young person is part of more than one family.
- In the client's record, click the change button on the Carer Contacts section to display the Change Carer Contacts dialog.

- Click the add new carer contact link to display the Add Carer Contact screen.
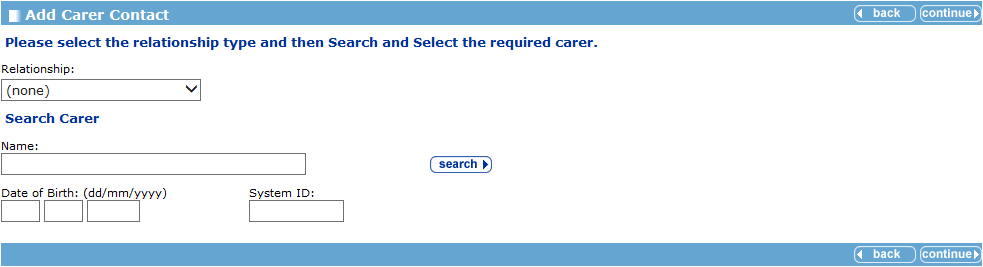
- Search for an existing carer contact record:
- Select a Relationship type, e.g. Father, from the drop down.
- Enter the carer’s name and click the search button to display a list of matching records.
- If the required carer is displayed in the results, select the record and click continue to save the carer record and display the Change Carer Contacts screen.
If the required carer is not displayed in the results:
- Click the add new carer contact link to display the Add Carer Contact screen.
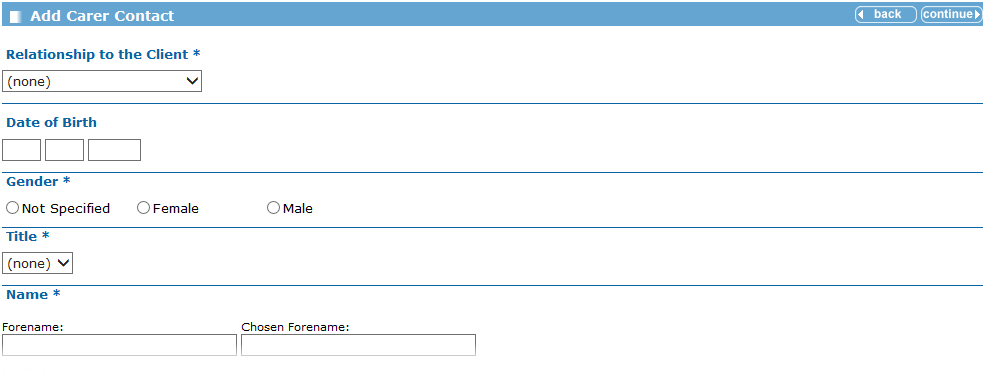
- Complete the required fields.
- Click continue to save the carer record and display the Change Carer Contacts screen.

- Select the check boxes as appropriate.
- If required, complete the Contact Order field. This indicates the order in which the carers should be contacted, where “1” is the first person to contact.
- Click continue to return to the client record.
Notes section
Notes are recorded as part of an interaction and give a general description of what was discussed as part of the contact.
It is important to keep notes of a particular type together so that anyone coming into contact with the young person can immediately get to the appropriate information.
The three main areas for adding notes in this section are:
- SEN Notes and Personal Notes are displayed in red as they are classed as confidential and may be restricted as part of role-based security.
- Benefit Notes are not classed as confidential and are displayed in yellow.
Add a New Note
- In the client's record, click the new note button on the Documents, Notes, Forms and Assessments section to display the New Note dialog.

- Select the required note (if a note of this type already exists it is opened automatically).
Note types with a red icon can only be read by users with appropriate permission. Notes with a yellow icon can be read by all users.
- Click continue to display the relevant Notes dialog.
- Enter your notes. Dates and names are added automatically.
- Click continue to return to the client record. Your note is displayed in the Documents, Notes, Forms and Assessments section.

View and Change a Note
- In the client's record, click the note you wish to change in the Documents, Notes, Forms and Assessments section.

- Click the note title you want to view/change.
- You can now read the notes and make changes if required.
- Click the change button in the left side panel under Note Actions.
- Enter your notes.
- Click continue to return to the client record.
You can access running notes from other locations in OneIYSS e.g. Additional Needs (SEN Notes) and Individual Circumstances (Personal Notes). These form part of the same notes accessed in Documents, Notes, Forms and Assessments, but are accessed from a different area in the client record.
Refer to: Document, Notes and Assessments for more information.
Professional Contacts and Involvements
The procedure below shows how to add a lead professional, lead worker or add a new additional worker. Also to view One Involvements.
In the example in the process below will add a lead worker. However, you can add an additional worker using the same process by clicking the add new additional worker link.
- In the client's record, click the change button in the Professional Contacts and Involvements section to display the Change Professional Contacts dialog.
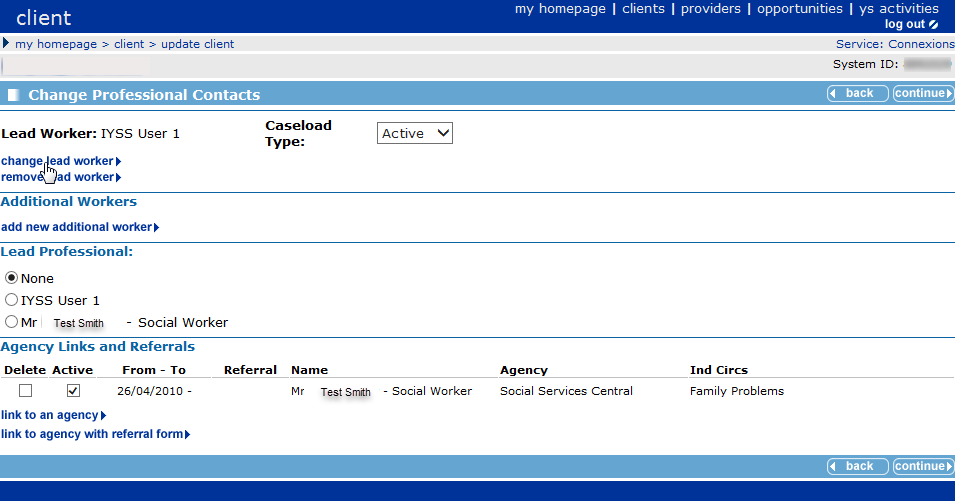
- Click the change lead worker link to display the Change Lead Worker dialog.
- Enter a name, forename or surname, and click the search button to display the search results.
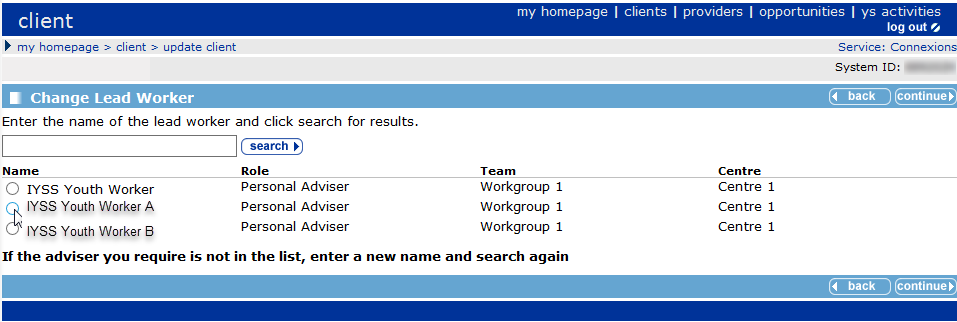
- Select the name you want and click continue to display the Change Professional Contacts dialog .
- From the names in the Lead Professional section, select the new Lead Worker’s name and click continue to display the client record.
The new Lead Worker is displayed on the client record. The change is recorded in the history of changes.
Add a Lead Professional
Only a few young people are allocated a Lead Professional. In OneIYSS, the Lead Professional can be selected from either Lead Worker or a recorded Agency Contact.
- In the client's record, click the change button in the Professional Contacts and Involvements section to display the Change Professional Contacts dialog.
- Select the Lead Professional from the list. If the person you require is not in the list, you need to add them as an Agency Contact first.
To add agency contacts is a system administrator function.
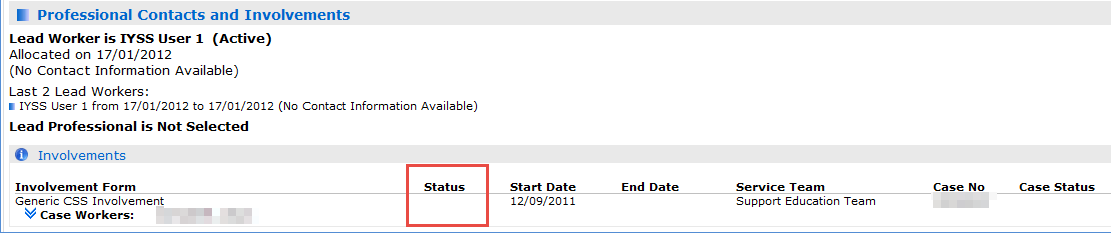
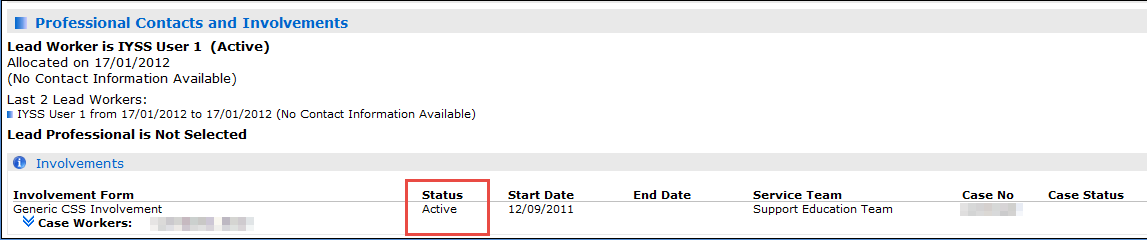
View One Involvements
In One, an involvement is linked to a student who may also be a client in OneIYSS. If a client has involvements in One, the message ‘Has Involvements’ is displayed in the Professional Contact and Involvements panel.
To show the involvement details, click the More button. The details that are displayed depend on whether you (as an IYSS user) are a member of the One establishment for the service that the specific involvements are linked.
If you are not a member of the One Establishment, you cannot to see the Status details:
If you are a member of the One establishment, you can see the Status details:
Agencies and Referrals
The procedure below shows how to link client to an agency, or record a referral to an agency.
Both task follow the same procedure except refer an agency that has a referral form to complete.
- In the client's record, click the change button in the Individual Circumstances section to display the Change Individual Circumstances dialog.
- Click the link to an agency link to display the Link Client to Agency (Step 1 of 3) dialog.
- Select either a current individual circumstance or new ones for which the referral is being made. Then enter any relevant Notes.
- Click continue to display the Link Client to Agency (Step 2 of 3) dialog.
- Enter an Agency Name in the search box and then click the search button to display the search results.
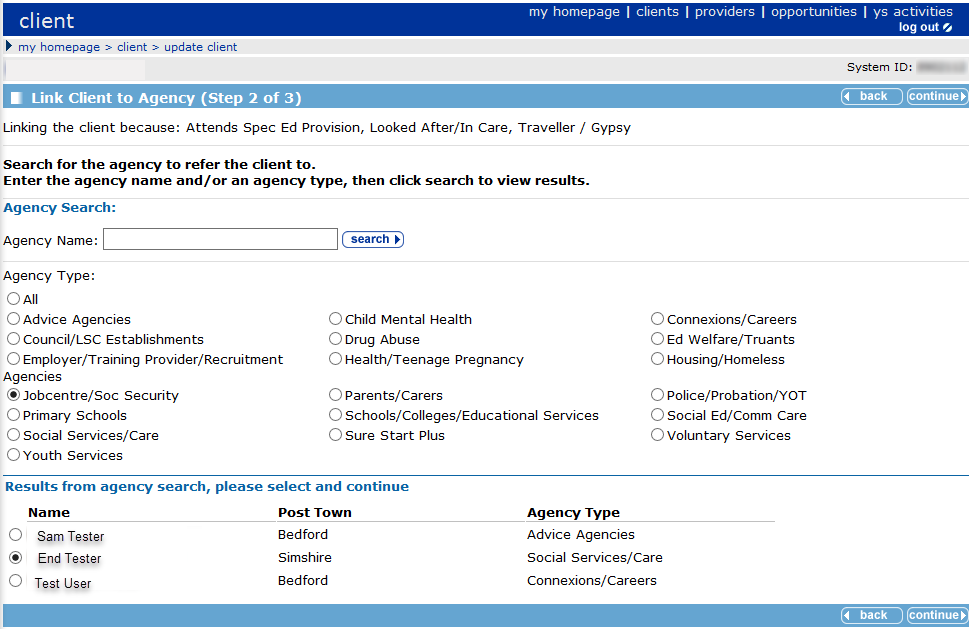
- Select the Agency Type from the list.
- Select the Agency Name from the agency search results.
- Click continue to display Link Client to Agency (Step 3 of 3) dialog.
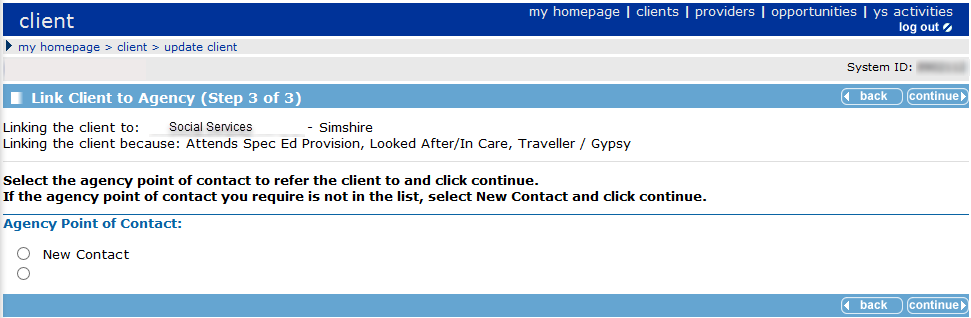
- Select the Agency Point of Contact from the list. If the contact you require is not displayed, select New Contact.
- Click the continue button to return to the Change Individual Circumstances dialog.
- If you selected the referral option, complete the Referral Details by entering text in the text boxes and completing the date fields, then click the continue button.
- Select continue to return to the client page.
Document, Notes and Assessments
The procedure below shows how to add a document to or change a document linked to a client record.
Add a new Document
- In the client's record, click the new document button in the Document, Notes, Forms and Assessments section to display the New Document dialog.
- Select the Document Type that you want to create.
- Click continue to display the New [Document Type] dialog.
- Select the Document Template you want. Click continue to display the document template.
- Enter a Document Title (this is displayed in the list in the Document, Notes, Forms and Assessments section of the client record page).
- Click in the main document section to activate the tool bar.
- Use the Insert Client Information links to add client information into your document.
- Click in the document where you want the client information to appear.
- Click on the client information link (e.g. full name) which is then displayed in the document.
- Enter any other text required. Use the spellchecker button to check spelling.
- If you are working on a long document and want to save it, click the save button.
- To print the document, click the print button.
- Click continue to return to the client page. Your document is displayed in the Document, Notes, Forms and Assessments section of the client’s record.
Change an existing Document
- In the client's record, in the Document, Notes, Forms and Assessments section, click the document name that you want to change to display the document

- To change the document, click the change button on the left side panel under Note Action.
- Make the required changes.
- Click continue to return to the client page.
If you are working in a document for a while you can save it regularly by clicking Save.
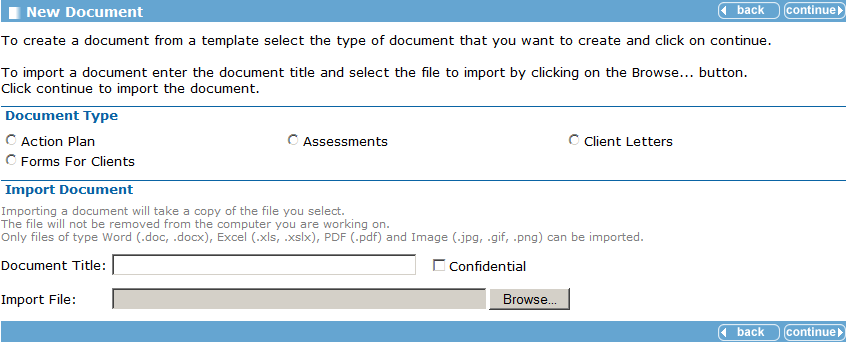
Import a Document
- In the client's record, click the new document button in the Document, Notes, Forms and Assessments section to display the New Document dialog.
- In the Import Document section of the dialog, enter a Document Title for the document you want to import.
- Click the Browse button and select the document you want to import from the Choose File to Upload dialog.
- Select the Open button to return to the New Document dialog.
- Click continue to save the imported the file. The imported file is displayed in the Document, Notes, Forms and Assessments section.
- Click continue to return to the client page.
You can only import files of type Word (.doc, .docx), Excel (.xls, .xslx), PDF (.pdf) and Image (.jpg, .gif, .png).
View an Imported Document
- In the client's record, click the document name that you want to change in the Document, Notes, Forms and Assessments section.
To view or change an imported document that is not a Word document, the dialog below is displayed.
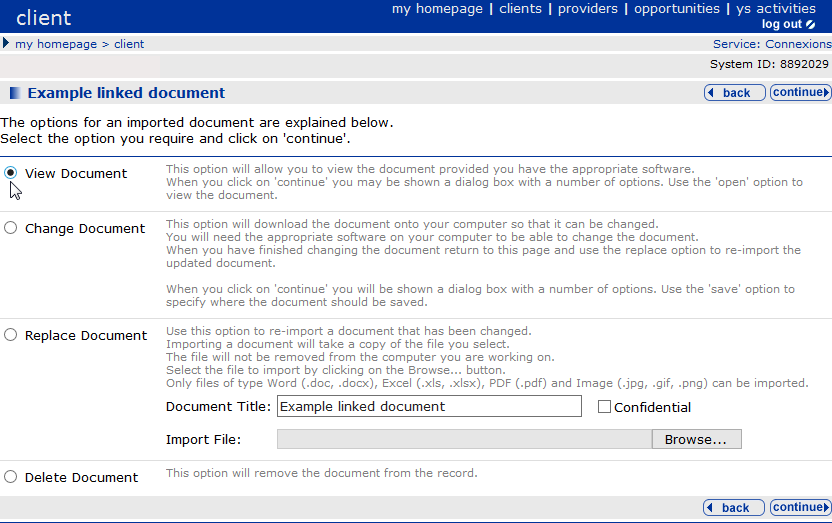
- Select the option you want and follow the instructions on the dialog depending on whether you want to view, change, replace or delete the document.
- Click continue to return to the client page.
Add an APIR to a Client Record
- In the client's record, click the new APIR button in the Document, Notes, Forms and Assessments section to display the Record New Assessment dialog.

- Select APIR Assessment. Click continue to display the APIR Assessment - Participation (Element 1 of 18) dialog.
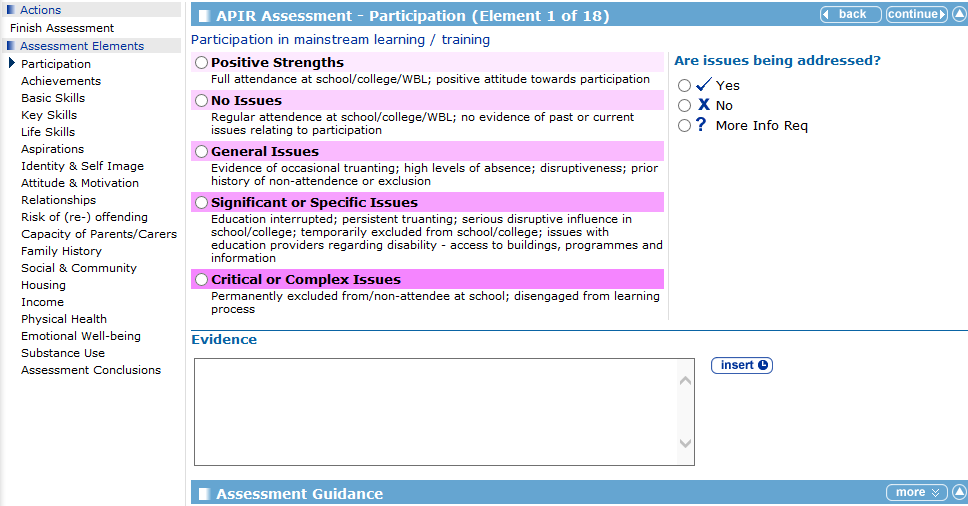
You may find it beneficial to read through the rest of this section before continuing.
- Either complete each element in turn by clicking the continue button to go to the next element, or select the element you want to record from the list in the side panel. As each elementelement is recorded the value shows next to the element.
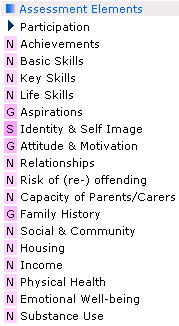
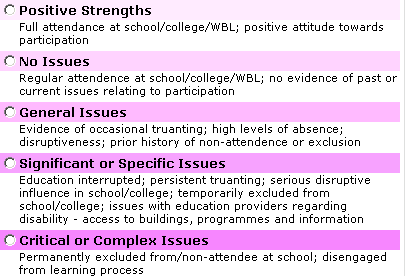
- For each element you need to complete:
- LevelLevel
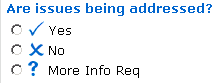
- Are Issues Being AddressedAre Issues Being Addressed
- Any relevant notes.
- To view the Assessment Guidance notes, click the more button.
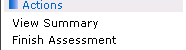
- When you have completed recording the assessment, click on Finish AssessmentAssessment in the Actions side panel.
The APIR Assessment Summary is displayed which may look similar to this:
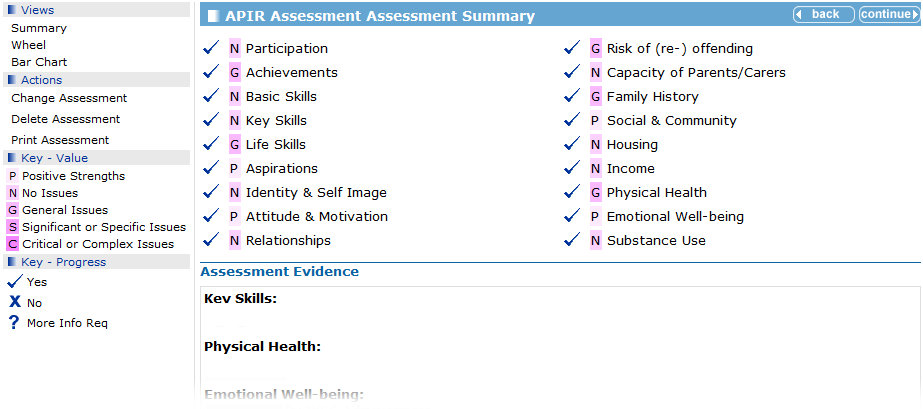
You can view the APIR assessment in WheelWheel or Bar ChartBar Chart format by selecting the options under Views in the left hand panel.
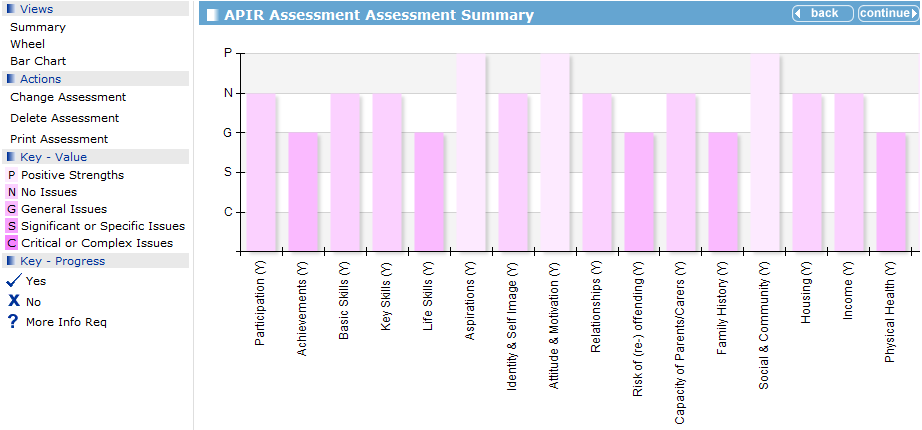
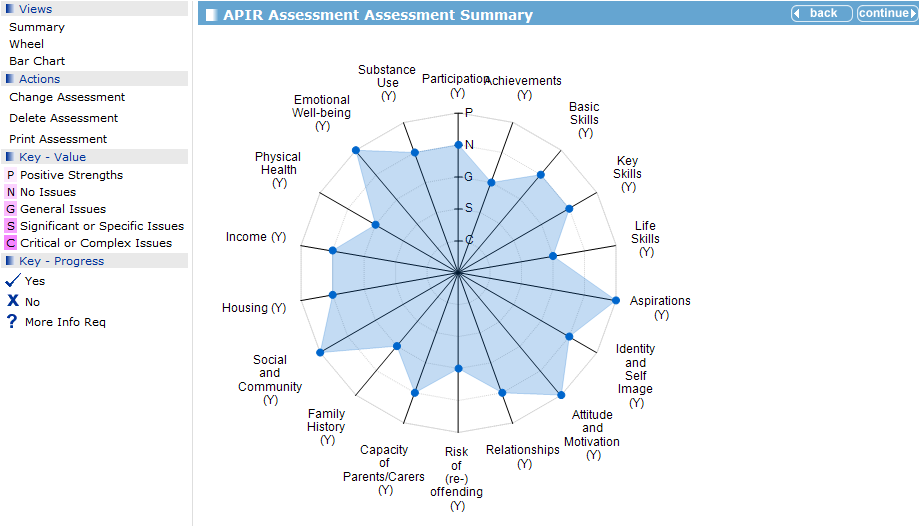
- Notes are displayed for all elements on each view.
- All elements have suggested issues to explore at the bottom of each page.
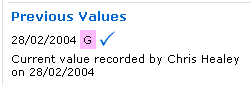
- When elements are changed the previous valuesprevious values are kept and displayed.
- From the Summary, Wheel, or Bar Chart view you can click continue to return to the client record.
Consent to Share Information section
The procedure below show how to change consent to share information on a client record.
Consent to share information with other agencies only needs to be changed if:
- Permission has been denied by the young person or their parents, to hold anything but basic data.
- The young person has said they do not wish to be contacted for a given period.
- The record contains ‘sensitive’ information as prescribed by the Data Protection Act.
- In the client's record, go to the Consent… section and click the change button to display the Change Consent dialog.
- Select the Information Sharing check box.
- Select either Permission granted (consent form signed) or Permission withheld.
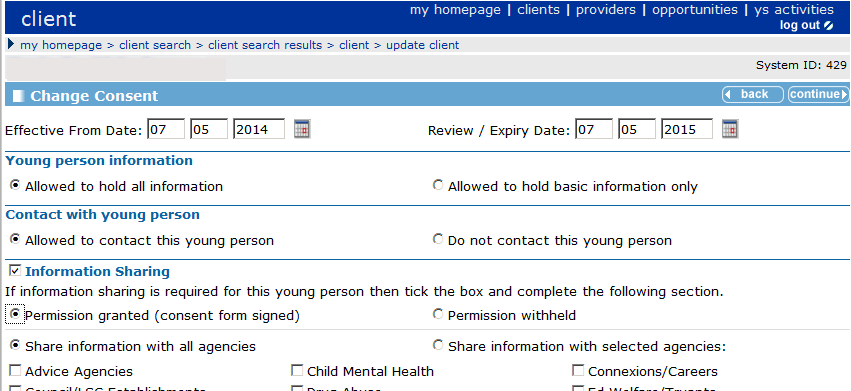
- If you select Permission Granted, you can choose which agencies and information you want to share with. Alternatively you can opt to select Share Information with all agencies.
- If required, add Consent Notes.
- Click continue to return to the client page. Your changes are displayed in the Consent… section.
If permission withheld had been recorded, then an alert is displayed on the header bar of the record, as follows

Qualifications and Attainments
You can record both Actual and Forecast qualification in the Qualification and Attainments section.
- In the client's record, go to the Qualifications and Attainments section and click the change button to display the Change Qualifications dialog.
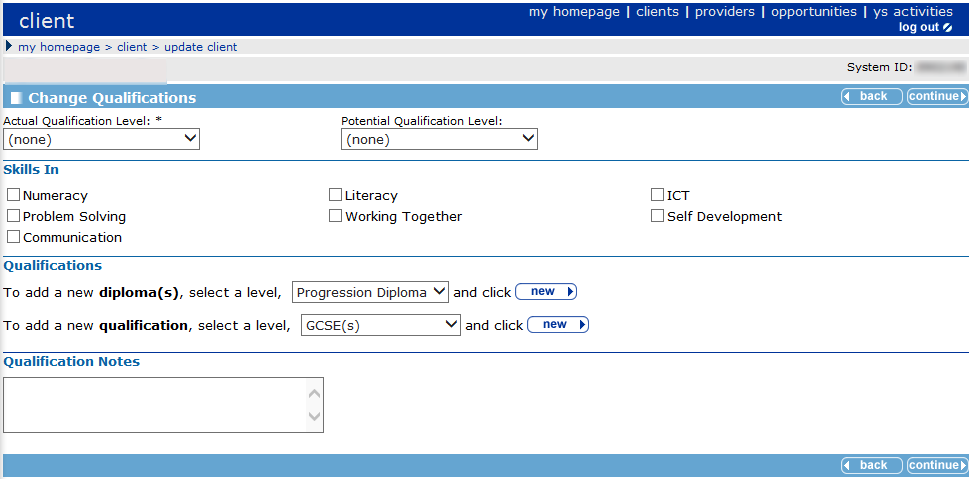
- In the Qualifications section, select the level you want from the To add a new qualification... drop down list.
- Click the new button to display the New [level] Qualification(s) dialog.
- Enter date of the qualification. You can also enter the examining board, and a forecast or actual grade.
- Select the Subjects and click continue to display the Change Qualifications dialog.
The new qualifications are displayed in the Qualifications section where you can update the Actual or Forecast grades, if necessary.

- Add any Qualification Notes required then click continue to return to the client record. The new qualifications are displayed in the client’s record.
Aspirations section
Aspirations are added to client records to identify the young person’s future plans, e.g. further education or employment and training.
Use employment aspirations to match the young person to job vacancies.
The steps below shows how to update aspirations and add an employment aspiration.
- In the client's record, go to the Aspirations section of the client page. Click the change button to display the Change Aspirations dialog.
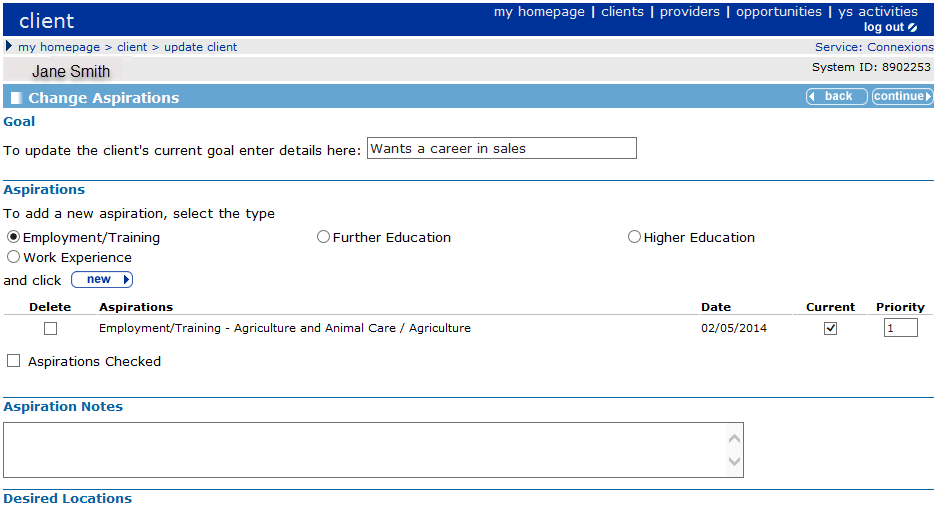
- In the Goal section, you can add a free text statement about the young person’s current goal, e.g. Client wants a career in sales.
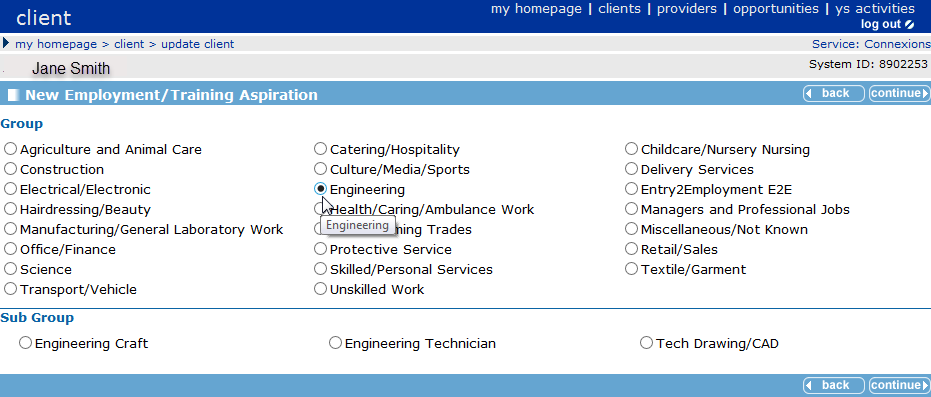
- Select Employment/Training as the Aspiration type. Click the new button to display the New Employment/Training Aspiration dialog.
- Select the occupation Group to which the aspiration belongs e.g. Engineering.
- From the occupation Sub Group select the specific job, e.g. Tech Drawing/CAD.
- Click continue to return to the Change Aspirations dialog.
- Record Aspiration Checked, if applicable. This records when, and by whom, Aspirations were last checked so that other users can assess how up to date the information is.
- If the young person is looking for work in a particular location, select Desired Locations.
- Select an Intended Destination, if appropriate
In the Aspirations section, the aspiration has been added and marked as Current and Priority 1. You can change these now or in the future if the young person’s plans change.
- Add any relevant Aspiration Notes, if required.
- Click continue to return to the client record.
Benefits and Allowances
The procedure below show how to add or update a client’s benefits and allowances.
- In the client's record, go to the Benefits and Allowances section. Click the change button to display the Change Benefits and Allowances dialog.
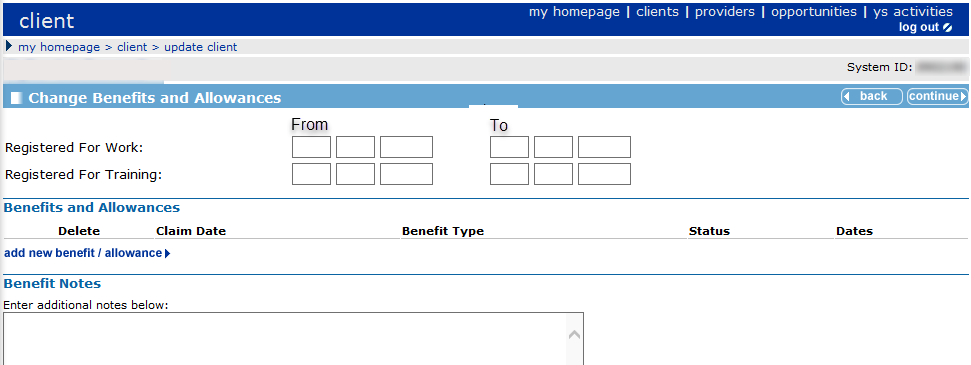
- If relevant, enter the From and To dates on which the client registered for work/training.
- Click the add new benefit/allowances link to display the Add Benefit or Allowance dialog.

- Enter the Claim Start Date.
- Select the Benefit Type.
- Select the Claim Status.
- Click continue to return to the Change Benefits and Allowances dialog. Details of the benefit claim are displayed in the Benefits and Allowances area.
- If required, you can add Benefit Notes relating to the claim.
- Click continue to return to the client record which is updated with the new benefit/allowance claim.
Submit an Opportunity
The procedure below show how to add a submission to a client record using an opportunity ID.
- In the client's record, go to the Opportunity Submissions section and click the new button to display the New Submission dialog.
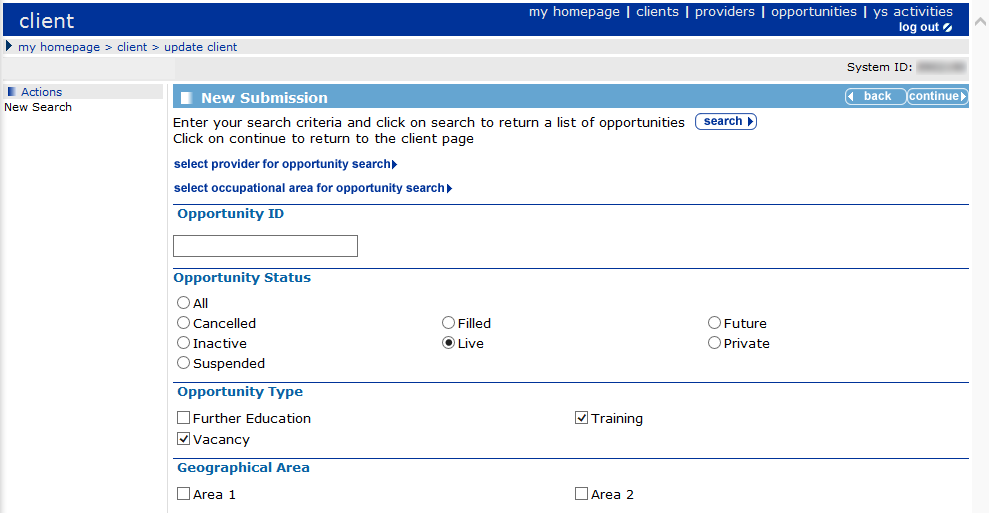
- Enter the Opportunity ID of the opportunity you require.
- Click the search button to display the opportunity search results.
- Select the Submit check box and select a submission status from the drop-down list.
- If the Submission Status is related to an interview, enter the interview date and time.
- Click continue.
The submission is displayed in the side panel. You can search for more opportunities, if required, by clicking new search and entering different criteria.
When you return to the client dialog the submissions are displayed as activities completed and also displayed on the Opportunity Submissions section.
You can also use Occupational Area or Provider to search for opportunities.
Key Client
The procedure below show how to create and remove key client. You can use the Bookmark Client facility to display a link at the top of the client record to give you quick access to client records.
Create a key client
- On the client record page, select Key Client from the Actions menu on the left-hand side of the dialog to display the Change Key Client dialog.
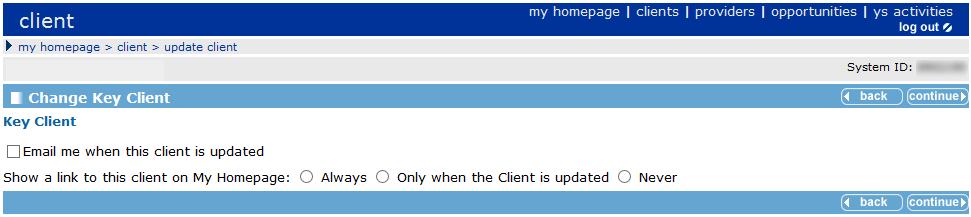
- In the Key Client section select:
- Email me when this client is updated: if you want to be notified via email when a colleague updates the record.
- Always: if you want the client to always appear in the Key Clients portal of My Homepage.
- Only when the client is updated: if you want the client to appear in the Key Clients portal of My Homepage when it has been updated by a colleague. OneIYSS removes the client from the panel after you have viewed the record.
- Click continue to return to the client record.
A key icon  is displayed on the record header bar of any client record where you have identified the client as a key client.
Remove Key Client status from a client record
- On the client record page, select Key Client from the Actions menu on the left-hand side of the dialog to display the Change Key Client dialog.
- In the Change Key Client area, select Never.
- Uncheck the Email me when this client is updated check box.
- Click continue to return to the client record. The key icon
 is no longer displayed on the client record header bar.
Bookmarking Clients
Bookmarked clients’ names and IDs are displayed on a My Bookmarks header bar:
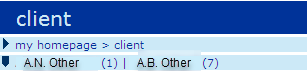
When you click on a bookmarked client, their record opens. Bookmarking a client is like minimising in a Windows environment.
- On the client record page, select Bookmark Client from the Actions menu on the left-hand side of the page.
The client name and id are displayed on the My Bookmarks header bar.
- If required, repeat this with other clients.
Bookmarks are removed when you log out of OneIYSS.
To remove a bookmark, click Remove Bookmark from the Actions menu.
Special Alert
A special alert identifies important information to be aware when working with a particular client, for example, to highlight staff health and safety issues.
Details of an issue can be recorded in Personal Notes, if required.
Refer to Notes for more information.
Add a Special Alert
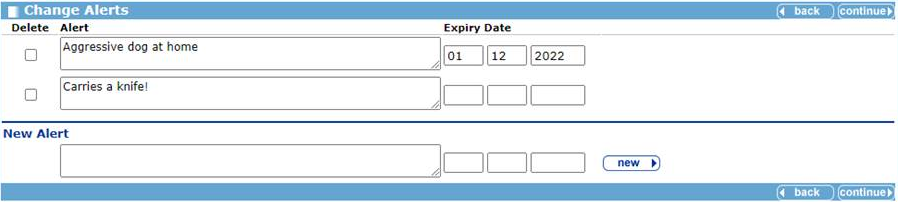
- In the client's record, select Change Alerts from the Actions menu to display the Change Alert dialog.
- Enter the details of the special alert in the New Alert text box.
- If appropriate, enter an Expiry Date for the special alert.
- Click the new button, to add the special alert to the list on the Change Alert page.
- Click continue to return to the client record.
The alert is displayed in the Summary section title in red text, identifying that there is an alert for this client. If you click on the Summary icon, the alert pop-up is displayed:
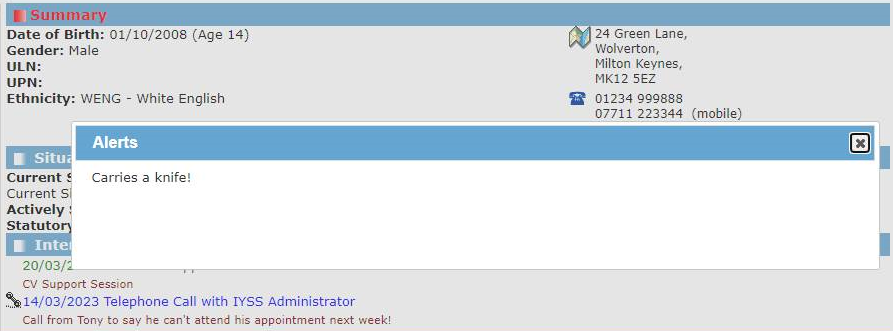
The pop-up will display active alerts. Select the cross (close button) in the top right corner of the Alerts pop-up to close.
To view all alerts including those that have expired, select Change Alerts from the Actions menu.
Remove a Special Alert
- In the client's record, select Change Alert from the Actions menu to display the Change Alert dialog.
- Select the Delete Alert check box adjacent to the alert you want to remove.
- Click continue to display the client’s record.
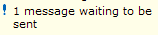
SMS and Email Messages
OneIYSS enables you to send SMS or email messages to individual young people or to a group of young people.
The Send Message link is only displayed on the young person’s record if they have a mobile number or email address recorded in the Summary section of their record.
When a message is sent, an interaction is automatically recorded on the young person’s record with the message included.
Messages are sent periodically by your organisation, e.g. every ten minutes.
If the young person replies to the message, OneIYSS sends you an email alert. The reply is added to the interaction section of the client record.
Send a Message
- In the client's record, select the Send Message link in the Actions menu on the left side of the dialog.
- Select whether the message will be sent via Email or Text (the options displayed depend on whether the client has an email address or a mobile phone number recorded).
If you send a text message, a character counter alerts you if your message is too long.
- Enter a subject and then type in a message.
- Click the continue button. In the side panel, a note is displayed: