![]()
Tools - Administration
Timeline Design
- Timeline DesignTimeline Design
A timeline is designed via Tools | Administration | Timeline | Timeline Design. Before a new timeline can be saved it requires a Name and it must contain at least one Activity.
Although it is optional to link a timeline to an involvement form, for CSS it is necessary to do this in order for a timeline to function correctly with an involvement orm.
A Timeline may contain many activities, branches and groupings of Activities (sequences, parallels, limits etc).
Activities may be added at the end of the timeline or may be inserted at any point where the Add icon is available.
Branches can be incorporated into the main Timeline, containing a number of ‘decision points’. When a decision point is reached you will need to make a choice which path (branch) to follow.
The days that lapse between the Activities are determined by three different Day Types.
Any aspect of a timeline may be amended, but any amendments that are made must still pass the same validation criteria as when setting up a Timeline.
A Service Team Manager can view Timelines that have been associated with an Involvement for their team members via Focus | ServicesServices. Highlight the Team Member and any Timelines that have been associated with an Involvement will appear under the Involvements panel.
Timelines are set up via Tools | Administration | Timeline | Timeline DesignTimeline Design. This opens the Timeline Enquiry.
Some sample SEN Timeline definitions are available to import.
The following SEND / EHCP timeline templates are available to reflect the 20 week statutory limit for the EHCP:
EHCP Assessment Timeline
EHCP Re-Assessment Timeline
EHCP Review Timeline. - Timeline EnquiryTimeline Enquiry
The Timeline Enquiry page is opened via Tools | Administration | Timeline | Timeline Design This path may be different if the Menu has been customised . It enables you to search for existing timelines.
To find the required Timeline enter a full or partial description in the Timeline NameTimeline Name field. Alternatively click the Search icon to open the Involvement Form Enquiry window. This will allow you to filter the search to find an existing Timeline associated with a particular Involvement Form.
If you wish to Clear the Selection click on the Delete button.
Clicking Search will return a list of Timelines, in alphabetical order, matching the selection criteria. The browse can be ordered by clicking a column headercolumn header. You may expand or collapse a panel by clicking the iconicon.
Double click on a record or highlight a record and click the Open in New Window icon to view the Timeline Details.
To add a new Timeline click the New icon.
Click on Delete to remove a Timeline. You will be prompted with a message:
Are you sure you want to delete this Timeline?
- How to import a Timeline DefinitionHow to import a Timeline Definition
- Select Tools | Administration | Timeline | Timeline Design.
- Select a timeline.
- Click the Import button.
- Browse to the location of the desired timeline definition (file extension *.XOML).
- Select the file, then click the Open button
Sample Timeline definitions are found in the client install location, typically: C:\Program Files\Children's Services\Children's Services System
The set of templates in this folder are as follows:
- Sample Attendance Timeline.xoml
- EHCP Assessment Timeline.xoml
- EHCP Re-Assessment Timeline.xoml
- EHCP Review Timeline.xoml
- SEN Statement Review Timeline.xoml
- SEN Timeline A or A2.xoml
- SEN Timeline P S or S2.xoml
Double click the Template you are bringing in (bring in one at a time).
If you get the following error message, it means that the templates have not been deployed correctly and you must contact your System Administrator as some changes need to be made on the Deployment Server.
You can check this further by right clicking on the timeline filename and selecting Properties.
The size of the timeline file may be showing as 0 bytes. This is incorrect, the file size should be greater than zero and it means the System Administrator or whoever installs your application software, needs to do some further configuration.
The System Administrator will need to add the .xoml file extension as a MIME file type (text/xml) on the Deployment Server, before the Timeline Templates can be viewed.
- EHCP TimelinesEHCP Timelines
A timeline is a set of predefined activities that a Caseworker or Administrative Officer follows when dealing with a particular type of involvement.
The activities on a timeline are intended to be followed each time a new involvement is created. When a timeline is associated with an involvement it is given a start date and the activities are displayed on My Home Page | My Workflow Messages, after the number of pre-defined days has elapsed.
Letters can be generated from a timeline to send to the student’s professional contact. Letters generated from a timeline are displayed in the student’s communication log.
The following timeline templates have been provided to reflect the 20 week statutory limit for the Education, Health and Care Plan (EHCP):
- EHCP Assessment Timeline
- EHCP Re-Assessment Timeline
- EHCP Review Timeline
New timelines can be created via Tools | Administration | Timeline | Timeline Design to reflect the local authority’s configuration of the four phases of a student assessment, as outlined by the DfE Code of Practice.
An additional correspondence activity of Other has been added to timelines to work specifically with EHCP involvements.
- Timelines (Workflow Management)Timelines (Workflow Management)
A timeline is a set of predefined activities that a Caseworker or Administrative Officer will follow when dealing with a particular type of involvement.
As these activities are intended to be followed each time a new involvement is created, the timelines need to be re-usable.
A timeline is designed once, but re-used many times by associating an instance of it with an involvement.
When the timeline is associated with an involvement it is given a start date and the activities are presented for completion as Workflow Messages on the Caseworker’s or Admin Officer’s My Home Page after the number of pre-defined days has elapsed.
A timeline can be deleted, but once it is deleted it cannot be retrieved; it is completely removed from the system. A System Administrator must assign Read-Write-Delete permissions to the user.
However, any correspondence or communication items that have been generated from the timeline will remain in the system. Correspondence and communication logs can be deleted via the Communication Log in the Links panel.
If a timeline has been associated with an involvement, a System Administrator must assign permissions to delete the timeline.
- Delete a TimelineDelete a Timeline
A timeline can be deleted, but once it is deleted it cannot be retrieved; it is completely removed from the system.
However, any correspondence or communication items that have been generated from the timeline will remain in the system. Correspondence and communication logs can be deleted via the Communication Log in the Links panel.
A timeline cannot be deleted if another user has it open.
If a timeline has been associated with an involvement, a System Administrator must assign permissions to delete the timeline.
To assign permissions to delete a timeline:
- Select Tools | Permissions | User Group Processes | CSS Administration Main Business Process.
- Assign Read-Write-Delete permissions to the user group.
- Select Focus | CSS Service Teams Administration | CSS Service Teams Enquiry to display the CSS Service Teams Definition page.
The Service Team Name is populated. - Select the Timelines can be Deleted check box.
- Click the Save button.
To delete a timeline:
- Select Focus | People | Students | Student Details | Involvements to display the Involvement Summary page; the first panel is the Timeline Details.
- Click the Delete Timeline button at the top of the page. The button is not activated until the involvement is saved.
A message displays to warn you that the timeline will be completely removed from the system. - Click the Yes button to delete the timeline.
Once a timeline has been deleted, a new timeline can be added to the involvement, but it will start from the beginning so users will have to skip any irrelevant activities to get to the current point on the timeline.
Deleting a timeline that is linked to an involvement does not affect the timeline template.
- EHCP Professional ContactsEHCP Professional Contacts
Professional contacts are added to the system via Focus | Services | EHCP Administration | EHCP User Defaults.
The EHCP Professional Contacts panel is included in the EHCP Assessment Involvement and the EHCP Re-Assessment Involvement forms. This panel enables you to:
- specify the professional contacts for a student
- specify to which contacts letters can be sent
The following roles can be set up as a professional contact:
- Assessment Officer
- Administrative Officer
- Medical Officer
- Social Services
- Communication Log Sender
- Special Educational Needs and Disability (SEND)Special Educational Needs and Disability (SEND)
In England, the statutory statements and assessment process have been replaced with a joint assessment process and a single Education, Health and Care Plan (EHCP). This plan brings together the support on which children and their families rely across education, health and social care.
Services work together to agree a plan that reflects the family’s ambitions for their child from the early years to adulthood (0 – 25 yrs). The process will be reviewed regularly to reflect the child’s changing needs and to clarify who is responsible for provision.
The existing SEN module has been left largely unchanged to allow for the transition from the SEN Statement to the EHC Plan. The SEN Statement, however, is now only available for historic purposes.
The following features are available to use with SEND EHCP:
- Case Notes
- Chronology
- Form Builder
- Involvements
- EHCP Professional Contacts
- EHCP Provision
- EHCP Relationships
- EHCP Timelines
- EHCP ProvisionEHCP Provision
The details of all provision provided for an assessment are recorded via Focus | People | Students | Links | Provision. A provision can be recorded as one of the following types:
A provision must be linked to a service.
A flag is available to record provision as a Personal Budget, enabling you to record the Personal Budget Type, Charge/Cost Details and Payee Details.
- EHCP RelationshipsEHCP Relationships
Relationships record the associations between the subject and other members of their family. Recording relationships in the Education, Health and Care Plan (EHCP) is initially carried out when a new EHCP is created. Additional relationships can be associated with the subject as the EHCP progresses. Relationships are also recorded via the Social Network.
Timeline Details
- Timeline DetailsTimeline Details
This page is the Timeline designer.
The Timeline[name] displays panels for:
- Basic Details
- Involvement Forms
- Workflow
A New Timeline can be created from here or an existing Timeline can be cloned. Click the Clone icon and a message will ask you:
Do you wish to clone the current Timeline?
Before saving the cloned Timeline a new Timeline Name must be entered. Saving without a new name produces the message:
Timeline with same name already exists
A Wizard is available allowing you to move through each panel by clicking Previous or Next instead of scrolling down the page. Click the Wizard icon again to return to a scrollable form.
- Basic Details (Timeline)Basic Details (Timeline)
Enter details for the Timeline Name (a mandatory field, up to 50 characters) and a Description (optional).
To find a Working Day Base click the icon to open the Base Enquiry. Select one base from a list of all bases recorded within the system. If a timeline is to run by Working Day Base, then you must use the one set up from the database. For more information, see Setting up a Working Day Base below.
In order to use a timeline in CSS it must be linked to an Involvement Form.
The timeline is designed in the Workflow (Timeline) panel.
Set up a Working Day Base
Setting up a working day base for selection on a timeline is a three step process.
Step 1 – Setting up a Base Term Lookup
- In the v4 Client select Tools | Administration | Lookups to display the Lookups page.
- On the Lookup Tables panel, select and open Table_ID 0559 Base Terms to display the Lookup Code [0559 – TABLE_ID] dialog below the panel.
- Click the New button to display the Lookup Code [New Lookup] dialog.
- On the Lookup Code panel, enter an Internal Code (<CSSW>).
- Enter a Description (<CSSW Working Day Base>).
- Select the Active check box.
- Click the Save button.
Step 2 – Setting up a Base Definition
- In the v4 Client select Focus | Bases | Bases to display the Base Enquiry page.
- Click the New button to display the Base Definition page.
- Select No to the Do you wish to add a Base from the National Database? question.
- On the Basic Details tab, enter a name for the working days base.
- Select a Base Type.
- Select the Active check box.
- Click the Save button.
Step 3 - Adding Dates and Times
- Click the Bases Online button at the top of the Base Definition page to display the Bases | All Bases <CSSW Working Days Base> | Base Details page in v4 Online.
- Select the Opening Times tab.
- Select the Academic Year for the current year to display the term opening times for the three terms.
- Delete two of the terms from the browse.
- Click the Edit button on the remaining term to display the Term Detail/Time Details dialog.
- Change the Term type to <CSSW – CSS Working Days>.
- Change the Start and End dates to the beginning and end of the working year.
- Select an Opening Time and a Closing Time for Normal.
- Click the Save button to display the new working year details.
- Click the Calendar icon to display the CSSW Term Dates dialog.
- Using the Individual Days radio buttons, select Holiday/Not Open, Staff Only Day or Enforced Closure against the days the working base is closed, i.e. Christmas Day, Bank Holidays, training days etc.
- Click the Save button.
- In the v4 Client, return to the Base Definition page.
- Click the Save button to populate the Terms and Opening Times panel.
- Click the View button to display the read-only Base Term Details dialog.
- Click the Term Calendar button at the top of the dialog to display the read-only calendar for the selected year. You can view the details of the calendar in v4 Client, but any changes must be made in v4 Online
- Click the OK button to close the Term Calendar dialog.
- Click the OK button to close the Base Term Details dialog.
The working day base is now available for selection when creating a timeline.
Each year (usually January start date) ensure a new year is added against the working base, this needs to be done in advance for long timelines.
- Involvement Forms (Timeline)Involvement Forms (Timeline)
In order to use a Timeline it must be associated with an Involvement Form,
To enable a Timeline to be used with one or more types of Involvement click .Add to open the [Involvement Form Link].
Use the browse to select an Involvement Type. Click to Clear the Selection.
This will open the Involvement Form Enquiry. The panel displays the Form Description and Form TypeForm Description and Form Type. Select a Form Type from the dropdown:
- EHCP Assessment Involvement
- EHCP Re-Assessment Involvement
- EHCP Review Involvement
- Generic CSS Involvement
- SEN Assessment Involvement
- SEN Statement Review Involvement
- SEN Tribunal Involvement
- SEN Standalone Review Involvement
When designing a Timeline for use with an Involvement Form of type SEN Assessment Involvement it is necessary to select one or more SEN Assessment Source(s) and SEN Assessment Type(s) by ticking the box(es).
When the new SEN Assessment Involvement was created it was mandatory to choose values for Assessment Type and Source. It is those values that appear in the SEN Assessment Source and SEN Assessment Type panels as unchecked boxes.
For example:
It is possible to design a Timeline that accommodates more than one Source and more than one Assessment Type, so if the same Timeline will suffice for say an Initial Assessment where the Source is either parent or School, then choose Assessment Type of Initial Assessment and Sources of both Parent and School for the Timeline Design.If conversely, you need different Timelines for Initial Assessment for Parent and School, then design two Timelines, choosing the same Type for both, but different Sources.
The SEN Assessment Source and SEN Assessment Type panels will appear even if the form is not of type SEN Assessment Involvement, but there won’t be anything visible within the panels.
If you design more than one template for any one Involvement form, then when the Timeline is associated with the Involvement form you will be presented with a browse to select the particular template to be used. If you wish to restrict the choice of Timeline associated with an Involvement form then you need to design only one Timeline template for each individual Involvement form.
SEN Assessment Source and Type at Run-time
When you choose to associate a new Involvement to a Timeline, by clicking on the Timeline button, the System matches the values on the form against the predefined values for Source and Assessment Type set up on Timeline Template. When a match is found, the system then populates the Timeline Chooser automatically.
If you design more than one Timeline with the same values of both Source and Assessment type, the system will present you with a chooser, from which you will need to select the appropriate Timeline.
If, after loading the Timeline, and saving the Involvement, you then edit the Source and Assessment type, making the associated Timeline invalid now, a new Timeline will not automatically load. You will need to save and close the Involvement, then re-open it – now the new Timeline will appear (providing you have designed one for the new combination of Source and Assessment type of course).
Click Remove to delete an Involvement Form from the list.
Unlike v3 the Timeline is not restricted by a Service and Reason Code. Reason Code is not defined in the Timeline, but in the Involvement Form.
Having selected the Involvement Form the Timeline can now be designed.
- Workflow (Timeline)Workflow (Timeline)
The Workflow designer is divided into two areas:
- Activities – lists the different type of activities used to create the workflow
- Involvement Timeline – ‘Drag and drop’ Activities onto the area to create a Timeline
To maximize the designer
- Click the Show/Hide button to switch off the feature panelsfeature panels. The Show/Hide button includes drop-down options allowing you to customise the desktop to Show All, Hide All or to select the feature panels you wish to show/hide.
- Select Workflow from the drop-down next to the wizard. Click the icon and if Hide All has been selected the Timeline template will fill the screen.
A new Timeline can be created here or Activities can be added to existing Timelines. Before a timeline can be saved it requires a Name and it must contain at least one Activity. Ideally it should be linked to at least one Involvement Form and can be linked to more than one.
The Start and Stop points for a new Timeline are shown automatically in the Involvement Timeline panel. Drag and drop Activities between the start and end points to create a Timeline template.
Anchor Step
There is currently no Anchor Step in v4 Timelines.
When the Timeline is associated with the Involvement, the Involvement Date (or the Received Date for SEN Involvements) is automatically assigned as the date on which the Timeline starts. Therefore it is not necessary to create the first Timeline Activity to be ‘Request Received’ (or similar for non-SEN Involvements).
Activities
- Add an ActivityAdd an Activity
An unlimited number of activities can be used to create a Timeline.
To add an Activity select from:
Activity Designer Properties 
Activity Adds a single Activity directly to the Timeline or inside a Parallel, Sequence or Branch 
Limit Defines maximum days in which a group of Activities must be completed 
Sequence Activity Adds a group box, places Activities that are to be carried out one after the other into the Sequence box 
Parallel Activity Adds a group of Activities that are to be carried out in parallel, but allows them to be completed in any order 
Branch Defines multiple routes through the Timeline Branch After Delay Defines multiple routes through Timeline (preceded by reminder message) 
Correspondence Activity Generates outbound correspondence at run time 
Stop Workflow For Branches only! Terminates the Timeline Click on the Activity Type to view its Designer Properties.
‘Drag and drop’ an activity category to the Drop Activities here section. When an activity category is ‘dragged’ onto the Involvement Timeline panel the icon appears to show where the activity can be ‘dropped’.
An icon appears on the Container Activity to show the Activity Type.
Right click on an activity to Cut, Copy, Paste or Delete. An Activity can also be deleted by highlighting it and using the Del button on the keyboard. Using the Drag and Drop functionality brings up the icon to show where the Activity can be placed. When using Copy and Paste click on the Timeline to display the icon. If the icon is not showing you will not be allowed to paste the activity in that position.
Use the plus and minus to expand and collapse the Activity. This will allow you to view more of the Timeline as a whole by only seeing the container headers. Take care that all the required fields have been completed before collapsing the Activity as the Timeline will not be valid and will not save.
When any activity is added a warning icon appears in the top right hand corner to show that it is incomplete. Click on the drop-down arrow to view the fields that require data to be entered.
Examples of errors
- A Warning Days message must be set.
- Message is less than the permitted size of 1
- A Condition/Question must be set
- Invalid value for Title
- At least one Activity is needed
Double click on the label heading to enter the Activity Properties.
- ActivityActivity
The Activity is the basic building block of the Timeline, use it whenever you want to create a single Activity (or task) that needs to be carried out. Activities can be dragged onto the timeline on their own, or can be placed inside any of the ‘Container’ activities, i.e. inside a Sequence Activity, a Limit, a Parallel Activity or either of the two Branches.
SEN Linked Fields can be added to an Activity.
When creating an Activity, the following fields are mandatory:
Title, Warning Days, Warning Days Message and Message Assignee, Target Days, Target Days Message and Message Assignee.
Behaviour of the Activity at run time:
Two Workflow Messages will be generated, one when the Warning Date is reached, the other when the Target (Due) Date is reached.
The Activity must be Completed or Skipped before you can proceed to the next Activity on the Timeline.
- Limit ActivityLimit Activity
A Limit is a ‘container’ Activity; think of a Limit as a container into which you must place all those Activities that are to be completed within the number of days defined as Limit Days.
Choose a Limit to contain any group of Activities that must be completed to a fixed deadline, for example, Statutory limits. However, Limits can be set using any of the three Day TypesDay Types.
Once the Day Type for the Limit has been chosen, only Activities of the same Day Type may be placed inside the Limit. Once the Limit Days have been defined, you may not place Activities inside the Limit whose Target Days collectively exceed the number of days defined as Limit Days.
If an entire Timeline is to be completed within a Limit, select the Limit Activity as the first one for the Timeline and place it between the Start and End of the Timeline, then drag and drop all the Activities that must be completed within the Limit, into the Limit container. Define Limit Days as the number of days in which the entire Timeline must be completed.
It is possible to define one or more Limits for a timeline and to place one Limit Activity inside another Limit Activity.
NB This approach has been used for the SEN Assessment Timeline which will be issued with v4 and reflects the SEN Code of Practice 2001.
When creating a Limit, the following fields are mandatory:
Title, Limit Days, Limit Day Type.
For all Activities placed inside the Limit Activity, the rules apply for that particular Activity type.
Behaviour of the Limit Activity at run time:
As soon as the first Activity within the Limit is in Progress, the outer container for the Limit is also shown as in Progress.
When any Activities within the Limit container are completed or skipped, the system works out whether the Limit date will be exceeded. If the Limit date will be breached, the system displays a Warning message on the Limit Activity, that has a HAZARD symbol, and the message ‘Limit Deadline dd/mm/yyyy will be exceeded by nn days’.
The Summary panel of the Involvement will also display a Hazard symbol against the Limit Activity if it is breached and it will indicated by how many days the Limit will be exceeded.
In the event that the Limit will be breached, the end user has the opportunity to re-plan the Target Days of any remaining Activities contained within the Limit Activity, providing these Activities are not at status ‘In progress’ (or Completed/Skipped). However, the Limit Date itself may not be changed at run time by the end User.
Limit Days may not be changed at run time.
The Limit Activity will remain at status ‘In Progress’ until all Activities that are placed inside it, are either completed or skipped.
- Sequence ActivitySequence Activity
A Sequence Activity is a ‘container’ Activity and is intended to contain a number of individual Activities that you intend to carry out one after the other, in sequence. When a Sequence Activity is dragged onto the Timeline, it automatically has the first Activity inside the container. (Although it is possible to remove this Activity and end up with an empty Sequence Activity on the Timeline, avoid doing this as it will adversely affect the date calculation of the subsequent activities.)
Place as many more individual Activities or other types of Activities into the Sequence Container and provide a Title for the container by clicking on the outside of the container, until the Activity Properties panel is displayed allowing you to enter the mandatory Title and the optional description for the Sequence Activity.
The outside edge of the Sequence Activity is only shown on the Timeline when you hover over it and the Title is shown in relief text, i.e. not in standard text.
There is not a lot of difference in practical terms, between the Sequence Activity containing three Activities and three ‘simple’ Activities placed one after the other on the Timeline; in both cases, the Activities must be completed in the sequence that they appear on the Timeline. However, if you have used the Sequence Activity, then you must enter a title for it and this title will appear in the Timeline Summary panel on the Involvement as a separate ‘node’ containing the three separate Activities. One other small difference is that if you use the Sequence Activity, and then need to move it to another place in the Timeline, you will be able to move the Sequence Activity and everything inside it, in one go, whereas had you used individual Activities, you would have to cut and paste or drag and drop, each one separately to its new position.
SEN Linked Fields can be added to a Sequence Activity.
When creating a Sequence Activity, the following fields are mandatory:-
TitleFor all Activities placed inside the Sequence Activity, the rules apply for that particular Activity type.
Behaviour of the Sequence Activity at run time:
Two Workflow Messages are generated for each Activity that is placed inside the Sequence.
The first Activity inside the Sequence is the one that is ‘In Progress’ initially.
All Activities inside the Sequence must be completed in order.
The Title of the Sequence Activity is displayed on the Summary Panel area of the Involvement.
The Titles of those Activities inside the Sequence container are displayed on the Summary Panel area of the Involvement.
- Parallel ActivityParallel Activity
A Parallel Activity is a ‘container’ Activity that allows you to place a number of Activities onto the Timeline that are logically grouped (e.g. all of the Request for Advice activities used in a SEN Timeline) but which you want to allow to be completed in any order, rather than one after the other. So, using the Request for Advice example again, if you use a Parallel Activity and place five individual Activities inside the parallel container, then at runtime, the end User will be able to mark any of those Request for Advice Activities as complete, according to the order in which they receive the individual advices back.
When a Parallel Activity is dragged onto the Timeline, it automatically has two Activities inside the container. (Although it is possible to remove these Activities and end up with an empty Parallel Activity on the Timeline, avoid doing this as it will adversely affect the date calculation of the subsequent Activities.)
To add extra Activities inside the Parallel, you can right click on the background of the Parallel container and choose ‘Add Branch’ which adds another single Activity (not to be confused with the Branch or Branch After Delay Activities – description follows), or drag another Activity in.
Add as many as you like, you can also add all the other Activity types inside a Parallel container, such as a Branch, or add additional Activity types to follow any of the single Activities. The size of the Parallel container expands as you add other Activities.
SEN Linked Fields can be added to a Parallel Activity.
When creating a Parallel Activity, the following fields are mandatory:
Title, Warning Days, Warning Days Message and Message Assignee, Target Days, Target Days Message and Message Assignee.
For all Activities placed inside the Parallel Activity, the rules apply for that particular Activity type.
Behaviour of the Parallel Activity at run time:
Two Workflow Messages are generated for the Parallel Activity as its Warning and Target Dates are reached.
The Parallel container is highlighted in orange when it is in status ‘In Progress’.
The Title of the Parallel Activity is displayed on the Summary Panel area of the Involvement.
The Titles of those Activities inside the Parallel container are displayed on the Summary Panel area of the Involvement.
Activities inside the Parallel can be marked as Completed or Skipped in any order.
You must complete or skip ALL activities inside the Parallel before the Timeline will move on to the Activity placed after the Parallel Activity.
Tip: If you want to allow the end User to proceed with other Activities at the same time as all those that are inside the Parallel container, then consider placing a Parallel inside another Parallel.
- BranchBranch
Branch does not have any Warning or Target Day messages defined. This means that as soon as the previous Activity on the Timeline is completed, the Branch Activity is now due and the end User should make their choice of which path to follow.
In all other respects, Branch and Branch After Delay behave in the same manner.
One or the other of these Branch Activities should be placed onto the Timeline when the timeline is required to branch in different directions, following different sets of Activities, according to the outcome of some condition or decision. For example, in a SEN Assessment, a decision will be made within six weeks, whether to assess or not. This is represented by defining a Branch Activity with a Condition/Decision for that branch of ‘Decision to Assess or Not’, with two ‘paths’ or possible outcomes, one of which is ‘To Assess’ and the other ‘Not to Assess’.
The behaviour of these Activities at runtime will be that the end user will need to choose one or the other of the paths, and, having chosen a path, the Timeline will then proceed to the subsequent Activities for that particular path.
Place any other Activities inside each Branch and having chosen the path to follow, the Timeline will then automatically present only those subsequent Activities to the end user at run time.
It is quite common to find a Branch like the ‘Assess or ‘Not Assess’ example used, where one path, the ‘Not to Assess’ path in this case, actually causes the Timeline to end at that point. To make the Timeline end once a path has been followed, place a Stop Workflow Activity inside the relevant arm of the branch. Once the path has been chosen at runtime, the Timeline will automatically terminate once it reaches the Stop Workflow Activity. The Stop Workflow Activity can be used inside any Branch but it cannot be used if not inside a Branch. (You will notice when designing the Timeline that it already has both Stop and Start icons that appear automatically, therefore the Stop Workflow Activity is reserved for use inside a Branch or Branch After Delay Activity only.)
When creating a Branch, the following fields are mandatory:
Title
For all Activities placed inside the Branch Activities, the rules apply for that particular Activity type.
Behaviour of the Branch Activity at run time:
No Workflow Messages are generated for the Branch, it is In Progress or Due as soon as the previous Activity on the Timeline is marked as completed or skipped.
The Branch container is highlighted in orange when it is in status ‘In Progress’
The Title of the Branch together with the Titles of all of its paths, are displayed on the Summary Panel area of the Involvement.
The end user must select the Branch container, then select ‘Choose Branch’ on the tool bar, then select the path they are choosing and click OK.
Once the path has been chosen, all other possible paths are unavailable. The Timeline automatically continues with the Activities inside the chosen path.
- Branch After DelayBranch After Delay
Branch After Delay has both Warning Days and Target Days defined. This means that there will be a delay after the previous Activity has been completed/skipped, before the end user receives the Workflow messages relating to the Branch After Delay Activity. (The delay equals the number of days defined as Warning/Target days for the Branch After Delay).
In all other respects, Branch and Branch After Delay behave in the same manner.
One or the other of these Branch Activities should be placed onto the Timeline when the timeline is required to branch in different directions, following different sets of Activities, according to the outcome of some condition or decision. For example, in a SEN Assessment, a decision will be made within six weeks, whether to assess or not. This is represented by defining a Branch Activity with a Condition/Decision for that branch of ‘Decision to Assess or Not’, with two ‘paths’ or possible outcomes, one of which is ‘To Assess’ and the other ‘Not to Assess’.
The behaviour of these Activities at runtime will be that the end user will need to choose one or the other of the paths, and, having chosen a path, the Timeline will then proceed to the subsequent Activities for that particular path.
Place any other Activities inside each Branch and having chosen the path to follow, the Timeline will then automatically present only those subsequent Activities to the end user at run time.
It is quite common to find a Branch like the ‘Assess or ‘Not Assess’ example used, where one path, the ‘Not to Assess’ path in this case, actually causes the Timeline to end at that point. To make the Timeline end once a path has been followed, place a Stop Workflow Activity inside the relevant arm of the branch. Once the path has been chosen at runtime, the Timeline will automatically terminate once it reaches the Stop Workflow Activity. The Stop Workflow Activity can be used inside any Branch but it cannot be used if not inside a Branch. (You will notice when designing the Timeline that it already has both Stop and Start icons that appear automatically, therefore the Stop Workflow Activity is reserved for use inside a Branch or Branch After Delay Activity only.)
When creating a Branch After Delay Activity, the following fields are mandatory:
Title, Warning Days, Warning Days Message and Message Assignee, Target Days, Target Days Message and Message Assignee
Behaviour of the Branch After Delay Activity at run time:
Two Workflow Messages are generated for the Branch After Delay as its Warning and Target Dates are reached.
The Branch container is highlighted in orange when it is in status ‘In Progress’
The Title of the Branch together with the Titles of all of its paths, are displayed on the Summary Panel area of the Involvement.
The end user must select the Branch container, then select Choose Branch on the tool bar, then select the path they are choosing and click OK.
Once the path has been chosen, all other possible paths are unavailable. The Timeline automatically continues with the Activities inside the chosen path.
- Correspondence ActivityCorrespondence Activity
Correspondence Activities (Letters/Emails/Other) are set up for a Timeline, which, at run time, will generate outbound correspondence, i.e. letters/statements/reports: any templates which are stored on the Report Server.
When a Correspondence Activity is added to the Timeline Design a Letter Activity is automatically inserted. Right click on the Correspondence header to Add Letter or Add Email. Letters/Emails can be Cut or Deleted and you can Copy and Paste a Letter/Email to another position on the Timeline. Up to eight individual pieces of correspondence may be added to each Activity.
When creating a Correspondence Activity, the following fields are mandatory:
Title, Warning Days, Warning Day Type, Warning Days MessageWarning Days, Warning Day Type, Warning Days Message, Target Days, Target Day Type, Target Days Message and Message Assignee. (The text Warning message and Target message default to the relevant fields, but can be overwritten).
Letter
Details of the Letter Activity include the Recipient’s Role, a checkbox for Response Required and the name of the Report Template that will be used to generate the letter/report.
Response Required defaults to a tick. When a Response is physically received for a piece of Correspondence that has been sent out, if ticked, this response will be recorded in the Communications Log.
SEN Linked Fields can be added to a Letter Activity, so that generating a letter updates the linked field on the Involvement record.
First and Second Reminders can be set up stating the number of Days before each Reminder is sent and the name of the Report Template. Up to two Reminder letters for each piece of correspondence may be added. For each reminder you may choose:
- a Letter/Report template to be used to generate the reminder ( this may be the same as was used for the original correspondence or may be different)
- Days sent – the number of days after which the reminder letter should be sent (between 1 and 99). At runtime the system starts counting from the day that the previous letter was produced and when it reaches the specified number of elapsed days, a Workflow Message will be generated to the same Message Assignees as selected for the Target Message.
Email
Details of the Email Activity include the Recipient’s Role (if you wish to add additional recipients, this can be done via the Communications Log at runtime) and a checkbox for Response Required. Response Required defaults to a tick. When a Response is physically received for an email that has been sent out, if this is a tick, this response will be recorded in the Communications Log.
An Attachment can be included in the email. Select the tick or the cross to show if an Attachment is included. If tick is selected then a Report must be Attached.
In the Content Details enter the Subject of the email (free text field up to 128 characters) and the Body of the email (a free text field up to 1000 characters).
SEN Linked Fields can be added, so that generating an email updates the linked field on the Involvement record.
First and Second Reminders can be set up stating the number of Days before each Reminder is sent and includes the Attached Report. Up to two Reminder letters for each piece of correspondence may be added. For each reminder you may choose:
- a Letter/Report template to be used to generate the reminder (this may be the same as was used for the original correspondence or may be different)
- Days sent – the number of days after which the reminder email should be sent (between 1 and 99). At runtime the system starts counting from the day that the previous email was produced and when it reaches the specified number of elapsed days, a Workflow Message will be generated to the same Message Assignees as selected for the Target Message
Other
An additional correspondence activity of Other has been added to timelines to work specifically with EHCP involvements.
- Stop WorkflowStop Workflow
When the previous Activity is completed/skipped (or the path has been chosen if there are no other Activities inside the chosen path prior to the Stop Workflow), the Stop Workflow is initiated.
The Timeline ends.
It is marked as completed once the Involvement has been saved.
Stop Workflow is only used on Branch and Branch After Delay. If this Activity is inserted into the workflow template, then at run-time when this path is selected it will complete the Timeline, ignoring all subsequent activities.
- Activity Properties
When adding an Activity to the Timeline double click on the container header to open the Activity Properties window. Enter the details, depending on which activity category has been selected:- TitleTitle
The Activity Heading. A mandatory field, up to 50 characters, for all Activity Types except Branches and Stop Workflow.
- DescriptionDescription
An optional free text field, up to 100 characters, to record further details of what should be done in the activity.
- Branch ConditionBranch Condition
A free text field to record a Condition or Question requiring a number of possible outcomes (Paths). A mandatory field for Branch and Branch After Delay.
- Branch PathBranch Path
You can add many different Paths, can also edit or remove existing paths. Each Path (outcome) represents a different branch that the timeline may follow
- Warning DaysWarning Days
Defined to enable the generation of Workflow messages. If the Message Assignee is set to Off, then the following fields are not required. Selecting Caseworker, Administrative Officer or Both makes all of the fields mandatory.
Warning Days – number of days, becomes Warning Date once associated with a Timeline.
- Setting Warning Days to 0 means that when the Timeline is associated with an Involvement a Workflow Message will appear in the messages column on the Home Page immediately the previous Activity is completed.
- Setting Warning Days to 1 means that a Workflow Message will appear in the messages column on the Home page the day after (at midnight) the previous activity is completed.
Type – Calendar, School, or Working Days, must be the same as Target Days within the same activity
Message – A free text field, maximum 100 characters which appears on My Workflow Messages on the Home Page. This field is mandatory if the Message AssigneeMessage Assignee has been selected; select Off to make it optional.
Message Assignee – the person who receives the message, select from Caseworker, Administrative Officer, BothBoth or Off. If more than one Caseworker or Admin Officer has been assigned to the Involvement they will all receive the Workflow Messages. If the Caseworker or Admin Officer is changed whilst the Involvement in ‘In Progress’, the system will cease to send messages to the previous people and will generate messages for the people now assigned to the Involvement.
- Setting Warning Days to 0 means that when the Timeline is associated with an Involvement a Workflow Message will appear in the messages column on the Home Page immediately the previous Activity is completed.
- Target DaysTarget Days
Defined to enable the generation of Workflow messages. Requires the following fields to be entered:
Target Days: Number of days, becomes Due Date once associated with a Timeline.
- Setting Target Days to 0 means that when the Timeline is associated with an Involvement a Workflow Message will appear in the messages column on the Home Page immediately the previous Activity is completed (or Start Date if first Activity).
- Setting Target Days to 1 means that a Workflow Message will appear in the messages column on the Home page the day after (at midnight) the previous activity is completed (or Start Date if first Activity)
Type: Calendar, School, or Working Days, must be the same as Warning Days within the same activity
Message: A mandatory free text field, maximum 100 characters, appears on My Workflow Messages on the Home Page
Message Assignee: The person who receives the message, select from Caseworker or Administrative Officer – message cannot go to both. If more than one Caseworker or Admin Officer has been assigned to the Involvement they will all receive the Workflow Messages. If the Caseworker or Admin Officer is changed whilst the Involvement in ‘In Progress’, the system will cease to send messages to the previous people and will generate messages for the people now assigned to the Involvement.
- LimitsLimits
The number of Limit Days and whether Calendar, School or Working Days. Only applies to Limit Activity
- Linked FieldsLinked Fields
Relevant only for SEN Assessment Involvement. Select from Assessment Panel Date, Assessment Notified Date, Assessment Start Date, Assessment Completed Date, Statement Panel Date, Statement Draft Date, In Lieu Date, Final Statement Date, Statement End Date
Received Date is not available as a Linked Field as it is no longer necessary to link the first activity on a Timeline to Received Date. Timelines are automatically linked to Involvement Date for all Involvements.
Refer to Linked Fields below to see the behaviour of a Linked Field when it is associated with an Involvement.
- Recipient RoleRecipient Role
A dropdown field containing system generated Roles that are maintained within Key Contacts.
It is possible to choose any recipient role that forms part of the set of Contact records for a Subject. At run time, the role will be populated with the names of the people occupying that role for the Subject for whom the letter is being produced. When more than one person occupies a role, you will be offered a selection at run time.
Note that there is a choice at design time, for some roles, between the role that is will be stored on the Involvement record and the role as stored against the Base record. For example, an Ed Psych role named on the Involvement record may or may not be occupied by the same person who is named as the Ed Psych on the Subject’s base record. If you choose the role Inv – Ed Psych at design time and then at run time, there isn’t an Ed Psych recorded on the Involvement, the system will advise there isn’t anyone recorded on the Involvement and offer you a choice to select a person from the set of Contacts recorded for the Subject, or to choose any Person recorded in the system to receive the letter. So there is some flexibility in choosing the right recipient at run time as well as at design time.
Only available for Letter and Email Correspondence Activity.
- Template DetailsTemplate Details
Click on the browse icon to select a Correspondence Report to add to the letter. Choose from Linked (Crystal) Reports, which are stored on the configurable Report Server. This may take some time to retrieve the list of available reports.
Or choose from a set of Quick Reports which are stored on a local drive in C:\Documents and Settings\My Report Templates.
Click on the Delete button to Clear the Selection.
This is only available for Letter Correspondence Activity.
- Attachment DetailsAttachment Details
If an attachment is to be included in the email, tick Attachment Included. If this has been checked then a Report must be attached.
Click on the browse icon to select a Correspondence Report to add to the email. Choose from Linked (Crystal) Reports, which are stored on the configurable Report Server. This may take some time to retrieve the list of available reports.
Or choose from a set of Quick Reports which are stored on a local drive in C:\Documents and Settings\My Report Templates.
Click on the Delete button to Clear the Selection.
This is only available for Email Correspondence Activity.
- Reminders (Letters)Reminders (Letters)
You may add up to two reminder letters for each piece of correspondence. For each reminder letter added you may choose:
- A Letter/Report template to be used to generate the reminder ( this may be the same as was used for the original correspondence or may be different
- The number of days after which the reminder letter should be sent. The effect of this at runtime is that the system starts counting from the day that the previous letter was produced and when it reaches the specified number of elapsed days, a Workflow Message/s will be generated to the same message Assignee/s as selected for the Target Message
- Reminders (Emails)Reminders (Emails)
You may choose to add up to two reminder emails. For each reminder email added you may choose:
- whether to include an attachment, the default being the template that was originally selected, however you may select a different template for the outbound reminder email (if No is selected then the list of reports will not be available for selection
- the number of days after which the reminder email should be sent. The effect of this at runtime is that the system starts counting from the day that the previous email was produced and when it reaches the specified number of elapsed days, a Workflow Message/s will be generated to the same Message Assignee/s as selected for the Target Message
- the Subject text specified for the original email is re-used as the Subject text of the reminder, but is prefaced by the text ‘Reminder’
- the original Body Text is re-used but it is prefaced by a line of text ‘Original email sent dd/mm/yyyy’ (this date will be populated at runtime)
- Key Contacts (Person Enquiry) Key Contacts (Person Enquiry)
The Person Enquiry window enables you to select a person known to the system using the Person Enquiry.
Alternatively, where a subject is already selected, click the Key Contacts tab to select from a list of key contacts for the current subject. If there is more than one subject, the drop-down can be used to select the one required.
In the case of Early Years Service Providers there are no Key Contacts.
A third tab called Base / Role is available when adding a From or To contact from the Communication Log.
Any ACLs set up against a service team, involvement or person, are passed through to the key contacts in the communication log and these persons are hidden, if appropriate.
Key Contacts Tab
The Key Contacts tab lists most contacts from the Social Network for the selected subject and on an ICS or EHCP form, where a question type of ‘A person with roles (adult or student)’ is used.
Roles for key contacts include Parents/Carers, as indicated on the Parental Relationship lookup table in v3 or defined via Student focus | Carers link in v4 as having Parental Responsibility Base Contacts for any base that the subject currently attends , Caseworkers, any person identified as a Caseworker linked to any v4 Involvement for the subject Administration Officers linked to an active v4 Involvement for the subject , EHCP Professionals, in an EHCP form, with a question type of 'A person with roles (adult or student) Other SEN Professionals, where the subject has an active v4 SEN Involvement) the subject themselves, their siblings and other contacts linked to the selected subject. You can select a group of contacts or an individual member by clicking in the adjacent box. Those selected will be listed in the panel beneath and if required they can be removed from the list using the Remove icon.
Base / Role Tab
The third tab called Base / Role allows an Agency to be added as a From or To contact on the Communication Log. Click on this tab to select a Base Name using Base Enquiry and a Role using People/Role Enquiry.
Click the OK button to close the Person Enquiry window and return to the previous panel with these contacts selected.
- Save the Activity PropertiesSave the Activity Properties
If all of the criteria have not been met the following validation message will appear at the bottom of the screen:
The timeline is not valid. Please correct any errors displayed on the timeline designer
Click on the down-arrow on the warning icon to view the fields that require attention.
Save the Timeline. If the timeline is validated and the validation criteria are satisfied the Timeline saved successfully message appears at the bottom of the screen.
- TitleTitle
- Activity Day TypesActivity Day Types
There are three Day Types to select from:
- Calendar Day
All days including Saturday and Sunday are counted, e.g. setting Calendar Day to 6 days for an Activity means 6 consecutive days will elapse after the previous Activity has been completed before this Activity is due. Calendar Days are used for SEN Timelines as advised by the DfE. - School Day
School Days are usually expected to be Monday – Friday each week, except for School Holidays and Closures. School Days are often used for Attendance Referral Timelines. School Days are dictated by the Base of the Subject of the Involvement to which the Timeline is associated. - Working Day
All days will be included in the count between one Activity and the next unless they are specified as Holiday or Closure in the Academic Calendar of the Working Day base selected for the Timeline.
A base is used to calculate the Working Days within a Timeline.
If you select School Day the base for the child who is the subject of the Involvement will be used.
When a timeline is associated with an Involvement the Day Types are populated with actual values.
Activities in a timeline can be defined in a mixture of Days, so that different activities may be defined as different Day Types. However, for any one activity Warning Days and Target Days must be defined with the same Day Type otherwise the following error message appears:
Warning Days and Target Days must have the same Day Type
To select a Day Type open the Activity and click on the dropdown for Warning Days Type and Target Days Type.
- Calendar Day
- Warning DaysWarning Days
Warning Days are used to create a Workflow Message that will be displayed to advise the recipient that they will shortly need to complete an Activity.
The message will be displayed nnn number of days (where nnn=Warning Days) after the previous Activity has reached its Due Date.
It is possible to Replan the Warning Days for an Activity at ‘run-time’, providing the Activity is not Completed, Skipped or In Progress.
Enter the number of Warning DaysWarning Days (up to 3 digits).
Click on the drop-down for Type and select Calendar Day, School Day or Working Day.
Enter details for the MessageMessage. If you define Warning Days and Target Days with the same day value, two workflow messages will appear on the Home Page.
Select from Caseworker, Administrative Officer or Off for the Message AssigneeMessage Assignee.
All fields are mandatory unless the Message Assignee has been set to Off.
Run-Time Timeline
Once the Timeline is associated with an Involvement the number of Warning Days becomes a Warning date.
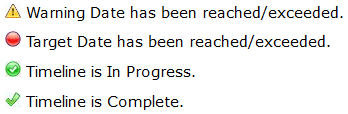
When the warning date is reached/exceeded, but the target date has not yet been reached, the system displays a workflow message on the Home Page.
When an update is made to the run-time Timeline the Timeline Summary is activated, showing the status of the Timeline and a warning date having been reached/ exceeded appears as a warning sign.
Save the Involvement before returning to the Home Page.
Click the Refresh button on the Home Page to update the status of the Timeline in My Involvements.
- Target DaysTarget Days
Target Days are used to create and define a workflow message for an Activity that will be displayed advising the recipient that they are due to complete the Activity now.
The message will be displayed nnn number of days (where nnn=Target Days) after the previous Activity has reached its Due Date.
It is possible to Replan the Target Days for an Activity at ‘run-time’, providing the Activity is not Completed, Skipped or In Progress.
Enter the number of Target DaysTarget Days. This must be greater than the number of Warning Days or you will be presented with the following error:
Target Days cannot be less than Warning Days
Click on the dropdown for Target Days Type and select Calendar Day, School Day or Working Day.
Enter details for the MessageMessage. If you define Warning Days and Target Days with the same day value, two Workflow Messages will appear on the Home Page.
Select from Caseworker or Administrative Office for the Message AssigneeMessage Assignee.
All fields are mandatory.
Run-Time Timeline
Once the Timeline is associated with an Involvement the number of Target Days becomes a Due date.
When both the Warning date and Target date are reached/exceeded the system displays a Workflow Message on the Home Page.
When an update is made to the run-time Timeline the Timeline Summary is activated, showing the overall status of the Timeline, together with any activities that are currently In Progress and a Target date having been reached/ exceeded appears as a red traffic light.
Save the Involvement before returning to the Home Page.
Click the Refresh button on the Home Page to update the status of the Timeline in My Involvements.
- Assign Owner to an ActivityAssign Owner to an Activity
To assign an owner to an activity open the activity at Warning Days or Target Days and select either Caseworker or Administrative Officer from the dropdown next to Message Assignee.
If there is more than one Caseworker assigned to the Involvement they will all receive the message.
Other post options may be added to the system at a later date.
If the Caseworker or Admin Officer is changed whilst the Involvement in ‘In Progress’, the system will cease to send messages to the previous people and will generate messages for the people now assigned to the Involvement.
- Manage Workflow Messages generated from a TimelineManage Workflow Messages generated from a Timeline
This panel on the Home Page displays details of all Timeline Activities where the Warning Date or Target Date has been reached and the message has been assigned to the role of Caseworker or Admin Officer in the Timeline template and you are currently assigned either or both of these roles in the Involvement to which the Timeline is associated:
Subject Name and Date of Birth of Subject Task Not populated for messages generated from a Timeline Due If due today, will show Today, if not due today will display the due date of the activity you are being warned about. For Warning Messages a workflow message is generated when the number of Working Days has elapsed (counting from the Due Date, or for completed activities, the ‘completion date’ of the previous Activity on the Timeline). However, the date that appears in the Due column is the Target Date of the Activity you are being warned about. For Due Date Messages a workflow message is generated when the number of Target Days have elapsed (using the same count as Working Days, the date shown is also the Due Date of the Activity. Assigned By The person who saved the Involvement Post Not populated automatically for messages generated from a Timeline, but can be added to the Involvement Assigned On Date the Timeline was saved Message The Activity name followed by the message defined when the Timeline was designed Click on the Subject or the Message to go to the related Involvement.
Click on the browse button to view the Message Details.
Clicking Refresh will update the list which will be categorised by items Due Today, Not Due and Overdue.
Individual or multiple messages can be deactivated by checking the box adjacent to the relevant messages and then clicking the Deactivate icon on My Workflow Messages.
Messages can be deleted or reassigned by forwarding to another user To delete or forward use the Search icon to open the Workflow Message Enquiry page.
- Message ForwardingMessage Forwarding
This dialog is opened by clicking the Forward icon on the Workflow Message Enquiry and Workflow Message Details pages.
It allows you to reassign the message to another user or post.
The fields on this dialog are:
Task This is a checkbox which may be changed as required. To User Allows you to select the user to whom you wish to forward the message. To Post If appropriate, the message may be forwarded to all users in a specific Post. Notes The notes box will contain the Additional Notes added to the message; it also allows you to edit the information. On completion click Send. The dialog will be closed and you will be returned to your previous page.
- Choose Base for Working DaysChoose Base for Working Days
The base is used to calculate the Working Days within a timeline.
A Working Day is the number of working days that elapse between the activities and when they become due.
Click on the browse to open the Base Enquiry.
To set up a Working Day Base
Setting up a working day base for selection on a timeline is a three step process.
Step 1 – Setting up a Base Term Lookup
- In the v4 Client select Tools | Administration | Lookups to display the Lookups page.
- On the Lookup Tables panel, select and open Table_ID 0559 Base Terms to display the Lookup Code [0559 – TABLE_ID] dialog below the panel.
- Click the New button to display the Lookup Code [New Lookup] dialog.
- On the Lookup Code panel, enter an Internal Code (<CSSW>).
- Enter a Description (<CSSW Working Day Base>).
- Select the Active check box.
- Click the Save button.
Step 2 – Setting up a Base Definition
- In the v4 Client select Focus | Bases | Bases to display the Base Enquiry page.
- Click the New button to display the Base Definition page.
- Select No to the Do you wish to add a Base from the National Database? question.
- On the Basic Details tab, enter a name for the working days base.
- Select a Base Type.
- Select the Active check box.
- Click the Save button.
Step 3 - Adding Dates and Times
- Click the Bases Online button at the top of the Base Definition page to display the Bases | All Bases <CSSW Working Days Base> | Base Details page in v4 Online.
- Select the Opening Times tab.
- Select the Academic Year for the current year to display the term opening times for the three terms.
- Delete two of the terms from the browse.
- Click the Edit button on the remaining term to display the Term Detail/Time Details dialog.
- Change the Term type to <CSSW – CSS Working Days>.
- Change the Start and End dates to the beginning and end of the working year.
- Select an Opening Time and a Closing Time for Normal.
- Click the Save button to display the new working year details.
- Click the Calendar icon to display the CSSW Term Dates dialog.
- Using the Individual Days radio buttons, select Holiday/Not Open, Staff Only Day or Enforced Closure against the days the working base is closed, i.e. Christmas Day, Bank Holidays, training days etc.
- Click the Save button.
- In the v4 Client, return to the Base Definition page.
- Click the Save button to populate the Terms and Opening Times panel.
- Click the View button to display the read-only Base Term Details dialog.
- Click the Term Calendar button at the top of the dialog to display the read-only calendar for the selected year. You can view the details of the calendar in v4 Client, but any changes must be made in v4 Online
- Click the OK button to close the Term Calendar dialog.
- Click the OK button to close the Base Term Details dialog.
The working day base is now available for selection when creating a timeline.
Each year (usually January start date) ensure a new year is added against the working base, this needs to be done in advance for long timelines.
Associate a timeline
- Associate Timeline with an InvolvementAssociate Timeline with an Involvement
A timeline can be linked to an involvement. In order to be able to use the timeline it must be associated with an involvement. The process is as follows:
- Create a New Involvement
or
- Select an existing Involvement without a Timeline
Once the timeline is associated the actual dates are calculated from the Warning Days and Target Days assigned when the template was created, together with the Involvement Date.
A Timeline automatically defaults to the Involvement Start Date for all types of Involvement Forms. For SEN Assessment Forms the Received Date is set by the system to contain the same date as the Involvement Start Date. However, it is possible to overwrite the default Start Date with a Start Date later than the Involvement Date.
Although a number of Timeline templates can be linked to an Involvement Form only one template can be associated to a particular Involvement currently.
The system will automatically associate a Timeline to an Involvement if one, and only one, Timeline has been linked to this type of Involvement Form. If more than one timeline has been linked to this type of Involvement Form then the system cannot perform an automatic association.
If an automatic association cannot be performed, the Caseworker or the Service Team Manager will need to select a Timeline that has been linked to the type of Involvement Form.
If there is more than one Active Involvement for the Subject(s) then you must select one before you can Continue Save.
Special attention needs to be given to Linked Fields
- Linked fields
- Update Linked Field: From Timeline to InvolvementUpdate Linked Field: From Timeline to Involvement
If an Activity which is linked to a field within an Involvement is completed, the completed date will populate the corresponding linked field within the Involvement.
Due to validation within the Involvement some date fields have flags which need to be set to true or sometimes false in order for a field to become editable, this will also be updated by completing the linked Activity.
Example: Assessment Start Date
When ‘Assessment Start Date’ is populated with the completion date of a linked Activity, the ‘Started’ flag is set to True.
If a date has already been entered within a linked field within the Involvement, then the Timeline linked Activity is completed, the date entered within the Involvement will be overwritten by the completion date of the linked Timeline Activity.
- Update Linked Field: From Involvement to TimelineUpdate Linked Field: From Involvement to Timeline
Within an Involvement if a linked field is given a valid date and is linked to an ‘In Progress’ Activity, the corresponding linked Activity on the Timeline will be completed with the date entered into the field within the Involvement.
If a linked field is populated with a date within the Involvement, but the corresponding Timeline Activity is not currently ‘In Progress’ the Timeline will not be updated with the date entered within the Involvement linked Activity.
If a Timeline Activity has the state of completed and therefore has a Completion date, and the user then changes the date within an Involvement linked field, the Timeline linked Activity completion date will not be updated by the new date entered within the Involvement linked field.If a linked field is populated with a date which would cause the current ‘In Progress’ Activity to have a completion date less than the last completed Activity within the Timeline, the following warning will be shown:
Activity [name of Activity] could not be completed
- Use Linked fields on Timelines of your own DesignUse Linked fields on Timelines of your own Design
SEN Linked fields can be added to a Correspondence Activity, so that generating a letter updates the linked field on the Involvement record.
The Timelines Correspondence Activity consists of a ‘container activity’ which is where you define the Warning Days/Message and Target Days/Message fields for all the letters you want to generate. Within the container you may add any number of letters, each with its own recipient and letter/report type.
If you wish to link a field, it must be linked to the individual letter, not to the container. When you generate that letter, the linked field will be updated.
It is possible to link the same field to more than one letter within the Correspondence Activity. If you do link the same field to more than one letter, it is the first letter than is generated that will cause the field to be updated on the Involvement record. Generating subsequent letters also linked to the same field will not change the value already populated in the linked field. If you wish to change the value of the field, edit it from within the Involvement record itself.
- Update Linked Field: From Timeline to InvolvementUpdate Linked Field: From Timeline to Involvement
- Timeline browse
- Select Timeline BrowseSelect Timeline Browse
If the system is unable to automatically associate a Timeline with an Involvement, the Caseworker or the Service Team Manager can select a Timeline Template.
Click on the Timeline button to open the Select Timeline browse. The Timeline browse icon will open the Timeline Enquiry to allow you to search for a Timeline that is assigned to the type of Involvement Form you are working with.
If there is more than one Active Involvement for the Subject(s) then you must select one before you can Continue Save.
School Day Base or Working Day Base are selected from here. However, depending on the following rules the base may be preselected for you.
If you wish to Clear the Selection click on the Delete button.
Save.
When a Timeline has been selected the system will return to the Involvement Details panel.
You must Save the record again.Saving the record opens the Timeline Details Summary.
- Working Day BaseWorking Day Base
The system checks to see if a Working day base has already been defined for the activity for use when calculating Warning Days and Target Days in Working Days. If a base has already been selected when the timeline was designed you will not be able to change it here.
- School Day BaseSchool Day Base
If School Days have already been defined for activities in the timeline template, then in the simplest case the main registered base of the Child who is the Subject of the Involvement will be used. However, since an Involvement may have multiple subjects or no subjects and also the Involvement may have a Base selected, the following rules will be applied at run-time:
Rules for selecting a Base for School Days – Generic Involvements
- Case 1: Generic Involvement with one subject and no Base selected within the Involvement
Expected Result: The main registered base for subject will be used, you will not be able to change it within the base enquiry screen (shown at the point of linking the Timeline). - Case 2: Generic Involvement with no subjects and no Base selected within the Involvement
Expected Result: No base will be shown by default, you must select a base using the base enquiry screen at the point of linking the Timeline. - Case 3: Generic Involvement with no subjects and a Base selected within the Involvement
Expected Result: Base shown against involvement should be used, you will not be able to change it within the base enquiry screen (shown at the point of linking the Timeline). - Case 4: Generic Involvement with multiple subjects and a Base selected within the Involvement
Expected Result: Base shown against involvement should be used, you will not be able to change it within the base enquiry screen (shown at the point of linking the Timeline). - Case 5: Generic Involvement with multiple subjects and no Base selected within the Involvement
Expected Result: No Base will be shown by default, you must select a base using the base enquiry screen at the point of linking the Timeline. - Case 6: Generic Involvement with one subject and a Base selected within the Involvement
Expected Result: Base for Involvement should be used, not the base the subject is registered at, you will not be able to change it within the base enquiry screen (shown at the point of linking the Timeline). - Case 7: Generic Involvement with one subject (not registered at a base) and no Base selected within the Involvement
Expected Result: No Base will be shown by default, you must select a base using the base enquiry screen (shown at the point of linking the Timeline.)
Rules for selecting a Base – SEN Involvements
You would normally use Calendar Days when creating a Timeline for an SEN Involvement. However, it is possible to define Activities to be used on a SEN Timeline that are calculated in Working Days or School Days.
If you have selected School Days in a Timeline Template then the following rules will be applied at run-time:
- Case 1: SEN Involvement with one Subject (not registered at a base)
Expected Result: No Base will be shown by default, you must select a base using the base enquiry screen (shown at the point of linking the Timeline). - Case 2: SEN Involvement with one Subject (registered at a base)
Expected Result: The main registered base for subject will be used, you will not be able to change it.
- Case 1: Generic Involvement with one subject and no Base selected within the Involvement
- Select Timeline BrowseSelect Timeline Browse
- Timeline Details SummaryTimeline Details Summary
The Timeline Details Summary opens with the Timeline Details in the form of a navigation tree, showing the status of any Activity that is In Progress, (the previous activity is complete, this activity is currently running), by use of the following icons:
Usually this would only be one Activity, however, if the Activity is one of a group to which a Limit has been applied, then the Limit is also In Progress and will therefore be displayed in the summary panel.
Similarly if the currently running activity is a Branch, where a path has not yet been chosen, then all the possible paths will be shown in the summary panel.
Use the plus and minus icons to expand and collapse the tree.
The summary relates to the current Activity only, whatever the Status.
To Complete, Skip the In Progress Activity or view the whole Timeline click the Launch Timeline button.
The status of the Timeline is also visible on the Home Page. Click Refresh to update the status of the Timeline in My Involvements.
A Service Team Manager can view Timelines that have been associated with an Involvement for their team members, from Focus | Services | Services Teams WorkloadServices Teams Workload. Highlight the Team Member and any Timelines which have been associated with an Involvement will appear in the Involvements panel.
- Launch a timeline
- Launch TimelineLaunch Timeline
A Timeline is launched from the Timeline Details Summary panel once it has been associated with an Involvement.
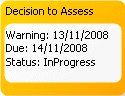
It shows all of the Activities that have been used to make up the Timeline. An Activity that has Status: In Progress will show in an orange box with the Warning Date and Target Date (changed to Due).
An Activity that is In Progress may not have reached its Due or Warning Date yet
From here you can Replan a Timeline, Skip an Activity, Choose Branch or Complete an Activity.
From a Correspondence Activity the following options are available: Generate Correspondence, Send Reminder and Log Response.
It is also possible to Add an Activity at runtime.
Click OK to return to the Timeline Details Summary.
- Complete an ActivityComplete an Activity
To Complete an Activity it must be In ProgressIn Progress.
Click on the container header to highlight the Activity and select Complete Activity. The Activity Date defaults to today’s date, but can be changed. However, the Activity Completion Date must not be in the future.
Select from Recalculate or Do Not Recalculate Subsequent Activities. Save.
It is possible to undo your changes (if made in error) by clicking on Close. This will display the message:
All Pending changes will be discarded. Are you sure?
Select Yes, this will return you to the Involvement Timeline Details Summary panel. From there you can re-launch the Timeline.
Recalculation of Warning Date and Due (Target) Date for Activities in the Timeline
The system recalculates the warning and target dates for all subsequent activities on the timeline, starting from the saved completion date of the activity that has just been completed and counting forward the number of warning and target days (using the appropriate Day type for the Activity) stored for each subsequent activity, to arrive at new warning and target dates. The revised Warning and Target dates are displayed.
Example:
The Warning Date for an Activity is 10/9/08 and the Target Date is 15/9/08.
The user chooses to complete the Activity and the Completion Date is defaulted to today's date, which happens to be 17th September.
The user did complete the Activity on the 17th, so he/she saves the default completed date of 17th September.
The system compares the saved completion date to the Target Date of 15th September and finds it has taken two days longer than expected to complete the Activity in question.
The user chooses to recalculate the warning and target days of all subsequent activities on the Timeline.
The System adds on two days of the relevant day type for the Activity to each of the Warning and Target Dates for the subsequent Activities on the Timeline, and displays the recalculated Warning and Target Dates.
Recalculation of Warning and Target Days for Parallel Activities
Example:
The Warning Date for an Activity is 10/9/08 and the Target Date is 15/9/08.
The user chooses to complete the Activity and the Completion Date is defaulted to today's date, which happens to be 17th September.
The user did complete the Activity on the 17th, so he/she saves the default completed date of 17th September.
The system compares the saved completion date to the Target Date of 15th September and finds it has taken two days longer than expected to complete the Activity in question.
The user chooses to recalculate the warning and target days of all subsequent activities on the Timeline.
The System adds on two days of the relevant day type for the Activity to each of the Warning and Target Dates for the subsequent Activities on the Timeline, and displays the recalculated Warning and Target Dates.
If a Timeline contains parallel activities recalculation applies to all those activities contained within a Parallel Activity: each Activity within the set should have the two days added onto the Warning Date and the Target Date.
Recalculation of Warning and Target Days for Activities within a Limited Sequence
Example:
The Warning Date for an Activity is 10/9/08 and the Target Date is 15/9/08.
The user chooses to complete the Activity and the Completion Date is defaulted to today's date, which happens to be 17th September.
The user did complete the Activity on the 17th, so he/she saves the default completed date of 17th September.
The system compares the saved completion date to the Target Date of 15th September and finds it has taken two days longer than expected to complete the Activity in question.
The user chooses to recalculate the warning and target days of all subsequent activities on the Timeline.
The System adds on two days of the relevant day type for the Activity to each of the Warning and Target Dates for the subsequent Activities on the Timeline, and displays the recalculated Warning and Target Dates.
If a Timeline contains limited sequence activities, recalculation applies to all those activities contained within a Limited Sequence.
Two days would be added on to each Warning and Target Date within the sequence.
Whenever Warning and Target Dates are recalculated for Activities contained within a Limited Sequence, the System will also check that the Limit Date will not now be exceeded.
The Activity box will change from orange to green, the Status will show as Complete, and the Completed Date will be shown:
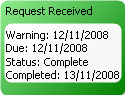
Click OK to return to the Involvement. The Timeline Details Summary panel is updated.
You must Save the Involvement before any status changes will be reflected on the Home Page. If there is more than one Active Involvement for the Subject(s) then you must select one before you can Continue Save. If you do not save the Involvement at this point these changes will be lost.
Remember to Refresh My Involvements.To complete a Branch or Branch After Delay Activity use the Choose Branch option.
- Choose BranchChoose Branch
The Choose Branch option is used to complete a Branch or Branch After Delay Activity.
Highlight the container header for the Activity. Click on Choose Branch and Select a Path from the dropdown. Save. This will Complete the Activity and the remaining Paths will be made inactive.
Stop Workflow is only used for Branch and Branch After Delay. If this Activity is inserted into the workflow template, then at run-time when this path is selected it will complete the Timeline, ignoring all subsequent activities.
Click OK to return to the Involvement. The Timeline Details Summary panel is updated.
You must Save the Involvement before any status changes will be reflected on the Home Page. Remember to Refresh My Involvements.
- Skip an ActivitySkip an Activity
You can only Skip an Activity that is already In ProgressIn Progress.
Highlight the container header for the Activity and select Skip. The In Progress status (orange) will move to the next Activity. The status will show as Skipped and a Skipped Date will appear:
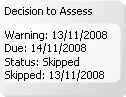
Individual activities within a Container activity can be skipped or the Activity as a whole can be skipped.
Click OK to return to the Involvement. The Timeline Details Summary panel is updated.
You must Save the Involvement before any status changes will be reflected on the Home Page. Remember to Refresh My Involvements.
- Replan TimelineReplan Timeline
You can only Replan an Activity that is ‘not started’. You cannot Replan an Activity that is In ProgressIn Progress or if it has been Completed.
To Replan, double-click to open the Activity and change either the Warning Days or the Target Days; these are the only fields that can be altered. Save.
Click Replan and all subsequent dates will change. Use the plus and minus icons to expand and collapse the activity to view the new dates, if necessary.
Click OK to return to the Involvement. The Timeline Details Summary panel is updated.
You must Save the Involvement before any status changes will be reflected on the Home Page. Remember to Refresh My Involvements.
Example:
The Warning Date for an event is 10/9/08 and the Target Date is 15/9/08.
The user chooses to replan the Activity to a new date of 16th September and saves.
The System now adds on one day of the relevant day type to each of the Warning and Target Dates for the subsequent Activities on the Timeline, and displays the recalculated Warning and Target Dates.
Limit Sequence Activities and Parallel Activities are dealt with in the same way as outlined, but adding one day this time.
If within a Limit, the system will work out new Warning Dates and Target Dates for all Activities within the Limit. It will also work out whether the Limit days will now be exceeded and will display a warning message.
You cannot change limit days defined within a Timeline template.
- Generate CorrespondenceGenerate Correspondence
At Run-time clicking the Generate Correspondence button creates a new outbound entry in the Communication Log.
A Quick Report can also be created from a Correspondence Activity utilising CSS specific data items. Letters that are linked to Timeline Correspondence Activities are created/stored in the Quick Reports panel, under Communication Log Correspondence (see How to use Quick Reports).
A Workflow Message will be received for the Correspondence Activity. Click through to the Involvement, and launch the Timeline. The Correspondence Activity will be at status In progress.
Select the container for the individual letter or email that you intend to generate. Click on the outer container to Generate All Correspondence within the Activity.
When you click Generate Correspondence, if the role selected as the Recipient at design time has no one occupying it, when the letter/email is about to be generated you will be unable to generate it. For example, if the recipient is ‘Caseworker’ and there is no Caseworker recorded on the Involvement, the system will advise you that the letter/email cannot be generated:
There are no people for the selected role: Caseworker.
Do you wish to add people manually to the communication item?
Yes / NoSelect Yes to add the Caseworker to the Involvement, Save, then re-launch the Timeline and generate the letter/email.
If you select No you will not be able to generate the correspondence:
There are no people for the selected role: Caseworker and so no correspondence items can be generated. OK
If the recipient role specified at design time has multiple occupants stored in the system at run time, for example, if you specify ‘Head Teacher’ at design time and the Student is dual registered, then the names of both Head teachers will be returned at run time. You may choose either or both Heads to receive letters/emails, if you choose both, two letters/emails will be produced and two entries made into the Communication log.
The letter/email will be generated for you to view/amend/print. Save the Involvement when you have finished generating letters/emails.
Generating the letter/email creates a new outbound entry in the Communication Log. The letter is stored as a linked file against the Communication Log entry. The Communications Log will be pre-populated with data from the Timeline Activity.
Within the Timeline, the individual letter/email Activity changes colour to green to show it is completed and if it is the only letter/email defined for the Correspondence Activity, then the overall Activity is also completed at this point. If other letters/emails have to be produced, continue generating each one in turn and when they are all generated, the overall Activity is completed. Multiple letters/emails can be generated at the same time.
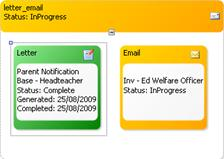
The completed letter/email shows two dates: Generated Date and Completed Date.
Once the correspondence has been generated the Send Reminder 1 button is activated. Clicking this button activates the Send Reminder 2 button, if a second reminder has been requested.
As soon as the final Log Response button is clicked the correspondence activity is complete and the activity turns green.
Save the Involvement. Once the Involvement has been saved, the letter will appear as a linked document for the Subject, so if you navigate at a later point to the Subject (the Student who is the subject of the correspondence), then click the link to Communications Log, then click the Linked Documents link, you will be able to retrieve the letters that have been generated.
- Generate Letters for ParentsGenerate Letters for Parents (Parent/Carers with Parental Responsibility set to True)
There has been a change to the Recipient Roles for Parent. This is to allow flexibility when producing letters.
Choosing Parent – Joint means that where those with Parental Responsibility of the Student share the same address, any letters that are generated will automatically be addressed as ‘Mr. John Smith & Mrs. Janet Smith’ (currently it is not possible to generate a letter to Mr. and Mrs. J Smith).
Note that if you are sending a letter to two Parent/Carers with Parental Responsibility at the same address and one at another address, using Parent – Joint will produce automatically two letters, one for those at the same address, another for the one at the separate address. So you don’t need to set up two Letter Activities, one as parent – joint, one as parent – individual as the system automatically takes care of the different addresses in this case.
Choosing Parent - Individual will produce one letter per Parent/Carer, irrespective of whether there are multiple Parents living at the same address. This feature has been designed to accommodate Legal letters, for example, Penalty Notices etc, but it may be used by any Service Team that uses Timelines and wishes to send out individual letters to those with Parental responsibility living at the same address.
- Log ResponseLog Response
If at design time Response Required is ticked then the Log Response button will be activated.
Clicking Log Response allows the Caseworker to record that the Local Authority has received a response to a letter/email that was previously sent as a piece of outbound correspondence.
Recording a Response updates the Communication Log, by creating an inbound communication of type letter or email, which is linked to the original Communications Log entry that was created for the outbound letter or email.
A Caseworker may record the fact that they have received a response from someone in the Communications Log itself. By logging a response in the Timeline this means that the Caseworker can click through to the Involvement from the corresponding Workflow message, launch the Timeline and record a Response against the relevant activity.
- Send ReminderSend Reminder
Up to two Reminders can be defined when the Timeline is designed. The number of Days until sent is set, whether an Attachment is included and if so, the attachment itself.
When a letter/email has been generated if the Reminder/s has been defined then Send Reminder 1 and Send Reminder 2 will be activated accordingly.
A Workflow Message will be received when the date for the first Reminder is reached for a particular Activity. The date for the second Reminder is calculated when the first Reminder is sent.
- Add Activity at Run timeAdd Activity at Run time
Additional Activities can be added to the Timeline at Runtime.
Before a new Activity can be added you must have saved any current changes:
Workflow has pending changes which need to be saved before adding a new activity.
Click Add Activity to view the list of activities:
Activity Designer Properties Activity Adds a single Activity directly to the Timeline or inside a Parallel, Sequence or Branch Limit Defines maximum days in which a group of Activities must be completed Sequence Activity Adds a group box, places Activities that are to be carried out one after the other into the Sequence box Parallel Activity Adds a group of Activities that are to be carried out in parallel, but allows them to be completed in any order Branch Defines multiple routes through the Timeline Branch After Delay Defines multiple routes through Timeline (preceded by reminder message) Correspondence Activity Generates outbound correspondence at run time Stop Workflow For Branches only! Terminates the Timeline Use the drag and drop functionality to add a new activity to the Timeline.
When any activity is added a warning icon appears in the top right hand corner to show that it is incomplete. Click on the dropdown arrow to view the fields that require data to be entered.
Examples of errors
- A Warning Days message must be set.
- Message is less than the permitted size of 1
- A Condition/Question must be set
- Invalid value for Title
- At least one Activity is needed
Double click on the label heading to enter the Activity Properties.
Click OK to return to the Involvement, showing the Timeline Details and Involvement Details. Save the Involvement.
Select an Active Involvement for the Subject(s) and click Continue Save.
Re-launch Timeline. You can now continue with the Timeline from the point In Progress.
- Launch TimelineLaunch Timeline
Preview and Print
- Preview and Print a TimelinePreview and Print a Timeline
Use the Zoom Level button to alter the magnification of the timeline. Select between 50% and 400% or choose Select All to view the Timeline as a whole.
Click on the Pan button to Zoom In or Zoom Out. Use the zoom tool to click on the area of the timeline you wish to alter. Click the Pan button again to return to the Default view.
Placing the Navigation Tool onto the Timeline will allow you to ‘drag’ the timeline up and down or left to right to view particular sections.
Whenever the zoom level or the magnification is altered the Fit To button is enabled allowing you to Fit to Screen Size (if the timeline is too big), or Fit to Workflow Size (if the timeline is too small).
A Print Preview button is available. Click on the button again to return to Default View.
There are two methods to obtain a printed copy of a Timeline.
- Method 1: Preview Image and PrintMethod 1: Preview Image and Print
Allows you to set the number of pages to spread the timeline over, can set to one page to view the timeline as a whole:
- Click the Print Preview button
- Select Page Setup
- Set Paper Size to A4
- Set Orientation to Portrait or Landscape
- Set Margins to 0.5
- Set Scaling to Fit to 1 Page wide and tall (depending on the size of timeline)
- OK
- Click the Print button.
If you wish to enlarge the image for easier viewing before printing click Pan and use the Zoom In function.
If, when altering the size, the image seems to ‘disappear’ from the screen click the Print Preview button and return to Default mode.
NB: Do not use the Previous or Next buttons - Method 2: Save Image and PrintMethod 2: Save Image and Print
Allows you to ‘adjust the timeline to ‘fit’ your page:
- Click Print Preview and select Print Preview
- Click Save Image
- Add a Filename, Save to the required location
- Go to saved location, Open image
- Right click on image, Copy
- Paste into a word document
- Adjust as required
Click on Print Preview | Default View to return to the timeline.
Data Transfer
- Timeline Data TransferTimeline Data Transfer
The user interface to transfer one or all of the timeline data to the Oracle database is accessed via Tools | Administration | Timeline | Timeline Data TransferTimeline Data Transfer.
Transfer of timelines reporting data to the Oracle tables occurs whenever a timeline activity is Completed or Skipped, but this transfer of data can affect performance and therefore needs to be set up as a Scheduled Task, to run twice daily at 1am and 1pm, although these times can be edited. The Oracle tables are written to for each completed or skipped activity, so that at such times when you wish to generate reports showing which activities are outstanding or completed for a timeline, the correct reporting data will be available. The activity status will always be shown correctly in the timeline itself, but if you produce any reports, the data may show a slightly different status than that shown on the timeline, depending on the time at which the reporting data was last saved to the Oracle database.
A Schedule Task Wizard is available enabling you to move through each panel by clicking Previous or Next instead of scrolling down the page. Click the Wizard icon again to return to a scrollable form.
- Set the Status of the Timeline Data Transfer FacilitySet the Status of the Timeline Data Transfer Facility
The setting TIMELINEDATATRANSFER found within the Application.ini, is set to FALSE. If synchronised data is preferred to faster performance, you can change this setting to TRUE via the Configuration Management tool.
- Create the Scheduled Task to Transfer Timelines Reporting DataCreate the Scheduled Task to Transfer Timelines Reporting Data
If you leave the setting TIMELINEDATATRANSFER as FALSE, then you must create a scheduled task that transfers the data periodically (unless you never want to reports on timelines). The task to be used has been created, but each LA must set this task up for themselves.
To create the scheduled task:
- Select Tools | Administration | Schedule Task to display the Schedule Task page.
- Click the New button.
- Enter a Name (e.g. Transfer Timelines Reporting Data).
- Enter a Description.
- Ensure the If the task is already running, then the following rule applies drop-down list is set to Do not start a new instance.
- In the Trigger panel, click the Add button to display the Trigger dialog.
- Select the Daily radio button.
- From the Start drop-down list, select the date and time at which you want the task to start.
- Ensure the Recur every field is set to 1 days.
- In the Advanced settings area, enter 12 hours in the Repeat Task every field.
- Select an Expire date.
- Click the OK button to close the dialog.
- In the Actions panel, click the Add button.
- From the INSERT NAME drop-down list, select Transfer Timelines Reporting Data.
- Click the OK button.
- Click the Save button. When prompted, select tomorrow's date or whichever date you wish the scheduled task to commence.
- Timeline SummaryTimeline Summary
Clicking Timeline Data Transfer displays the Timeline Summary panel under the following headingsheadings:
- Timeline: the timeline name as defined via Tools | Administration | Timeline | Timeline Design.
- Timeline Description: the timeline description as defined via Tools | Administration | Timeline | Timeline Design.
- Timelines: the number of associated timelines (i.e. the number of involvements where this timeline is attached.
- Transferred: the number of timelines (i.e. timeline instances attached to involvements) already transferred to the Oracle database. This is for information purposes only – to let the user know whether any timeline data is still waiting to be transferred.
- Pending: the number of timelines (i.e. Timeline instances attached to Involvements) still waiting to be transferred.
Highlight one or more of the Timelines to transfer to the Oracle database and click the Transfer Timeline Data button.
- Associated InvolvementsAssociated Involvements
Clicking the View Associated Involvements button will list all the associated involvements (of the selected timeline) in the panel below. This is for information only – to provide details of associated involvements.
When an involvement record is saved, any changes to the status of the associated timeline are transferred to the Oracle database.