![]()
Manage Transactions
Transactions are associated with a cost centre, a nominal ledger and an invoice point. Transactions can be accessed from any of those entities. For transactions relating to tuition, the transaction is usually added from the relevant course, via the More Options | Billing area, if it is linked to a nominal ledger account. You can record transactions that represent fees for services provided and the costs that the LA has incurred (e.g. for venue hire, catering or trainer costs).
Transactions can be viewed, new transactions added and invoices generated. You can cancel unpaid sales or purchase orders and write off unpaid invoices. Batch processing of transactions is available.
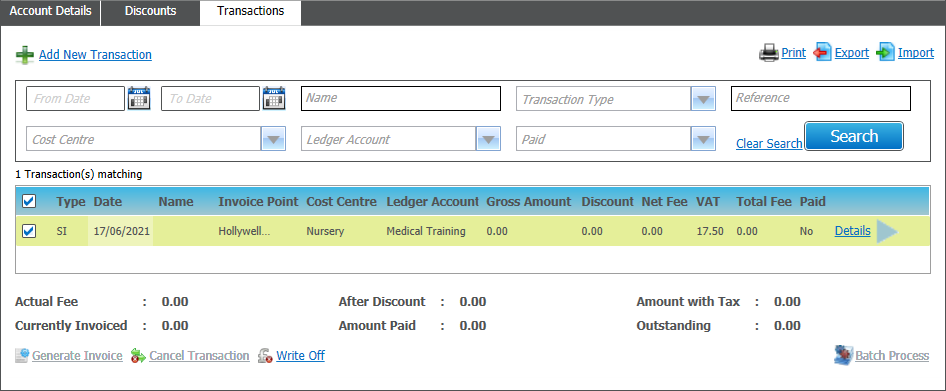
A list of transactions is displayed when you select the Transactions tab while viewing a cost centre, invoice point or nominal ledger account.
When you click the Billing link while viewing a course with an associated nominal ledger account, a list of transactions linked to that specific course and its applications is displayed.
A list of transactions can be viewed for a selected invoice point or nominal ledger.
To manage transactions:
- Select the required Invoice Point or Nominal Ledger to display the account details.
- Select the Transactions tab to display a list of current transactions.
- If required, enter search criteria to filter the list and click Search.
Choose from the following options:
View transactions
Select the required check box to display further details of the transaction beneath the panel.
- Sales Order

- Sales Invoice

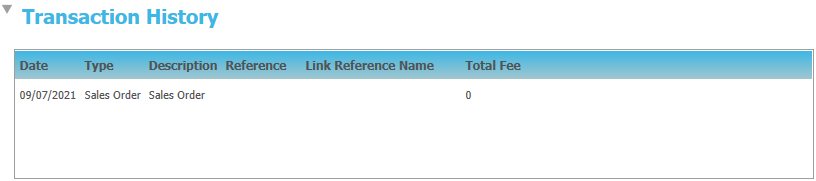
Click the Details hyperlink to view the Transaction Details / Fee Details screen and Transaction History if applicable.

Add a new transaction
Click Add New Transaction to display the Transaction Details / Fee Details screen.
Transactions are usually added from the Course area via More Options | Billing rather than via the Administration area.

Enter details as required.
Ledger Accounts
If required, add a Ledger Account. This may be automatically completed, depending on the type of account and the entry point for recording the transaction.
- Click the Ledger Account browse to display the Select Ledger Accounts dialog.
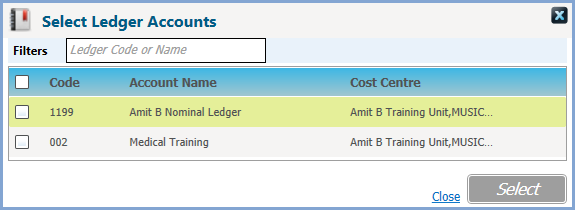
- Select the required account from the list of ledger accounts for the cost centre.
If required, click the Link Reference browse button to display the Select Ledger Accounts dialog and select a further account to be linked to this transaction. For example, to group nominal ledger accounts together, you can specify an overall account.
See also
- Cost Centres
- Discount Defaults
If discounts are associated with the invoice point, the discount with precedence is automatically applied to the transaction. - Course Billing
Points to note
- If a transaction is added for a course, selecting a Type of Applicant enables you to select an applicant on that course.
- If discounts are associated with the invoice point, the discount with precedence is automatically applied to the transaction.
- Payment Types are managed via Lookup Table ID: 0567.
- The Cost Centre, Ledger Account and Invoice Point are either entered or automatically completed, depending on the type of account and the entry point for recording the transaction.
- The Cost Centre is automatically completed for course billing transactions.
Edit a transaction
Transactions that have not been paid or cancelled can be edited. The details that are editable depend on the transaction type. Transactions with a type of SX, PX, WO, SI (Paid) or PI (Paid) cannot be edited.
Click the Details hyperlink to view the Transaction Details / Fee Details screen.
Amend details as required.
Generate an invoice
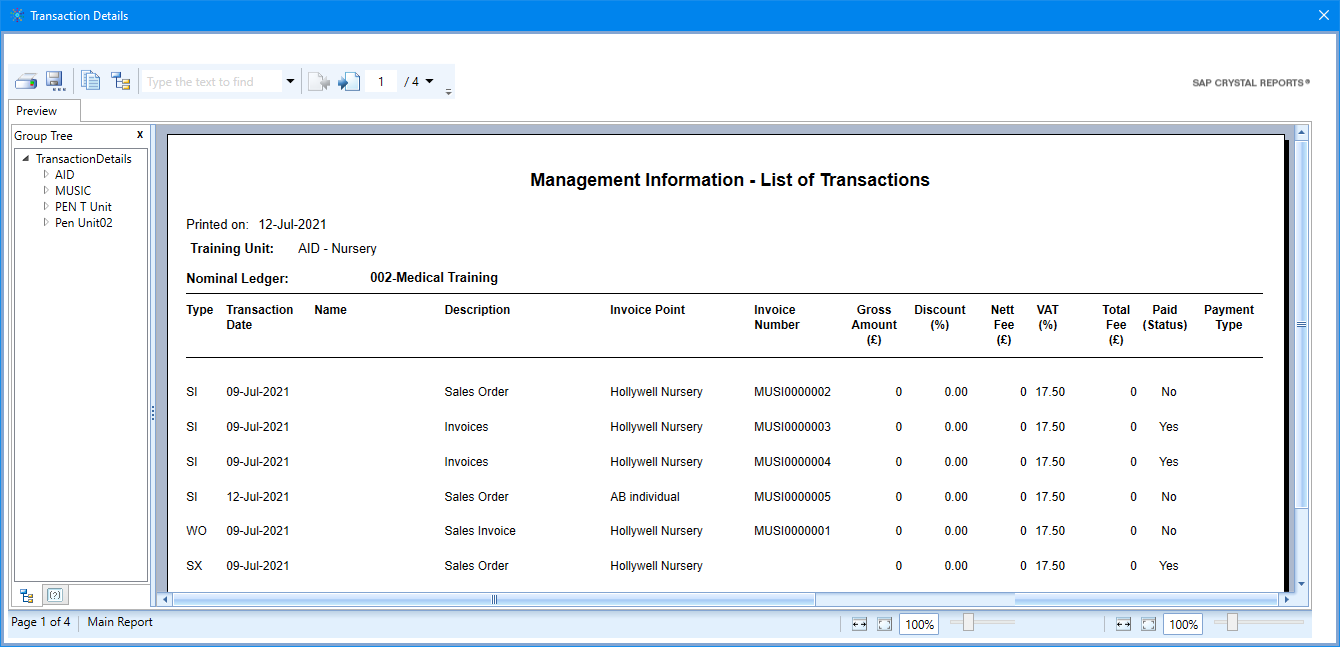
An invoice can be generated for a sales order transaction. Generating the invoice updates the transaction type and generates an invoice number. If an Invoice Report is set up for the training unit then, as part of the Generate Invoices process, you can generate and print the report.
- Select the check box of the required sales order (SO) to display further details of the transaction beneath the panel.
- Click Generate Invoice to update the transaction type to sales invoice (SI) and generate an invoice number for each transaction.
- If an Invoice Report is set up for the training unit then the following is displayed:
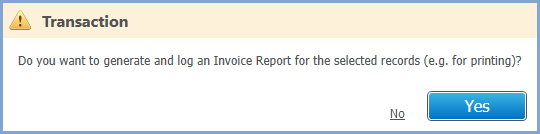
- Select Yes to display the Report Parameters dialog.
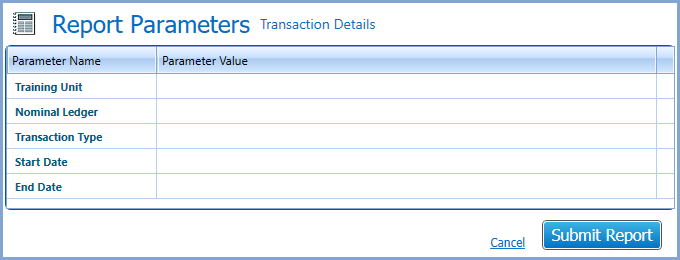
- Select parameters as required and click Submit Report.
The Invoice Number is the Invoice Prefix for the training unit followed by a 7-digit incremental number.
The Invoice Prefix is added via Administration | Training Unit | Basic Details
![]()
Generate an Invoice Report
A template invoice report must be linked to the Training Unit | Basic Details - Invoice Report. A sample report is provided as one of the template standard reports.
The invoice report must be a Crystal report which has a parameter set up to accept a value to IP_TRANSACTION.PRINT_ID. This is designed so that all selected invoices will be printed on one report.
- Select one or more Sales Invoice transactions.
- Click Print to display the Select a Transaction Report dialog.
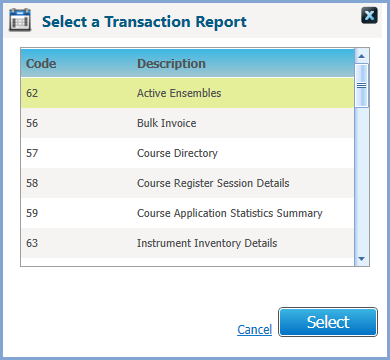
- Select the required report and click Select to display the Report Parameters dialog.
- Enter values as required and click Submit Report.
Regenerate an Invoice Report
Once an Invoice report has been generated, it can be regenerated for the selected group of records by selecting one of the transactions and clicking the View Invoice Report button.
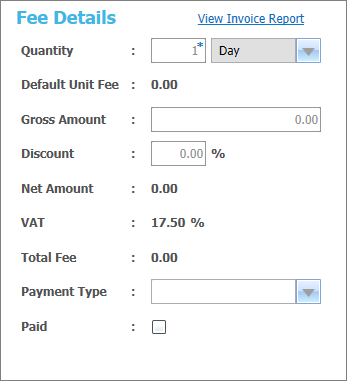
- On the Fee Details panel, click View Invoice Report to display the Report Parameters dialog.
- Enter values as required and click Submit Report.
Cancel a transaction
A Sales Order (SO) or Purchase Order (PO) that has not been paid can be cancelled. This updates the transaction type to Cancelled Sales Order (SX) or Cancelled Purchase Order (PX).
- Select the check box of the required sales order (SO) or purchase order (PO) to display further details of the transaction beneath the panel. The order must have a Paid status of No.
- Click Cancel Transaction to cancel the transaction. A confirmation message is displayed.
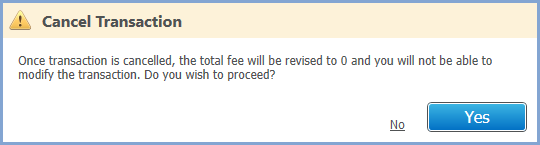
The transaction type is change to SX.

When a Sales Order or Purchase Order is cancelled, the Type is updated to Cancelled Sales Order or Cancelled Purchase Order, the Paid status is updated to Yes and the Fee Details are updated to 0.
Write off a transaction
A Sales Invoice (SI) or Purchase Invoice (PI) that has not been paid can be written off.
- Select the check box of the required sales invoice (SI) to display further details of the transaction beneath the panel. The order must have a Paid status of No.
- Click Write Off to write off the invoice. A confirmation message is displayed.
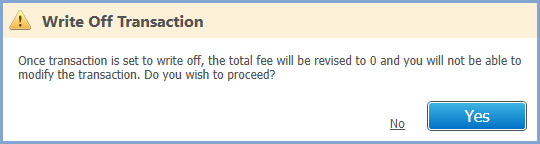
The transaction type is changed to WO.

When a transaction is written off the Transaction Type is updated to Write Off (WO) and the Fee Details are updated to 0. The Transaction History is also updated.
Batch process transactions
Two or more transactions of the same type that are unpaid can be updated using a batch process.
Select the check box for the transactions you want to batch process. The orders must have a Paid status of No.

- Click Batch Process to open the Batch Processing dialog.
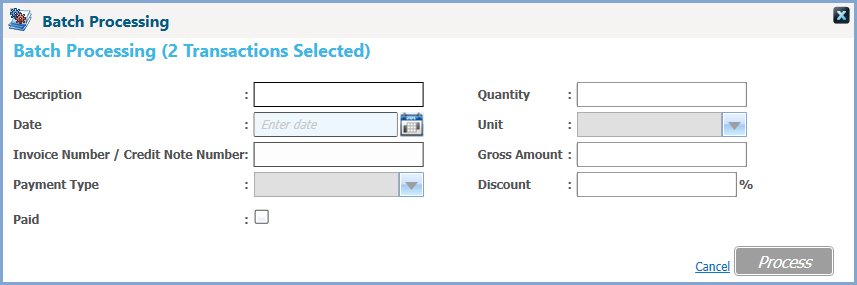
- Enter details as required and click Process. A confirmation message is displayed.
