![]()
Assessment Involvement
Recording a SEN assessment for a student involves creating a SEN assessment involvement. Once you have created a SEN assessment involvement it is used throughout the statutory SEN process to add data for all SEN assessment phases, i.e. from the receipt of request for assessment to issuing a final statutory statement, as follows:
| Phase | Statement Process | Weeks | More information |
| Phase 1 | Decision | 6 | Log a Request for Assessment (Phase 1) |
| Phase 2 | Assessment | 10 | Log Assessment details (Phase 2) |
| Phase 3a | Draft Statement | 2 | Log Draft (or In Lieu) Statement details (Phase 3a) |
| Phase 3b | Final Statement | 8 | Log Final Statement details (Phase 3b) |
The SEN Process and the Timeline
Although it is optional to link a timeline to an involvement, it is necessary to do this for a timeline to function correctly with an involvement.
The SEN process is time specific. Each date field on an involvement indicates an event within the assessment process. These dates are linked to a timeline which is displayed at the top of the involvement form after you first save the involvement.
Pre-defined timelines are supplied, appropriate to the SEN process.
Prerequisites
Before you can create an involvement on SEN you should make sure the following are already setup:
| SEN Version | Prerequisite | More Information |
| v3 | Map all users of involvements to a person on the database (which is usually themselves). Tools | System Administration | Users | User Details | Mappings | |
| v4 | Create a Post, e.g. Assessment Officer, via Tools | Team Structure. Add User(s) to a Post. Select if the user is a CSS Caseworker and/or SEN Admin Officer. | SEN Posts |
| v4 | Create Establishments via Tools | Team Structure. Add a Post to an Establishment. | SEN Establishments |
| v4 | Create a Service Team via Focus | Services | CSS Team Administration. Link an Establishment to Service Teams. | SEN Service Teams |
| v4 | Create SEN Involvement Forms via Focus | Services | CSS Involvement Forms. To SEN involvement forms, add Caseworker label, CSS Service Team, Statuses, Sources, etc. | SEN Involvement Forms |
| v4 | If you are using timelines, link a Timeline to SEN involvement forms via Tools | Administration | Timeline | Timeline Design | Create a new Timeline |
Log a Request for Assessment (Phase 1)
This procedure describes how to log a request for a new statutory assessment, for example you have received a request from a student’s parent to assess a student for SEN purposes.
Create a new Assessment Involvement
- From the required student’s record, select Involvements in the Links panel on the right side of the Home Page to display the Involvement Summary dialog.

If active involvements exist for this student, they are displayed below the Involvement Filter panel on the Involvement Summary page.
- Click the New button in the Involvement Filters panel to display the Choose an Involvement Form dialog.
- Highlight the required assessment involvement form then click the Select button to display a new blank involvement.
When you create an assessment involvement from a student’s record, some fields are automatically populated. These include:
- The Service Team that you are linked to
- Involvement Form name
- Subject
- Caseworker or Assessment Officer
- SEN Professionals, as defined in Services | SEN Administration | SEN User Defaults.
Add Request details
- On the Involvement Summary dialog, select the Involvement Details panel.
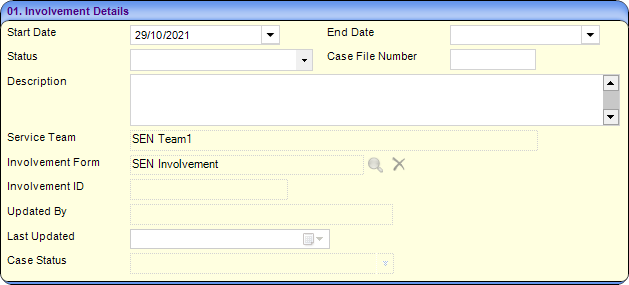
- Enter the required details:
- Start Date: The date the request for assessment was received by your Local Authority, e.g. letter from the student’s parents.
- Status (Lookup ID 0674): Add a status to reflect the involvement circumstances, e.g. Active.
- Description: You can add descriptive text for this involvement.
- Service Team: This field is populated with the service team already linked to this type of involvement.
- In the Subjects panel, to see more details about the student, click the Details button. The subjects panel is pre-populated with brief details about the student, e.g. name, date of birth and start date of this involvement.
If you create an involvement without selecting a student first, this panel is blank. To select a student, click the Add button.
- In the Reasons panel, add reasons for the request, including a Primary Reason.
- Click the Add button to display the Involvement Reason Chooser dialog.
- Select one or more reasons from the list.
- Click the Save button to populate the involvement.
- In the Send Data to ContactPoint panel, because ContactPoint is no longer used, make sure the Send Data to ContactPoint check box is X.
Add Assessment Officers and Admin Officers
The SEN Officer panel and the SEN Admin Officers panel may be pre-populated with officers who belong to the service team to which this involvement form has been linked. If not, the panel is blank.
- To add more SEN officers to these panels, click the Add button to display the Chooser dialog.
- Select the required officers, then click the Save button to populate the involvement.
Add SEN Professionals
The SEN Professionals panel is partially populated with names defined via Services | SEN Administration | SEN User Defaults.

Named Person is a generic field in which you can add another professional, if required.
To add more professionals to the SEN Professionals panel:
- Click the Browse button to display the relevant appropriate role table.
- Select the required professional.
- Click the Save button.
To clear a professional role, click the Clear button.
To see more details of each person, click the Details button.
You can link Educational Welfare Officer (EWO) and Ed. Psych. roles to a Base, e.g. the student’s school. If so, these roles are automatically populated in the SEN Professionals panel.
Enquire on Progress of the Assessment
Use the SEN Assessment Progress panel to enquire on the progress of the involvement since the assessment Received Date. This panel is only updated when you first save the involvement.
The fields are automatically updated as each phase is completed.
If the actual period is out of the statutory period, the dates are displayed in red.
Add more Phase 1 Details to an Assessment
Use the Assessment Details panel to log assessment phase 1 details, e.g. SEN needs and medical needs.
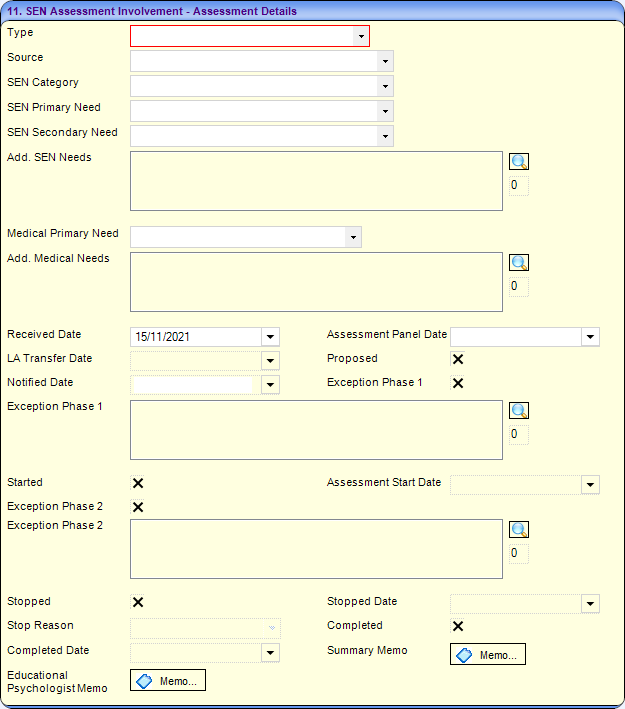
You can use the Memo buttons at the end of the panel, to record notes specific to the Educational Psychologist and Summary information. Alternatively, bigger documents can be linked to the involvement using the Linked Documents functionality.
- Select the Assessment Details panel.
- Enter details as required:
- Type (Table_ID 0315): Select the assessment type from the drop-down, e.g. Initial Assessment.
If the assessment is transferred from another Local Authority, select LEA Transfer.
- Source (Table_ID 1052): Select the origin of the request for this assessment, e.g. parental/guardian request, school, etc.
- SEN Category: Select the main category of need (as specified in the SEN Code of Practice), e.g. CI - Communication and Interaction.
- SEN Primary Need (Lookup ID 0123): Select from the drop-down.
This is the main reason for the request, e.g. Spectrum Autistic Disorders.
- SEN Secondary Need: Select from the drop-down.
- Add. SEN Needs: Click the Browse button to display a list of needs from which to select one or more needs.
This field in enabled only after you select a SEN Primary and SEN Secondary Need.
- Medical Primary Needs (Lookup ID 0613): If required, you can select a primary medical need from the drop-down.
- Add. Medical Needs: Click the Browse button to display a list of needs from which to select.
This field in enabled only after you select a Medical Primary Needs.
- Received Date: Enter the date the request was received by the LA. Today’s date is displayed by default, which you can change to an earlier date if required.
The assessment process always starts from the Received Date.
- Assessment Panel Date: Enter the date when the Assessment Panel meets to discuss the student’s assessment request.
- LA Transfer Date: If applicable, enter the date the assessment was transferred from another LA.
This field is only enabled if you selected LEA Transfer as the Type in the Assessment Details panel.
- Type (Table_ID 0315): Select the assessment type from the drop-down, e.g. Initial Assessment.
- Once you have completed the mandatory fields, click the Save button.
A Case Number is automatically generated in the Involvement Details panel when you save the involvement.
Attach a Timeline to the Involvement
If a timeline has been linked to the Assessment Involvement Form, when you save the involvement the Select Timeline dialog is displayed.
- Click the Save button to attach the timeline displayed in the Timeline field, to the assessment.

If more than one timeline has been linked to the involvement form:
- Click the Timeline button on the Involvement toolbar to display the linked timelines.
- Select the required timeline.
- Make sure the Start Date of the timeline is the same as the Start Date on the Involvement Details panel.
- Click the Save button to display the SEN Assessment dialog.
- Click the Save button to create the timeline/involvement link.
The Timeline Details panel is added as the new first panel.
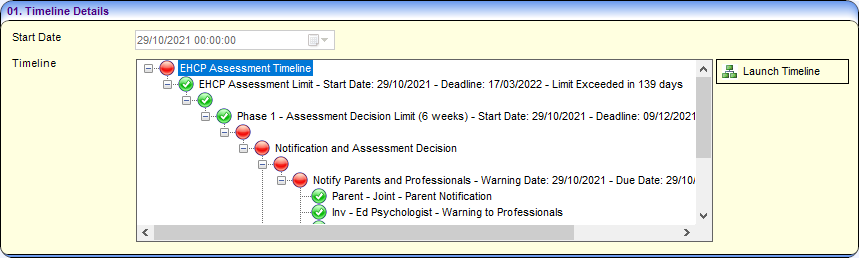
Use the plus and minus icons to expand and collapse the tree.
The timeline navigation tree displays what activities need to be done and their current status, using the following icons:
 Warning Date has been reached/exceeded.
 Target Date has been reached/exceeded.
 Timeline is In Progress.
 Timeline is Complete.
Use the Timeline to Continue the Involvement Process
Use the timeline to complete assessment activities, i.e. find out what work needs to done next on the assessment and whether the activities (or tasks) are ‘on time’. Here are some hints on using timelines:
- To open the timeline, click the Launch Timeline button in the Timeline Details panel. The timeline that has been attached to the involvement is displayed, for example:

- Complete the activity boxes in sequence, which follows the statutory SEN process.
- When you complete a timeline activity, e.g. Assessment Panel Meeting, that contains a date field, e.g. Assessment Panel Date, it updates the corresponding linked field on the involvement.
It is important to allow timeline activities to complete the involvement fields, rather than enter dates directly into the involvement.
- When you have dealt with an activity, you should mark it as either complete or skipped. Options depend on the activity type, e.g. Complete Activity, Generate Correspondence, Generate All Correspondence, Choose Branch, Skip.
You should not use the Skip button to skip activities if they contain a mandatory date field.
- Timelines are colour co-ordinated to show you what has been done already and what need to be done to progress the assessment in a timely manner.
Timeline activity colour Meaning 
action to be done next 
action complete 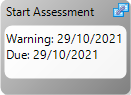
action not done yet 
action that has been skipped - When you have finished an activity, press the Do not Recalculate button the timeline toolbar.
Do not press the Recalculate button as this will disrupt the statutory timescale for this assessment.
- You can use the timeline to generate letters by clicking the Generate Correspondence button. Letters are stored in the Communications Log and shown on your Home Page as Linked Documents.
Correspondence can be generated in Quick Reports, or Crystal reports. - You can Replan an Activity that has not started. You cannot replan an activity that is In Progress or if it has been Completed. To replan, double-click to open the activity and change either the Warning Days or the Target Days, these are the only fields that can be altered. Then click the Save button.
Update Linked Field: From Timeline to Involvement
When you complete an activity which is linked to a field within an involvement, the completed date populates the corresponding linked field within the involvement. Linked fields have a ‘chain link’ icon in the top right corner of an activity box.
Due to validation within the involvement some date fields have flags which need to be set to true (or sometimes false) in order for a field to become editable; this is also updated when you complete the linked activity.
Example:
When Assessment Start Date is populated with the completion date of a linked activity, the Started check box is automatically selected.
If a date has already been entered in a linked field within the involvement, then subsequently you complete the timeline linked activity, the date entered within the involvement is overwritten by the completion date of the linked timeline activity.
Delete a Timeline from a Student’s Involvement
To delete a timeline from an involvement, make sure the timeline can be Deleted check box is selected on your Service Teams Definition dialog via Focus | Services | CSS Service Team Administration.
When the timeline can be Deleted check box is selected for your service team and when a student’s involvement has been linked to a timeline, a Delete Timeline button is displayed on the involvement toolbar:

- To delete a timeline from an involvement, click the Delete Timeline button. A warning message is displayed asking you to confirm:

- To permanently remove the timeline from the student’s involvement, click the Yes button.
If required, you can then link a new ‘blank’ timeline by clicking the Timeline button on the involvement toolbar. The new timeline starts from the beginning of its process, so you should skip any previous activities to get to the current point on the timeline.
Record the Assessment decision
To log the Assessment Panel’s decision:
- Select the Assessment Details panel.
- Enter the required details:
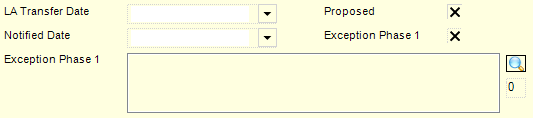
- Proposed: If the assessment has been agreed by the Assessment Panel, tick this check box, which enables the Notified Date field.
- Notified Date: Enter the date that the stakeholders, e.g. parents, school etc. were notified by the LA of the intention to assess.
- Exception Phase 1 (check box): Select the check box if the statutory time limit of 6 weeks for phase 1 is exceeded.
Exception Phase 1 is only available if the source of the request is a parent or guardian.
- Exception Phase 1 (text box): To add one or more exceptions:
You must record an Exception when the assessment process fails to meet the timescale for the phase, or you anticipate that it will fail.
- Click the Browse button to display the Select Exceptions Chooser (Lookup ID 0316).
- Select one or more exception reasons relevant to Phase 1 from the chooser.
- Click the Select button to return to the SEN Assessment dialog.
- Click the Save button.
A Case Number is automatically generated when the record is saved which is displayed on the Involvement Details panel.
Log Assessment details (Phase 2)
This procedure describes how to log a statutory assessment. Phase 2 of the assessment includes requesting and logging letters of advice from health and care professionals etc.
- From the required student’s record, select Involvements in the Links panel on the right-hand side of the Home Page to display the Involvement Summary dialog.
- Select the required assessment involvement then display the Assessment Details panel.
The Assessment Detail panel is mainly concerned with Phase 1 activities. However, it contains Phase 2 fields, as described below.
- Enter the assessment details as required.
- Started: Tick this check box to record that the Phase 2 assessment process has started.
If the assessment is not to proceed, uncheck this box. You must then record an exception reason in the Exception Phase 2 field.
- Assessment Start Date: Enter the date on which the assessment process started.
- Exception Phase 2: When the statutory assessment time limit is exceeded, select the check box.
- Exception Phase 2 (text box): To add one of more exceptions:
- Click the Browse button to display the Select Exceptions Chooser (Lookup ID 0317).
- Select one or more exception reasons relevant to Phase 2 from the chooser.
Exception reasons are defined via Tools | Administration | Lookups and are mapped to external DfE codes.
- Click the Select button.
- Stopped: If the assessment is to be stopped you must check this box and record a Stop Reason. Click the Browse button to select a reason from the lookup table (Table_ID 0404).
- Completed: When this assessment is complete, select this box. You must also enter a Completed Date which indicates the end of Phase 2. The completed date must be after the Start Date and cannot be after the system date, i.e. today’s date.
- Educational Psychologist Memo and Summary Memo: To write a memo, click the Memo button to display the Memo pop-up window.
The Memo button colour is red if a memo has been added and saved.
- Started: Tick this check box to record that the Phase 2 assessment process has started.
- Click the Save button.
Log Draft (or In Lieu) Statement details (Phase 3a)
This procedure describes how to record details of the phase 3a ‘draft or in lieu’ statement process.
- From the required student’s record, select Involvements in the Links panel on the right side of the Home Page to display the Involvement Summary dialog.
- Select the required assessment involvement then select the Statement Details panel.
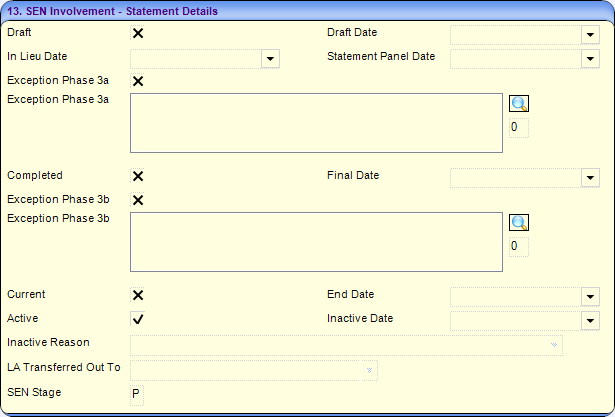
- Enter the required details:
- Draft:
- If the Local Authority has issued a draft statement, tick the Draft box. Then, enter the date the draft was issued in the Draft Date field.
Or
- If a draft statement is not to be issued, a Notice in Lieu of the Statement must be served, so uncheck the Draft field. Then, enter the date the Notice in Lieu of the Statement was served in the In Lieu Date field.
- If the Local Authority has issued a draft statement, tick the Draft box. Then, enter the date the draft was issued in the Draft Date field.
- Exceptions Phase 3a: When the statutory assessment time limit is exceeded, select the check box.
- Exceptions Phase 3a (text box): To add one of more exceptions:
- Click the Browse button to display the Select Exceptions Chooser (Lookup ID 0317).
- Select one or more exception reasons relevant to Phase 3a from the chooser.
- Click the Select button.
- Draft:
Log Final Statement details (Phase 3b)
This procedure describes how to record details of the Phase 3b ‘final statement’ process.
- From the required student’s record, select Involvements in the Links panel on the right-hand side of the Home Page to display the Involvement Summary dialog.
- Select the required assessment involvement then display the Statement Details panel.
- Enter the Statement Details panel:
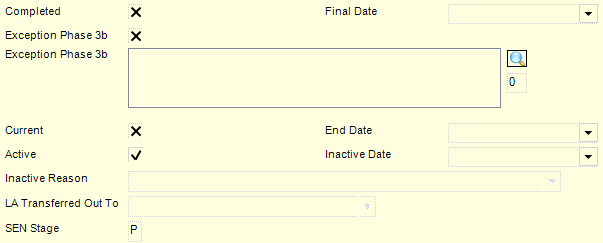
- Completed: When the final statement has been issued, tick this box and record the issue date in the Final Date field.
- Exceptions Phase 3b: When the statutory assessment time limit is exceeded, select the check box.
- Exceptions Phase 3b (text box): To add one of more exceptions:
- Click the Browse button to display the Select Exceptions Chooser (Lookup ID 0317).
- Select one or more exception reasons relevant to Phase 3b from the chooser.
- Click the Select button.
- Current and Active: When the final statement is issued, tick these check boxes.
Save the Involvement and Create a Review
When you save a Phase 3 assessment involvement for the first time, a system dialog is displayed enabling you to create a SEN Review Involvement record for the student.
- Click Save at the top of the assessment involvement to display a confirmation dialog:
Do you want to create Next Review? - To create a future review involvement, click the Yes button to display the Create Review dialog.

The Review Date is calculated one year ahead, in anticipation of Review Type being Annual Review.
- Select the required Review Type from the drop-down.
- If necessary, change the Review Date.
- Click the Create Review Involvement button to display the SEN Assessment dialog.
The review involvement is created in the background.
- Click the Save button. The new statement review record is displayed on the Review panel of the assessment involvement.
To display the new statement review involvement, click the Edit button to display the Review Involvement.
Enquire on a Student’s SEN Stage
When you save an assessment involvement after Phase 3 details have added, the SEN Stage field on the Statement Details panel displays the codes specified in the SEN Code of Practice, i.e:
- Q (Statement is under assessment)
- S (Final statement issued)
Log a Decision to Stop an Assessment
This procedure describes how to record a decision to stop the Phase 3b ‘final statement’ process.
- Open the required student's assessment involvement.
- Select the Statement Details panel.
- Deselect the Active check box.
- Enter the Inactive Date.
- Select an Inactive Reason from the drop-down (Table_ID 0328).

When the Inactive Reason has an external code of MOV – Moved to other LEA, LAs can record the LA transferred out to.
- In the Assessment Details panel, select the Stopped check box.
- Select a Stopped Reason from the drop-down (Table_ID 0404).
- Enter the Stopped Date.

- Click the Save button. If a timeline is attached to the involvement, a dialog is displayed.
Some Timeline Activities are In Progress. Click OK to continue and cancel Timeline?
- Click the OK button to cancel the timeline.
The Case Status of an involvement which has been stopped is displayed in the Involvement Summary panel, e.g. Assmt. stopped.